
Here are step-by-step instructions for how I added journaling to my layout in the shape of Mickey's head.
STEP 1
Open the image you want to use as a template. For me, this was the survey marker photo. I enlarged it so the text shape wouldn't match up exactly with the photo in my layout.
STEP 2
Add a new layer. In the end you will delete the template layer and don't want to lose any of your journaling when doing so. I used this as my "buffer layer" to insure none of my journaling ended up on the template.
STEP 3
Select the pen tool.
STEP 4
Click the Paths button in the toolbar at the top of the screen.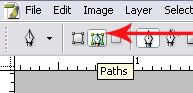
STEP 5
Begin outlining the shape you want to duplicate with your text.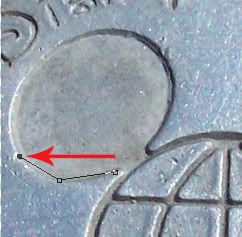
STEP 6
After you have completed your outline, select the Text tool and place the cursor over your pen line where you would like the text to begin. Click to start your text.
Note: The pen line does not need to completely enclose the image you are tracing -- just go as far as you would like to take your text.
STEP 7
Type your journaling. It will follow the path you created with the pen. Add any spaces to help "push" your text where you want it to go. For example, I did this to help center the word "World" at the top of the "head." STEP 8
Once you have finished typing your journaling, select the template layer and delete it.
STEP 9
Merge the two remaining layers. (Note: I changed the text here to black to make it more readable. I left it white for the project.) Select all, copy and then you can paste it into your layout. Use the Move tool to position it where you want it.


Sunflower Birthday
13 hours ago


VERY cool! I tried it (simple curve for mine) and it worked like a charm:) Thanks so much for the link.
ReplyDelete