10/31/2011

Happy Halloween!

Saturday was our playgroup's 3rd annual Halloween party. Each family comes dressed in a theme. This year, our family chose Toy Story costumes.

Halloween 2011: Toy Story
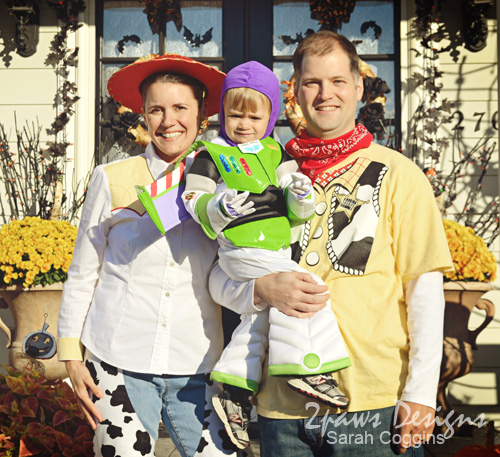
Jessie, Buzz Lightyear & Woody
The boys' costumes were easy. Dylan's came from the Disney Store. Trent purchased his shirt online, already owned the handkerchief, and I found his cowboy hat (not pictured) at a kids' consignment sale for $1!

My costume took a tad more work. I did buy the red hat at the Disney Store, but then embellished a plain white shirt with yellow fabric & red stitching and made the chaps. It was all quite easy just a little time consuming as I went slow trying to get it all "just right" and didn't have patterns. I spent a good deal of time studying online images of Jessie, sketching the designs and then trying it all on to get the placement/fit correct. I was pleased with the result though especially when in the midst of picture taking, one of the 2-1/2 year old boys pointed at me and yelled, "Jessie!" Now there's proof of when you nailed a costume. :) Thanks to making this cowgirl's night, G!

And thanks to Allison for taking the photo of our family! :)

10/28/2011

Shoot and Edit: Memories edit

I used a couple of actions this week to brighten up my photo:

Week 42: Memories edit

Join in the fun with Jill Samter Photography and Ramblings and Photos:

10/27/2011

Art Wall

I've been wanting a spot to display some of Dylan's artwork for a while now. A more defined spot than the front of the fridge. I started a board on Pinterest to "collect" the various ideas I liked to inspire my art wall.

I chose the corner of our dining room where his little Ikea LÄTT table & chairs set sits as the wall space to use. With the limits of that space as my starting point, I narrowed down ideas to a simple frame & bulldog clip combo.

Digging around in a bin of donated frames at our nearby thrift store, I selected 3 based on the details in the frames. (And I "splurged" a little more on Dylan while there getting him a new raincoat, rain boots & the book pictured below - I had really good luck that day!)


Once home, I took the frames apart and wiped them down. Then primed the frames and the particle board backing (finding some with those nice board backs was a huge plus!). After the primer was dry, I painted the frames using leftover green paint from the refinished cabinet in the opposite corner of the room. The backs I painted with the wall paint so they would "disappear" when hung. Then I hot glued small bulldog clips from my scrapbooking supplies to the top center of each.


I hung the frames based on where the previous artwork had been and high enough to keep little hands off of them. I'm liking the grouping of 3 but would prefer 1 or 2 of the frames to be bigger so I'll be keeping my eyes open during future thrift shopping. For the moment though, I'm quite pleased with the look and Dylan is enjoying seeing his art work there. As I rotate the pieces out, I'm photographing them for a book I'm working on that will contain all of his artwork for 2011! I'll share some of that once it's completed in the early part of next year.


All in all, this project cost me under $4! I only had to buy the frames. The primer, paints and bulldog clips were all items I had around the house.

Supplies: frames; Kilz primer; Paints - Valspar #318-6 Shubbery and 55% tint of Valspar #348-2 Offshore Mist both mixed in Olympic no VOC base; hot glue; Making Memories bulldog clips.

10/26/2011

Halloween Party 2010

Working on my costume for our playgroup's annual Halloween party this weekend had me inspired to finally complete a page about last year's fun.


Each family comes dressed up in a theme. I know Trent & I don't look very costumed in the group photo but we were - we were zoo keepers to Dylan's monkey. ;) We stuck to simple polos and jeans with name badges. This year we're stepping it up a notch and doing Toy Story. Dylan as Buzz, Trent as Woody and me as Jessie. Speaking of which, I better get back to sewing and completing my costume!

Supplies: Karen Funk's The Sweet Life solid papers; Gennifer Bursett's Toolbox Mists Vol. 1; Sara Schmutz's Back to Basics tags, Nursery Rhymes elements and Star Spangled freebie; Miss Mint's Kooky Spooky elements; Audrey Neal's Dotted Dates 2010; Another Typewriter font.

10/25/2011

Mr Potato Head Pirate Pumpkin

Last year after Halloween, I found a Mr Potato Head Pirate Pumpkin Kit in the clearance section at our grocery store. I thought Dylan might enjoy it this year (and hopefully future years too) so I tossed it into the cart. Fast forward to late September when I bought him a fake pumpkin from the craft store to decorate. Knowing my toddler, I knew he would want to pull the pieces in & out and play with it so I went with a fake pumpkin.


During a naptime, I prepped the pumpkin using my scrapbooking & stamping supplies to help. I dipped the prong from each piece into a black stamp pad so when I determined it's position, I could press it to the pumpkin and have an instant mark. Then used my paper piercing tool to poke holes in the pumpkin. The holes were just large enough to help me press the pieces in and make perfect fitting holes.

The completed pumpkin ...


I pulled out the pieces out (except for the hat and shoes) before he woke up. When he came downstairs and saw the pumpkin & pieces, he was so excited and began playing with it immediately.


Since then, he's made a number of interesting creations. The hat and shoes are typically in their "correct" spot (I think mainly due to the fact those each have 2 prongs where the other pieces only have 1 each) but all the other pieces vary. I love seeing what he comes up with.

Featured as part of 15 Pumpkin Play Activities for Kids on Growing a Jeweled Rose.

10/24/2011

Shoot and Edit: Memories

This week's prompt of "memories" inspired me to look back in my photo files. I decided upon this photo I took in May. Days warm enough for pool play in the backyard are definitely a memory at the moment.

Week 42: Memories SOOC
ISO 400, ss 1/250, f5.0

Join in the fun with Jill Samter Photography and Ramblings and Photos:

10/21/2011

Admit One

Our playgroup had a great time earlier this month attending a puppet show and having lunch at Mellow Mushroom. Dylan was even bold enough to climb on stage and participate - sort of. He mainly stood up there and watched the action. ;)


Supplies: Simply Tiffany Studios Summer Template 1; Karen Funk's Giggles & Grins papers; Robyn Meierotto's Kraft FunDay elements; Audrey Neal's Everyday Celebrations Journaling Bits; Jen Allyson's Notions Pink & Co elements.

10/20/2011

Shoot and Edit: Pumpkin edit

I kept my edit this week very simple. I used Ashley's Nice & Easy action. Tweaked the various layers. Then merged and cropped. That's it.

Week 41: Pumpkin edit

Join in the fun with Jill Samter Photography and Ramblings and Photos:

10/19/2011

fall fun

A glimpse of the fun we had at a local farm earlier in the month:


Supplies: Jen Papadimitriou's October Blueprint template; Sara Schmutz's Trick or Treat kit; Jen Lessinger's Fall In kit; Karla Dudley's Digi Essentials (stitches - recolored); Audacious Designs' Neutral Stock papers; Miss Mint's Fat Plastic Alphabet - Citron; Rhonna Farrer's Celebration kit; Janda Everyday Casual font.

10/18/2011

Chicka Chicka Boom Boom fun

One of the books Dylan received for his birthday this year was Chicka Chicka Boom Boom. He's been enjoying this book a lot recently - I think partly because he suddenly has more interest in letters. To help encourage this, I thought we could try acting out the book through art & magnets. I saw an idea on Pinterest to create a construction paper coconut tree, tape it to a cookie sheet and then use the magnets. I decided to try the idea but on the front of our fridge instead.


I gave Dylan a piece of white construction paper along with pieces of the tree that I had already cut out. He used a glue stick to attach the pieces. I made sure to show him the book cover to help correlate the two.


In true two year old style, he insisted that we do the project his way which meant him standing on one of his little chairs at the kitchen counter vs sitting at his table.


(And, yes, I can clearly see the scissors I left out on the counter in the background of the last photo. Should have put them up first, however, I was beside him the entire time since I was worried about him falling off that chair and he was quite immersed in the project so they were a non-issue at the time.)

After he finished creating his tree, I added magnets to the top two corners so we could hang it on our fridge. Then we pulled out our alphabet magnets and began acting out the story as we read.


The best part was, of course, when all the letters make it to the top of the coconut tree and "Chicka chicka ... BOOM! BOOM!" The magnets (all 26 letters plus a few numbers because they are magnets too so Dylan wanted them in the tree as well) went flying across my kitchen floor. Oh, yes, acting out books is a LOT of fun!

10/17/2011

Shoot and Edit: Pumpkin

We visited the NC State Fair this past Saturday. With this week's theme in mind, I stopped by the pumpkin carving display to take a few photos. This particular face caught my attention:

Shoot and Edit: Pumpkin SOOC
ISO 400, ss 1/80, f5.6

Join in the fun with Jill Samter Photography and Ramblings and Photos:

10/13/2011

Trick or Treat: hybrid cards

Sara Schmutz has a new release today - Trick or Treat - featuring 16 papers and 20 elements:


I used the kit to create a couple of Halloween cards. If you haven't tried using digital kits to make cards, you should! It's such an easy way to get more use of a kit and make several of the same design with minimal effort (of course, don't tell any of my recipients that I said these were minimal effort!).

To start, I created an 8.5x11 blank page in Photoshop and set it up with masks for 2 card faces sized at 5.25" x 4" to match the white cards I planned to decorate. I then chose my papers and clipped them to the mask, rescaling as desired. For example, I wanted to be sure to get the spider on the orange card so I scaled the digital paper down accordingly.


I did the same thing with the elements i wanted to use. I placed them on each 'card' as I wanted them. Scaled them to size and, in the case of the larger tag, decided where to trim it as well as added the text. I then shifted the elements off to the side to prepare for printing. I could have left them on the 'cards' for a single print but wanted that little extra depth added by physically layering the pieces.


After printing the sheet, I used my x-acto knife to cut out each of the pieces. I used a black stamp pad to ink the edges of the tags. It helped cover the white edges and give a little more of a spooky Halloween look.


I adhered each card front to blank white cards. The larger tag I glued directly to the blue web card. I used foam backed adhesive to attach the smaller ribbon label.


Supplies: Sara Schmutz's Trick or Treat kit; Stamp Act Jumbled font; Recollections white cardstock & cards; foam backed adhesive; black stamp ink; adhesive.

10/12/2011

Tissue Paper Pumpkins

In March, our playgroup decorated shamrock outlines with tissue paper. It was such a fun and easy project, I decided to try it again yesterday with Dylan and my niece, Lily.

Supplies - clear contact paper, pumpkin outline, bits of colored tissue paper
I hand sketched pumpkins onto red-orange paper. Then used my x-acto to cut them out. I stuck the pumpkin outlines to clear contact paper and put one in front of each child along with a small pile of colored tissue paper bits.

Dylan (2 years) started on his and then got distracted. Lily (12.5 months) wasn't quite sure what to do so I held up a few pieces and let them drop to her pumpkin and encouraged her to press them down. This turned it into a game and got her involved as well as regained Dylan's interest in the project - dropping tissue paper bits is fun!

Lily also enjoyed dropping tissue paper on the floor while Dylan worked on his pumpkin.
Once they both bored of the project, I took away their pumpkins, sealed them with another sheet of clear contact paper and trimmed around the edges. We hung the pumpkins on the sliding glass door to enjoy.

Completed pumpkins - Dylan's on left and Lily's on right.
They look so pretty hanging up with the light shining through!

10/10/2011

forward facing

Dylan taking in the view in August 2010 when he was finally big enough to face forward:


Supplies: DHD Fall Blog Hop kit; Deena Rutter's Happier Frames; Sara Schmutz's ABC, Back to Basics, & Nursery Rhymes kits; Michelle Underwood's Best Days of Our Life extras; Pink Trike Design's Dated Monthly Worn Journaling Tags & Hip Holiday alpha; Just the Way You Are font. Inspired by Two Peas Weekly Challenge Sketch.

10/07/2011

Shoot & Edit: Orange edit

One of the things I disliked about my SOOC shot was how dark it was. I was able to fix it with a very quick & simple edit. I started with Ashey's Nice & Easy action then followed steps from Sarah at Naptime Momtog for the HDR action. Mouseover to see the difference.

Week 39: Orange edit
Join in the fun with Jill Samter Photography and Ramblings and Photos:

10/05/2011

Halloween Night 2010

Last Halloween we took Dylan trick or treating for the first time. Literally only went to 3 of our immediate neighbors. He wasn't quite sure what to make of it all. He did love getting candy handed to him and clinched it tightly in his fist (we had a few melted chocolate bars to say the least!). The photo below is one of my favorite from the night. We bumped into our neighbor's 2-1/2 year old son who "explained" to Dylan what was going on. Dylan meanwhile just eyed Luke's lollipop. ;)


Supplies: Miss Mint's Pimp My Page Template #40 and Kooky Spooky papers & elements; Jen Allyson's Spooked elements; Just the Way You Are font.

10/04/2011

First Pediatrician Appointment

Dylan was only 3 days old when we took him to his first pediatrician's appointment. Love how peaceful he looks napping in his seat and clutching his Soothie (he still loves that!) as we waited to be called back.


My inspiration for the page came from last month's Color Swatch Challenge at Design House Digital. I've had this photo pulled for sometime to scrap. The challenge colors were perfect & just the kick I needed to get the page completed. :)


Supplies: Karla Dudley's Breezy paper collection; Carina Gardner's Baby Mine kit; Jen Allyson's Halloween Freebie; Karen Funk's Genuinely You & Butterfly Kisses elements; Janda Everyday Casual font.

10/03/2011

Shoot and Edit: Orange

Trent, Dylan and I spent a few hours yesterday afternoon at a nearby farm doing all sorts of fun fall things (hayride, pumpkin picking, etc). Our final 'big' activity was the corn maze. When we started off, Dylan was insistent upon carrying the flag all by himself. I positioned myself a bit ahead of him on the path to get a few shots. Perhaps not the best overall photo, but I love this shot regardless - the excitement of waving the flag in front of him. A good reminder of enjoying the little pleasures in life. :)

Shoot & Edit - Orange SOOC
ISO 100, ss 1/200, f7.1

Join in the fun with Jill Samter Photography and Ramblings and Photos: