Showing posts with label under $20. Show all posts

8/15/2014

DIY Cork Boats

One of the activities during Dylan's Pirate Birthday Party last month was creating Cork Boats. They were very easy to do and a lot of fun. Here's how to create your own:


Supplies
  • corks (ours were purchased from The Scrap Exchange)
  • foam sheets
  • wood skewers
  • foam stickers (optional)
  • hot glue
To keep the craft simple & do-able during the party, I did a bit of prep work beforehand. I used hot glue to attach the corks together in sets of 3 to create the base of the boats. Then quickly sketched a sail pattern onto a piece of scrap paper and cut it out to trace onto the foam sheets. I precut all the of sails.


The skewers purchased from our grocery store were far too long so I cut each in half with a pair of scissors and poked them into the sails. Then separated all the pieces into plastic containers and set out on our Little Tikes picnic table for the kids to have easy access. We put together one boat so they could visualize the project.


Admittedly, craft projects with young kids can be hit or miss. Depends on the personality and interest. These cork boats were a huge hit. I think the simplicity and quick assembly helped. Plus, the allure of water is always a huge hit with boys. We had a low container filled with water just to the side of the picnic table so they could test out their boats.


After the party, we found Dylan happily playing with all the leftover boats. A lot of fun pirate play resulted from this simple craft.


6/18/2014

Forest Friends Infant Car Seat Cover

Friends of ours were expecting their first baby next month (in about 2 weeks). She showed up early on Monday - healthy & perfect. Oops in that I hadn't yet shipped the gift! Luckily I had made it already.


They had a car seat cover listed on their registry so naturally I made one instead. I had fun shopping for fabrics. I was trying to find something feminine but not pink overload. This fun forest friends print jumped right out at me. Surprisingly, Dylan also loved it when I showed up with it asking if it was for "our baby." Aww. At the time we still didn't know whether we were expecting a boy or girl so I assured him I would go back after to buy fabric for our baby. (Note to self: still need to do that  - but we have a few months still.)


For the inside I chose a complimentary light green check patterned flannel. Just dark enough to help block a little extra light during nap time.


I packed it up and got it in the mail yesterday. Thankfully, they are in the same city so it should be delivered today - just in time to welcome the new family of 3 home.


PS - thanks to LM for once again letting me use her infant car seat for photographing!

6/04/2014

Ivory Soap Experiment

A bar of Ivory soap was included in the recent Influenster #TLCVoxBox I received and reminded me of an experiment I had meant to try for some time. A friend actually gave us a bit of Ivory soap as part of a "Mustache Bash" birthday party to try the experiment a couple of years ago. I set it aside for a rainy day and darn if it didn't get misplaced during our move. But now we had an entire bar to play with.

Ivory Soap Experiement #SudLife

Supplies

  • bar of Ivory soap
  • microwave safe plate (we used a paper plate)
  • microwave
We unwrapped the bar and I asked Dylan to uses his senses (well, not taste - that wouldn't be nice!) to inspect the Ivory soap. We looked at it reading off the letters, touched it and smelled it.


Then I carefully cut about a quarter of it off stashing the rest in a plastic bag for another day. We put our piece onto a paper plate and put it into the microwave.


We microwaved it on high for about 20 seconds and it quickly began to expand! As I opened the door to look closer, the "cloud" of Ivory soap deflated a bit, but was still much greater in size than the small piece we had started with.


We carefully removed the soap from the microwave and began to inspect it. Looking at and feeling the changes. It was larger and softer in texture. If you squished a bit between your fingers it turned into flakes.


We carried the entire plate upstairs to the tub and got his bath prepped. Then it was play time.


Dylan squished it and placed handfuls in the water observing how they floated.


Lots of good clean fun! Thanks Influenster and Ivory Soap for helping us play and giving us an easy weeknight kids' craft.

2/05/2014

Valentine's Robot T-Shirt


I have a small surprise for Dylan next week - a fun Valentine's Robot T-Shirt. He knew I was going to make him a shirt and I asked for his preference between a dinosaur or a robot. He chose a robot. While the boys were out on Saturday morning, I quickly sketched up a design, cut it out of freezer paper using my X-acto knife (those design school skills pay off when you don't have an electric cutter!) and painted it in using fabric paint.


I kept the design simple and not too "Valentine's" minus the red paint and little heart so he can wear it beyond this month. I also bought the shirt a size larger with hopes that he'll be able to wear it next year too. Now to keep it a secret for another week. I can't wait to show him.

Do you have a special Valentine's shirt or outfit?

Supplies: Old Navy shirt - clearance $2.54; Tulip fabric paint; freezer paper


1/20/2014

DIY Roman Shades from Mini Blinds

I mentioned in my currently post last week that new yellow towels had me thinking about paint and fabric possibilities for our master bathroom.


I've been leaning toward gray walls with a white/gray/yellow print fabric for the curtains. There are two windows. One over the tub in the main bathroom area and a smaller one in the toilet room. When we moved in, both had mini blinds. Ok. Sufficient. But blah. I kept thinking back to an idea I pinned a while ago about making roman shades using mini blinds. I ended up following a tutorial by Craft, Interrupted that I found more recently.


I originally searched online for fabric and found a print I liked. Then I calculated up how much I would need for the two windows - 3 yards. About $35. Reasonable, but I thought there had to be a way to do it for a little less. Then I remembered another Pinterest idea I had used in our home before - repurposing tablecloths from Target for curtains. Perfect. At about $16, I would have plenty of fabric from one tablecloth to make the two roman shades.

I found a tablecloth online that I liked and headed to Target to buy it. Then I actually saw it and stopped dead in my tracks. The colors just weren't working for me. What I thought was white/gray/yellow was white/gray/yellow and beige. It was a larger print and just … well, just felt wrong.

I reassessed. I looked at every tablecloth. No.  

I wandered down the aisle of curtains. No. 

I considered looking at the sheet sets. I did make curtains years ago from flat twin sheets that we used in both an apartment and our last house. But, again - no.

I found myself in the shower curtain aisle and suddenly I found options. 3 different designs (including one that was remarkably similar to that original tablecloth but in the right colors). I ended up choosing a pretty, silky feeling, white/gray/yellow paisley print. On sale for $18 it more than fit the budget.  And when I came home and compared it to our new "Mum" towels from JC Penney? The yellows were almost a perfect match. Yes.


At 72"x72" one shower curtain was had more than enough fabric for the two shades. I cut both out on Saturday night and yesterday completed the shade for over the toilet. The smaller of the two, I thought it would be best to start with. Honestly, the project went pretty quickly. The most time consuming part was being patient while waiting for the fabric glue to dry.


I plan to make the second shade next weekend. It should go together even quicker now that I know the basic steps and won't need to stop and reread through them multiple times.


Overall, I'm very pleased with how the shade turned out. From the ugly mini blinds to this beautiful custom shade - our master bath is looking all grown up (just wait until we get paint on the walls! Crazy ;) ). Also, this is the second time I've made a roman shade. The first was one I made for our kitchen in our last house using a pattern I saw online so long ago I've lost it. This particular idea was easier, faster and looks better.


Cost: $18.29 for shower curtain

1/08/2014

Framed Pin Collection

I returned from England in November with 2 souvenirs for myself. One was a pin from the Hard Rock Cafe in London. Confession, I have a collection of these pins that goes back at least 17 years(?). I even have a couple that were gifted to me from my father and sister from various trips. Unfortunately, they have just piled up in a drawer all this time, until I saw a simple idea for framing pins on the 3 R's blog here.


I was hoping to get to Ikea (next month maybe?) to pick up some Ribba frames to duplicate the idea. In the meantime, I stumbled across a 3 pack of similar shadow box frames at Michaels for under $10 using my coupon. I cut foam board I had on hand from the Dollar Tree to fit the back of each frame. I played around with placement a bit before deciding on one I liked and actually sticking them in place.

The newer ones have small, short, straight pins that made it easy to push directly into the foam board after removing the plastic backs. The older ones have the long pins that run from one end to another and end in a small clasp. Those I inserted carefully at a slight angle and then pressed the clasp into the foam to help hold in place. I used a small adhesive foam square on the clasp of a couple to further secure them.


So far, I've only filled the one. Debating what I might do with the other two (other buttons/pins? Future Hard Rock pins? Something completely different?).

And, if you're wondering what my second souvenir was, I also purchased a tumbler from Starbucks with "England" on it. A practical souvenir. Something I was already planning to buy as I have one I love and wanted another but here was the added bonus that it reminds me of our 10th anniversary trip every time I use it.

What sort of souvenirs do you bring back from a vacation?

1/01/2014

NYE 2013 and the DIY Union Jack shirt

The past few New Years, our friends have thrown a smashing good UK themed party with a countdown and balloon drop at midnight GMT (i.e., 7pm our time so easy for the kids to "stay up" and celebrate).


Last year wanting to dress Dylan in theme, I found a Beatles t-shirt and purchased a 5T. So far we've gotten 2 years out of it and it still is a little big so I'm thinking it might make at least one more appearance.

I decided last minute (as in Monday afternoon) that I wanted something fun to wear too. Somehow while in England in November, even while looking for a Union Jack flag for Stacey to hang at the party, neither Trent or I thought to get ourselves a shirt! So, after picking Dylan up from preschool, we swung by Michaels where I bought a plain light gray t-shirt and small bottles of red & blue fabric paint.


I resized a template from Beehive Bits and Pieces blog to fit my shirt (find it here). Printed and traced it onto freezer paper. Ironed the paper and painted it in.


The result was a fun, festive shirt I'll be able to wear for year after year.

Happy New Year!

Cost: about $7 using 50% coupon for t-shirt

11/22/2013

Disney Trip Envelope 2013

I originally created the Disney Trip Envelope in fall 2007 and updated it a year later. Since then, it has sat amongst our trip albums and other memories waiting for a future use. The future finally arrived last spring as we took Dylan to Walt Disney World for the first time. Here's a look at the changes I made for our latest trip ...


Park Hours I kept this one essentially the same. Updated the dates and park hours for each (hint: find park hours on WDW's website here - https://disneyworld.disney.go.com/calendars/).


Parades & Fireworks On Disney's website, you can search parade times for a particular date. I searched for the 4 days of our stay and made a note of times by park so we could easily plan for when we wanted to see one.


Table Service We opted not to buy a dining plan this visit and pass on all table service. The latter was partly in not wanting to be tied to a specific place and time. We wanted to just move at whatever pace worked best with Dylan. And, while I was somewhat tempted to book a character breakfast, as he was showing a little nervousness around costumed mascots locally at the time, I didn't want to chance a similar fear and have a terrified child stuck at a table. Thus, this card was pulled from the envelope and stashed for use hopefully on our next trip.

Kid Attractions In my original design, I had a card listing our personal favorite attractions at each park and which had fast passes. I recreated the attraction card and made a new list of kid friendly attractions that we thought Dylan might enjoy and underlined the ones that had the fast pass option.


Pressed Pennies This was a new card I added. Dylan already had a pressed penny collection from various trips. Thinking he might want a specific character or two during our visit to Walt Disney World, I searched online at Presscoins.com to find where some of his favorites were located as well as noting which ones were at our resort.


Disney To Do List Before the trip, Dylan & I talked about what he might want to do at Disney and came up with a list of 7 basic things. I printed these out for him to use as a checklist during the trip. This was a fun way to enjoy our visit to Walt Disney World and also not feel as pressured to "do it all."


Admittedly, when I first created this envelope, smart phones weren't what they are now. I did have a Blackberry on the 2008 trip, but the "there's an app for that" phase hadn't begun. Part of my reason for continuing with this (besides the simple tradition for us) and for leaving my DSLR at home (*gasp*) - we wanted to be in the moment and enjoy that magic with our son. Not faces glued to little screens in our hands or fumbling with a heavy camera to get the 'perfect' shot. As magical is Disney is at any age, watching him light up with excitement was the most magical part of all.

Planning a trip to Disney with your young child(ren)? Check out my tips for Disney with a Preschooler and how to save money with Packed Fun for Less.

11/11/2013

DIY Numbered Burlap Basket

While redecorating our laundry room, I was searching for new baskets/bins to tidy up the look on the open shelf. To give the room a more peaceful, completed feel. I managed to re-use two fabric bins from our old house and quickly found a nice handled basket at HomeGoods to store all our Swiffer products (yes, we have a lot of those!). But I couldn't find another like it. I wanted either a match or something that would coordinate nicely with what I had and tall enough to store all our lightbulbs. Yes, I did just say I was searching for a bin to store our lightbulbs.


My most recent search led me to Marshall's where I discovered a burlap basket in the clearance section for $7.50. The size seemed perfect so I scooped it up immediately with simple plans to alter it.


Going along with the trend of numbered decor and still excited about how easy & well my freezer paper stencil sharks turned out at Halloween, I decided I could do the same to the basket. I already had all of the materials.

First, I measured the distance from the handle to the bottom of the basket to determine a height for my number. I then used Photoshop to select a font and size the '1' (you could easily do this in Word or Google Docs, etc).


After printing the '1' onto regular 8.5x11 paper, I traced it onto freezer paper and cut it out using my X-acto knife. Then determined placement on the basket.


The ironing was a tad tricky only in that the basket has soft sides. I held it carefully and ironed lightly to tack it before moving it to the end of my ironing board so I could press down. I used the cotton setting and pressed it firmly twice.

Once I felt confident the freezer paper was secure, I let it cool and then painted it with fabric paint and a foam brush. I personally like the cheap foam brushes - easy to blot & dab the paint on.


After painting, the directions said to let it dry up to 4 hours. I didn't. I cheated. I was painting it in my bathroom anyhow so I got out the hair dryer to speed things up! After a minute or two, it seemed dry and I pulled away the freezer paper.


Literally, this project took me maybe 15 minutes start to finish. It helped that I had my idea, had experience with the freezer paper stenciling (really, so easy - if you haven't tried, go for it!), and used the hair dryer to speed up drying. The result is a fun new basket for our laundry room.


And, yes, it really was all for lightbulb storage.

10/11/2013

Toilet Tube Monsters

Inspired by a photo on Pinterest (and as I type this, I realize it links to a tutorial - oops), Dylan & I collected several toilet paper tubes to create monsters for Halloween. I showed him the photo and then set him loose with markers, paint, pipe cleaners and googly eyes.


The faces amazed me. He drew the noses and mouths, then glued on the eyes:


Ok, so these turned out more "cute" than "monster" but we love them and Dylan is very proud of his monsters. He should be. He's 4 and made these entirely on his own minus punching holes in the sides for the pipe cleaner arms to slide through. I helped with that part but under his direction on where to make them.

Looking for more fun kid friendly Halloween crafts? Check out our past project shares: Candy Corn Art, Ghost Footprint Plaque, and Tissue Paper Pumpkins.

Linked up to Pintastic Tuesdays at This Mommy Cooks Dinner.

10/07/2013

The Front Door

Hello, gorgeous! 

Our freshly painted front door and steps lined with pumpkin mums.
It's taken a year, but finally I can think that every time I see our front door. You see, the door to the foreclosure house when we first saw it was white. Simple, functional and fine. After living with a black door for the previous 9 and a half years (HOA rules in our old neighborhood said door & shutter colors must match), I was happy for any change.

Then it rained. And the paint began to bubble and chip. Repeat multiple times throughout the months to mid summer. It was not pretty. Our best guess - whoever last painted the door used the wrong paint and thus with each rain the front door looked worse and worse.

In July, we had the entire house powerwashed. I left specific instructions to the company doing it to hit the front door and hit it hard. When we arrived home, I literally laughed out loud as I saw the disaster left behind. The bubbled paint job was almost completely gone revealing some white primer (?) and streaks of the original black beneath.

Paint chip (color at top) against the brick & siding of our home.
[Tip: try this at several times during the day to see the variations due to lighting.]
Then we waited. July is just too hot & humid in North Carolina for outdoor painting. As fall approached with cooler days, I began to get the urge to complete this project. I had a few ideas of what color I wanted - something in a blue gray tone. While surfing Pinterest, I found the perfect example from PlyGem here. The third color swatch from the bottom was exactly what I was thinking. The brick and siding colors in the swatch were similar to our home and the accent color - a blue gray. My mind was made up. Off to Lowe's we went and I quickly selected a shade from Valspar and had a quart of semi-gloss exterior paint mixed: Prussian Cadet.

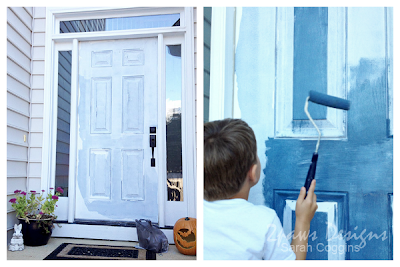
The "lovely" streaky door before on the left and my little assistant helping paint.
It took a few hours, slowly adding a coat, letting it dry and adding another coat. Repeat. Repeat. Enjoy.

Admittedly, we all did a double take our first few days returning home. It's a fun little pop of color and so much more cheery than before. Even one of our neighbors has come over and said how much she likes it. Hopefully they all do. We're certainly happy to now have a beautiful, welcoming front door. Another project complete.

Our freshly painted blue door decked out with our $3 fall wreath.

Cost: $12.98 + tax