Showing posts with label Valentine's. Show all posts

2/14/2014

Valentine's Day 2014

One of the fabulous things about being 4? Dylan woke up excited just to have another snow day at home. No realization there was a small surprise awaiting him for Valentine's Day.


He was so excited about the Minion card and robot t-shirt I made for him as well as the heart shaped box of chocolates. And, since the snow equaled a slow start to a weekday, we also had homemade Peanut Butter and Banana Stuffed French Toast, of course.


Hope you are having a wonderful Valentine's day! What's your favorite way to celebrate?

Supplies: Celebrate white cards; Minion printable from HaleGrafx; corner rounder punch.

2/05/2014

Valentine's Robot T-Shirt


I have a small surprise for Dylan next week - a fun Valentine's Robot T-Shirt. He knew I was going to make him a shirt and I asked for his preference between a dinosaur or a robot. He chose a robot. While the boys were out on Saturday morning, I quickly sketched up a design, cut it out of freezer paper using my X-acto knife (those design school skills pay off when you don't have an electric cutter!) and painted it in using fabric paint.


I kept the design simple and not too "Valentine's" minus the red paint and little heart so he can wear it beyond this month. I also bought the shirt a size larger with hopes that he'll be able to wear it next year too. Now to keep it a secret for another week. I can't wait to show him.

Do you have a special Valentine's shirt or outfit?

Supplies: Old Navy shirt - clearance $2.54; Tulip fabric paint; freezer paper


2/13/2013

[almost] Wordless Wednesday: Valentines

Glad I thought to grab these on clearance last year after the holiday so Dylan is ready for his class party tomorrow!


Linking up to Wordless Wednesday and Sarah Halstead

2/11/2013

Heart Penguin

Dylan created this adorable penguin a couple weeks ago:


It started off as a bunch of hearts. I forgot to take photos of the pieces & process, but if you want to help your child make one it's very simple. Cut 5 hearts of various sizes out of colored construction paper - a large one in black, medium one in white, and three smaller ones in orange. Cut a bow of out another color if you would like. Ours was a blue bow tie, but you could also make it a hair bow for a girl penguin. :)

Let your child glue together the hearts, bow and two googly eyes. Dry and admire!

The idea to make the penguins came from this post at Rainbows within Reach blog.

2/06/2013

Wordless Wednesday: Paper Heart Wreath

Inspired by this Pin

Linking up to Wordless Wednesday and Sarah Halstead

1/16/2013

Valentine Crafts

A month out from Valentine's Day, I thought I'd share a few of my favorite past crafts to help inspire ideas for the next few weeks ...

Valentine Envelope Chair Backers

Watercolor Valentines

Handprint Heart

You Spin Me mini album

2/14/2012

Watercolor Valentines

Dylan helped me make cards to send to his grandparents for Valentine's Day.


We started with me sketching hearts onto watercolor paper. I then gave him the paper along with his watercolors and he painted them. I loved how different and unique each heart was. After they were dry, I cut out the hearts, glued them to the cards and added his name & the date to the bottom of the painting.


Supplies: watercolor paper & watercolors; Bazzill cards.

2/13/2012

Stamped Heart

My neighbor and I have started a Friday morning swap with our boys. One week I watch her son and one week she watches Dylan. This past week, Dylan went to her house. The boys played but also did a little crafting. I was so excited when I saw his completed artwork.


The hearts were stamped using a toilet paper roll dipped in paint. I had actually pinned this idea last year and then forgotten to get around to it in recent weeks.

Photo Credit Nila Garriga Photography
After the paint had dried, each boy "sewed" the edges with yarn through punched holes. So cute. Dylan's is hanging proudly on his art wall in our dining room.

Supplies: paper; toilet paper tube; paint; hole punch; yarn.

1/31/2012

Heart Suncatcher

One of Dylan's neighborhood friends spent a couple of hours with us on Friday morning. I decided to try a craft project with the boys using the same method I did last year for a shamrock and pumpkin. I cut heart shapes from a piece of red scrapbook paper and placed it on a sheet of clear contact paper. Gave them a pile of white, pink & red tissue paper pieces to stick to their heart. Then sealed it up with another sheet of contact paper and trimmed it. Here's Dylan's finished heart:


Supplies: red scrapbook paper; clear contact paper; white, pink & red tissue paper.

1/17/2012

Valentine Envelope Chair Backers

Inspired by cute Valentine's envelope chair backers at Pottery Barn Kids, I pulled together a few supplies to make a pair for Dylan's Ikea LÄTT table & chairs set. I changed the design of mine slightly for a more "masculine" look by leaving off the scallops and replacing the large heart with a button.


Supplies
  • white felt (I used a packaged 36" x 36" sheet; smaller sheets would also work)
  • white & red thread
  • velcro
  • red embroidery floss
  • 2 red buttons

Start by measuring the chairs you want to place the envelopes on to determine your envelope size. I made my envelopes 11" wide by 8" high. Since I opted not to add scallops, I was able to cut each envelope as one large piece. With help from my assistant, I drew out the design using fabric marker and traced one of our china dinner plates (Pottery Barn, fittingly!) to create the curve at the opening end:


After cutting out the envelope shapes, I measured the top of the chairs to determine the size for the straps. To do this, use a tape measure to go all the way around the top of the chair where the envelope will attach - remember to overlap for where the velcro will affix. My straps were 9" long by 1.5" wide.

I folded my large cut piece into the envelope shape and held it to the chairs to determine strap placement. Knowing I wanted the straps at the outermost point and near the top, I decided on 1" in on each side and 1/2" down. Pin straps at the desired locations and sew onto the envelope piece:


Add a strip of velcro to the top end of each strap. Add the second piece on the opposite end & opposite side to secure to chair later. I literally took the envelope to the chair again after sewing on the first piece and used my fabric marker to note the location for the second piece ensuring a good, snug fit:


Fold the front up, pin and sew along both sides and the bottom at 1/4" in from edge:


Sew along the two angled edges of the flap, also at 1/4" in, to add definition, if desired. Next, hand stitch the red embroidery stitches just inside the lines you sewed by machine - all three sides of the flap and the sides and bottom of the envelope. I used DMC floss #321.


Finally, add button holes to the flaps. I used my sewing machine's button hole option to do this (tip: use fusible interfacing on the backside of the flap to stiffen and make this process easier). Hand stitch a red button on each envelope to create closure.


Finally, place on chairs and enjoy! If you create your own, let me know - I'd love to see. :)


Tip Junkie handmade projects

2/28/2011

Valentine's Morning

Dylan on Valentine's morning checking out his gift.  I love that he took the time to "read" his card.  :)


Supplies: Erica Hernandez's Letter Template #23; Karla Dudley's Sunkissed papers; Biograffiti + Deena Rutter's Whole Lotta Love kit; Audacious Designs Good Dog kit; Instagram app; Pooh font.

2/17/2011

Coffee Filter Painting

Dylan and his buddies love to get crafty.  And definitely love painting but that can get a bit messy.  It worked out well a few months ago when warmer and we could strip the boys to nothing but diapers in the garage and let them go crazy with paint and canvases.  A bit too chilly for that now which is why I was excited when I found the idea for coffee filter painting in this post at Strings to Things blog.

For our adventure, we taped coffee filters down to plastic covered cardboard (one of the moms had these on hand from a recent purchase.  Taping these down to the high chair tray would work great too).  Gave the boys a couple of markers each to color the filters.


Dylan surprised me by having very little interest in this coloring portion.  He did a couple scribbles on two of his filters and went off to play with toys.  I scribbled on the remaining filter so we'd have something to paint later.  The other two boys really got into this part though and had quite colorful creations.  When the "paint" (aka water in a little bowl) and brushes came out, they all got excited and had a great time.  As you can see, Dylan was very serious about this process.  Well, until he and his buddies figured out how to fling water. ;)


Dylan and I repeated the process a few days later when bored and stuck at home.  I love how easy it was and such little mess. After the filters dried, I cut hearts from a few and glued them to Valentine cards for his grandparents.


I've saved the remaining painted filters.  Thinking they might end up in a scrapbook page. :)

2/11/2011

Shoot and Edit: Hearts edit

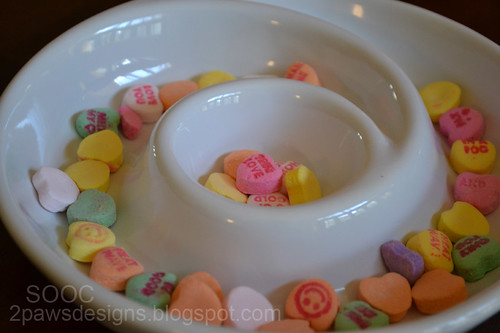
I started my edit this week the same way as I seem to start them all - by adjusting the levels - setting my white and dark points then shifting the input and output levels until it visually looked good to me.  Then I used the clone stamp tool to remove a teeny, tiny piece of something (sugar crumb perhaps?) that was hanging out on the edge of the circle in the center of the bowl.  It was bugging me and needed to go immediately.  ;)

From there ...
  • I created a duplicate layer with the high pass filter.  Love that trick from Ashley and how it really brings out the details. 
  • Added a new adjustment layer - curves.  As with the levels, I played around until it looked "right."
  • Merged all layers.
  • Duplicated the background layer.  Applied the Gaussian blur effect (0.3).
  • New adjustment layer - levels.  I initially left the RBG alone and tweaked the Red, Blue and Green.  Then I returned to RBG and made a few slight changes.
  • New adjustment layer - brightness/contrast (+3, +11).
  • New adjustment layer - color balance.  I adjusted the balance through all 3 tone balance options (shadows, midtones, highlights).  My goal was to keep the colors of the candy hearts natural and the bowl white, but also to warm up the bowl just a bit.
  • Added a solid fill layer with the color #FFF7F8.  Changed the layer to Soft Light mode.  Lowered the opacity to 60%.  I really liked the softening this step gave the image.
And here's my end result:

Join in the fun with Forever'n Ever'n Always Photography and Ramblings and Photos:

2/08/2011

Shoot and Edit: Hearts

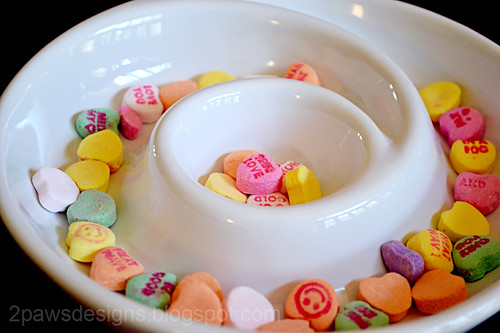
Yup, I went the way of the conversation hearts.  One of those weeks where I waited until the last minute.  I remembered a box stashed away in the junk drawer in our kitchen (seriously do not know how old these are!).  Poured them into my Pottery Barn swirl bowl just because I like it.  :)  And took a few shots.  Here's my favorite:

ISO 1000, ss 1/60, f5.3
Join in the fun with Forever'n Ever'n Always Photography and Ramblings and Photos:

2/02/2011

Handprint Heart

I mentioned in Monday's Shoot and Edit post that we pulled out the paints over the weekend to create more handprint art.  I confess, I still had Dylan's Christmas Tree plaque hanging so it was definitely time for a change.  I found a wooden heart plaque at Michael's and painted it white.  Then with Trent's help holding whichever hand we were painting, I put red paint on Dylan's hand and then helped him place it on the plaque. 


After the paint had dried.  I sealed it with Mod Podge just like our other plaques and added a picture hanger to the back.

Supplies: wooden plaque; acrylic paints; brushes; Mod Podge; picture hanger.

2/17/2010

opening valentines

Dylan had a great time on Sunday looking through all of his valentine cards and the book Trent & I gave him:


Supplies: Jen Martakis's Photo-A-Day Weekly Templates Set 2; Betsy Tuma's Glitterati: Cupid kit; Jen Allyson's Winter Wonderland kit; Century Gothic and 2peas island style fonts; Miss Mint's Kindergarten Crafts kit. Inspired by the Weekly Digital Challenge Make A Sticker at Two Peas and by the colors in aganzenmuller's Bob layout.

Bookmark and Share

2/15/2010

valentines

We had a wonderful weekend spending time together as a family - the perfect gift. :) Here are the valentines Dylan & I gave to Trent this year...


Supplies: Die Cuts with a View card; Fiskars border punch; Bo Bunny and Making Memories patterned papers; Bazzill cardstock; QuicKutz heart die; adhesive backed foam; Making Memories rub-on sentiment. Inspired by the January A Year in Cards class at Two Peas.


Supplies: Betsy Tuma's Glitterati: Cupid kit; Boopee font.

Bookmark and Share

2/15/2009

Felt Heart Valentines

For Ter's week 7 Card Challenge - love. These are the cards I made for our brothers:


Supplies: Paper Reflections corrugate card (cut into 2 smaller cards); red felt; Bazzill cardstock; QuicKutz die; Making Memories rub-on words & brads; black stamp ink.

2/14/2009

Happy Valentine's Day!

Hope you are having a wonderful day! Here's the card I made for Trent this year:


Supplies: Yours Truly card; misc. dark brown cardstock; Chatterbox patterned paper; Heidi Swapp ghost hearts; StazOn ink pad; Making Memories stitches.

2/08/2009

Be Mine card

For Ter's week 6 Card Challenge - ribbon:


Supplies: Die Cuts with a View card; Chatterbox patterned paper; NRN Designs & Making Memories letter stickers; Autumn Leaves felt ribbon. Also inspired by Jan 2nd of dw2008.