Showing posts with label Halloween. Show all posts

11/01/2013

Friday Freebie: 12x12 Collage Template

Happy Friday! Take a lot of photos last night? This month's Freebie is a template to help with that. Originally created for my The Art of the Brick layout, it's a clean 12x12 design for up to 7 photos. The template is free for personal use only.

Click here to download Brick template

Enjoy!

Have you missed one of my previous digital freebies? Click HERE to find them. And, don't forget to subscribe to my feeds so you won't miss future freebies!

10/30/2013

Happy Halloween!


We decided to take a new *spin* on Halloween this year and went for the theme - Sharknado. If you haven't seen the movie, search it out on a rainy day. It is so bad it's hilarious. Especially when you get to watch it with friends on your beach vacation. But I digress ... this is about Halloween and our costumes.

Once we came up with the theme, we quickly decided Dylan would be a shark. I had planned to make him a costume based on this tutorial from Fiskars, but while looking for a plain gray hoodie at Target, I found a pre-made shark hoodie on sale for under $10. Scratch the DIY at that price. He clearly agreed because he wore it from the moment we found it up to checkout.

Shark spotting in Target!

Trent chose to be the victim. His costume was the easiest with his own clothes plus fake bloody gauze. He tied some around one leg and wrapped his right arm which, we realized after taking a family photo (Dylan didn't want to participate - repeat of last year? - so we snuck up behind him getting an "individual" shot) was the arm he put around me. Thus it isn't visible. But, he also unintentionally held his right hand behind his back so in the photo he almost looks like a real victim.

That left one detail - the sharknado. Taking a spin (pun intended) from a costume my friend, Stacey, did last year as part of her family's spider theme, I quickly made my costume. The shirt I purchased and added a shark graphic using freezer paper and black fabric paint. Then I created a tutu "sharknado" with white & platinum tulle and hot glued in a few mini shark toys.


At the last minute, I decided to make Dylan a shark shirt similar to mine. The weather in NC is never really predictable for Halloween. Last year he was snug & warm in his Sulley costume while I had to add a jacket over my Boo costume. This year? It was a tad warm. Assuming he might get hot in his hoodie, I dug out an old gray long sleeve shirt from his closet and added a shark. He was thrilled with the "new" shirt and that it matched mine (note to self: embrace these moments because he won't find matching mama cool for much longer!).

What are your family's costumes this year? Happy trick or treating!

10/28/2013

Annual Pumpkin Fun

Not much says fall and Halloween to me like visiting a local pumpkin patch. This year we lucked out and I won 2 tickets to Ganyard Hill Farm in Durham so we headed there a week ago for a morning of family fun.


We took a hayride, enjoyed the corn maze (really more of a corn path, but it was a perfect stroll) where Dylan picked some corn to feed to the goats, plucked a bit of cotton, and of course each picked a pumpkin.

Posing with our 3 pumpkins on the hay bales.

We also explored the weird & exotic patch - quite a fun mix of colors & textures.


To spread out the fun and make sure our pumpkin didn't rot (the weather can be crazy in NC although I think last week was cool enough, it would have survived), we waited until yesterday to carve. Dylan was excited about the old kits I pulled from the Halloween boxes. He wanted to do a ghost design, but our largest pumpkin was too small for it or any of the others. Instead, we encouraged him to do an "old fashioned" jack 'o lantern.


Dylan drew the face design. Then I cut the top so we could scoop out the insides. He helped me separate the seeds for roasting before we scraped the inside and carved the face. Finally, Trent helped him start squeezing out some glitter glue (leftover from one of the old kits that, of course, he had to use once he saw it - honestly amazed this stuff hadn't dried out). So, yes, we have a one of a kind, sparkly jack o' lantern this year.

Freshly picked on the left and with one carved on the right.

We ended our fun with roasted pumpkin seeds, of course. A first for Dylan.


And a bit of a science lesson for our 4 year old - from picking the pumpkin off the vine at the farm, to carving & scooping, to roasting and eating. Fall is off to a fun & festive start here.

What is your favorite fall activity?

10/11/2013

Toilet Tube Monsters

Inspired by a photo on Pinterest (and as I type this, I realize it links to a tutorial - oops), Dylan & I collected several toilet paper tubes to create monsters for Halloween. I showed him the photo and then set him loose with markers, paint, pipe cleaners and googly eyes.


The faces amazed me. He drew the noses and mouths, then glued on the eyes:


Ok, so these turned out more "cute" than "monster" but we love them and Dylan is very proud of his monsters. He should be. He's 4 and made these entirely on his own minus punching holes in the sides for the pipe cleaner arms to slide through. I helped with that part but under his direction on where to make them.

Looking for more fun kid friendly Halloween crafts? Check out our past project shares: Candy Corn Art, Ghost Footprint Plaque, and Tissue Paper Pumpkins.

Linked up to Pintastic Tuesdays at This Mommy Cooks Dinner.

9/23/2013

Pumpkin Mums

Fall is my favorite season. And yesterday, I started decorating my house. One of the first things I did last year was add mums up the steps to the front door. Having just moved and with a lot on my plate, I literally just plopped the flowers (thin plastic 'pot' and all) onto the steps and called it done. This year, I'm making a little more effort.


While I could (and probably should for year round decorating) invest in a few nice pots to line the steps, I decided to take a fall twist and use pumpkins for pots. Fake pumpkins. I don't trust real ones to hold up all season and we've had great luck with a carved fake pumpkin for years. It still looks great. So now I'm testing how well they survive the elements + a live flowering plant.

How to make your own? Easy! All you need are 5 supplies - fake pumpkin, mum plant, marker, knife & a drill.

Supplies for faux Pumpkin Mums

Start by marking the top of your pumpkin for where you will cut. I just held the plant over and loosely traced with an orange Sharpie. My thought was the orange would blend in better if the lines ended up showing a bit. Instead, my initial hole was a bit too small so I just kept trimming out slowly until the plant just barely slid in. I wanted a snug fit.

Mark an outline of the pot for cutting.

Then (no pictures of this step) I used our drill to make a couple of small holes in the bottom to allow for drainage.

Add the flowers to the faux pumpkin, place and enjoy!

Can you spy why there isn't a wreath on my front door yet? Next project - new paint!
I bought my pumpkins on sale at Michaels and my mums on clearance at Lowes so the entire project cost me under $25 for 3 Pumpkin Mums. I'll update later in the season with how they are holding up. Hopefully, I'll be able to refill these same pumpkins year after year.

Happy Fall!

For more fake (faux?) pumpkin ideas ... our carved Bat pumpkin we've been using since 2006 and Mr Potato Head Pirate Pumpkin.

11/09/2012

Trick or Treat - the layout

Last year Dylan trick or treated with one of his playgroup friends. This year we drove over to our old neighborhood to meet up with one of his buddies there so they could go together. After one house, he said he was done. Thankfully, we were able to convince him to continue on with his friend and by the 2nd house he was hooked. He even helped hand out candy with his friend's father after we were done!


Supplies: DHD November Blueprint template by Jen Papadimitriou; Have a Hoot papers by Celeste Knight; Digi Essentials 2 by Karla Dudley; DHD Daydream Believer collaboration kit; Halloween Free by Jen Allyson; Trick or Treat & Country Fair kits by Sara Schmutz; Kooky Spooky kit by Miss Mint.

10/31/2012

Happy Halloween!

This past Saturday it was once again time for our playgroup's annual Halloween party. Everyone came dressed for the festivities ....


Our family theme this year was Monsters Inc. The idea started back in the spring when I stumbled across a kids' Sulley costume at Goodwill for $5. I bought it thinking it would be fun for Dylan's dress up collection but later decided it would work great for Halloween.

We tried for a family photo similar to last year, but, while he posed for the kids' shot and the group one above, our little monster refused to pose with just us. I tried begging to no avail ...


Nope. Not happening. So Trent & I posed just the two of us ...


I made both of our costumes. For the Mike costume, I took a green t-shirt we already owned and added fabric to create a giant eye and smile. The hardhat was a thrift find (50 cents). I spray painted it blue using paint leftover from my canvas art project and added a sitcker with the Monsters Inc logo that I created in Photoshop.


For the Boo costume, I used her monster costume as inspiration. I combined a sparkly purple dress and sheer gray top - both thrift finds ($7 total). The hat I created using purple felt, leftover white fabric from Mike's eye (teeth), batting, a headband (free from the NC State Fair last month. I just added sticker "eyes" over the original stickers), and yarn (hair).


All in all I spent under $20 to outfit all 3 of us. Hopefully I can do just as well next year and we can get a true family photo. Maybe.

Happy Halloween!

10/29/2012

Monster Pizzas

Looking for a fun Halloween inspired food idea for our playgroup when Dylan & I hosted earlier in the month, I came across a recipe for Monster Pizzas. We changed it up a bit, but kept the same general concept. The boys all loved creating their own special pizzas.

Ingredients
English Muffins
Pizza sauce
Mozzarella cheese 
Mini pepperoni
Red, green & yellow peppers in various sizes

I gave each toddler half an English muffin and added the sauce for those that wanted it. Then let them top with cheese.


Next I brought over a divided plate of peppers and mini pepperoni to top their pizzas and create the faces. I got mixed reactions. To be expected from toddlers. :)


Dylan loves his veggies - especially peppers. He made a face but kept eating the green pepper nose before I could snap a photo.

Red pepper hair (or eyebrows?), mini pepperoni eyes and yellow pepper mouth.
Then ate off all the veggies before I could nab the pizzas and put them on a tray to warm in the oven. Thus his is the "ate all my veggies" pizza.


The lunch was a hit. I think almost every bite of pizza was eaten plus a good amount of fresh fruit (bananas, apples & strawberries). Of course, the promise of mini pumpkin cupcakes for dessert might have helped. ;)


10/19/2012

Candy Corn Art

On a rainy afternoon earlier in the week, I went to Pinterest for a craft idea to entertain us. Dylan was very excited when I said "candy corn." I quickly explained it was an art project and that I didn't have any of the actual candy. I have a feeling it will find our cart during our next grocery trip... That said, he loved this simple craft I found on Mamas Like Me blog.


I hand sketched the outline of a candy corn using a white crayon. Then wrote each color name in its section using a crayon of the same color (ie, I wrote 'yellow' using a yellow crayon). I gave Dylan a small bottle of glue and pieces of white, yellow & orange construction paper. Together we worked on the glue (our gluestick had dried up and this was his first time using a bottle of glue). Dylan carefully placed each colored piece on his own.


He was very proud of his finished project and showed it off to Trent when he got home. Then hung it on the fridge for everyone to see. :)

11/30/2011

Trick or Treating 2011

The last day of November and I have one more Halloween layout! 


I know another holiday has come and past, but I'm still stuck in Halloween at least when it comes to scrapbooking. Must switch gears today though. I'm making another Christmas/Dec Daily album this year and today we're going to see Santa which to me equals the start of the season & our album.

Supplies: Robyn Meierotto's Cupcake patterned papers; Sara Schmutz's Back to Basics frames; Rhonna Farrer's Celebration kit; Miss Mint's Kooky Spooky elements; Jen Allyson's Halloween Free kit; DHD Digital Scrapbooking Day 2011 Blog Hop collaboration; Just the Way You Are font.

11/23/2011

Funny Faces

Dylan had so much fun last month playing with the Mr. Potato Head pumpkin decorating kit and fake pumpkin I bought for him. It's now stashed in the attic with our other Halloween goodies for next year, but I'm still enjoying the many photos I took of his creations. It'll be fun to see how they compare to what he makes with it next year. :)


Supplies: Robyn Meierotto's Oceanside papers (recolored); Tia Bennett's Fit 2B Tied alpha; Karen Funk's Sweet Life papers; Gennifer Bursett's No Tricks, Just Treats elements; Miss Mint's Momitude kit; Karla Dudley's Digi Essentials 2; Antique Typewriter font; Instagram app. Inspired by Shannon Dombkowski's Good Eats layout.

11/04/2011

Friday Freebie: Toy Story Halloween

If you've been around my blog this week, you know that the calendar may say "November" now but I'm still enjoying Halloween! For once I have had some great creative mojo to get pages done immediately after an event (versus last year's Halloween Party layout that I just finished last week!).

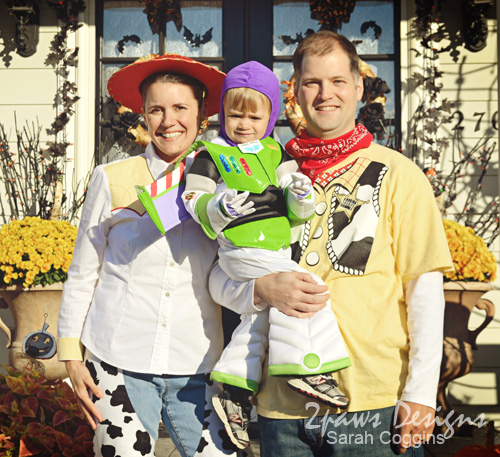
Today's post is no exception - here's our family all decked out in our Toy Story costumes:


Supplies: Celeste Knight's Have a Hoot solid papers; Agnes Biro's Photo Overlay No 2; Gennifer Bursett's No Tricks Just Treats elements; Sara Schmutz's Trick or Treat patterned papers & Nursery Rhymes elements (staple); Janda Everyday Casual font.

And in honor of Digital Scrapbooking Day tomorrow, I created a template of the above layout to share with you for free! It's for personal use only. The template is 12x12 with 11 layers including editable shadows.

Click here to download the Halloween 2011 template

Enjoy!

Have you missed one of my previous digital freebies? Click HERE to find them. And, don't forget to subscribe to my feeds so you won't miss future freebies!

11/03/2011

third annual Halloween Bash

A little glimpse of our fun last Saturday night:


Supplies: Jen Allyson's Spooked solid papers; Sara Schmutz's Trick or Treat elements; Karen Funk's Photo Frame Clusters Vol. 1 & 2; Just the Way You Are and Century Gothic fonts.

11/01/2011

Jack O'Hummus

For our playgroup Halloween party, each family brings a dish to share. Inspired by a dish I saw on Pinterest with a pumpkin used as part of the display, I specifically picked a small pretty pumpkin when visiting a local farm with friends last week.

On Saturday morning, I washed the pumpkin in cool water with dish detergent. Yes, I gave it a bath! Knowing the pumpkin would be a on platter touching food, I wanted to be sure it was as clean as possible. :) Then I set up a little carving area for Dylan & me on the kitchen floor since it was cold & rainy outside.

This was Dylan's first pumpkin carving experience. He watched me carefully as I cut a circle and pulled out the top. Then I handed him a spoon so he could help me scoop.


He scooped seed by seed. Very slow. Inspecting each bit and then putting it into the "trash" bowl.


Once we had the pumpkin cleaned out, I sketched a face. Dylan approved except for one thing - it only had eyes and a mouth. "Nose, Mama. Nose." So, a nose it got.

Our Jack O'Lantern turned into Jack O'Hummus later as I dropped in a container of hummus and surrounded it with pita wedges all from a local Mediterranean deli.


I placed the Jack O'Hummus and the pita wedges into one of my 'fancy' Dollar Tree serving platters (love those!). And the hummus stayed well chilled thanks to a great idea by Trent - after the carving in the morning, we placed the pumpkin in the fridge. We pulled it out to add the hummus and take to the party. Four hours later when we were packing up to leave, the pumpkin and hummus were still cold!

Halloween may be over for this year, but I think this could still make a great fall party idea without the face. :)

10/31/2011

Happy Halloween!

Saturday was our playgroup's 3rd annual Halloween party. Each family comes dressed in a theme. This year, our family chose Toy Story costumes.

Halloween 2011: Toy Story
Jessie, Buzz Lightyear & Woody
The boys' costumes were easy. Dylan's came from the Disney Store. Trent purchased his shirt online, already owned the handkerchief, and I found his cowboy hat (not pictured) at a kids' consignment sale for $1!

My costume took a tad more work. I did buy the red hat at the Disney Store, but then embellished a plain white shirt with yellow fabric & red stitching and made the chaps. It was all quite easy just a little time consuming as I went slow trying to get it all "just right" and didn't have patterns. I spent a good deal of time studying online images of Jessie, sketching the designs and then trying it all on to get the placement/fit correct. I was pleased with the result though especially when in the midst of picture taking, one of the 2-1/2 year old boys pointed at me and yelled, "Jessie!" Now there's proof of when you nailed a costume. :) Thanks to making this cowgirl's night, G!

And thanks to Allison for taking the photo of our family! :)

10/26/2011

Halloween Party 2010

Working on my costume for our playgroup's annual Halloween party this weekend had me inspired to finally complete a page about last year's fun.


Each family comes dressed up in a theme. I know Trent & I don't look very costumed in the group photo but we were - we were zoo keepers to Dylan's monkey. ;) We stuck to simple polos and jeans with name badges. This year we're stepping it up a notch and doing Toy Story. Dylan as Buzz, Trent as Woody and me as Jessie. Speaking of which, I better get back to sewing and completing my costume!

Supplies: Karen Funk's The Sweet Life solid papers; Gennifer Bursett's Toolbox Mists Vol. 1; Sara Schmutz's Back to Basics tags, Nursery Rhymes elements and Star Spangled freebie; Miss Mint's Kooky Spooky elements; Audrey Neal's Dotted Dates 2010; Another Typewriter font.

10/25/2011

Mr Potato Head Pirate Pumpkin

Last year after Halloween, I found a Mr Potato Head Pirate Pumpkin Kit in the clearance section at our grocery store. I thought Dylan might enjoy it this year (and hopefully future years too) so I tossed it into the cart. Fast forward to late September when I bought him a fake pumpkin from the craft store to decorate. Knowing my toddler, I knew he would want to pull the pieces in & out and play with it so I went with a fake pumpkin.


During a naptime, I prepped the pumpkin using my scrapbooking & stamping supplies to help. I dipped the prong from each piece into a black stamp pad so when I determined it's position, I could press it to the pumpkin and have an instant mark. Then used my paper piercing tool to poke holes in the pumpkin. The holes were just large enough to help me press the pieces in and make perfect fitting holes.

The completed pumpkin ...


I pulled out the pieces out (except for the hat and shoes) before he woke up. When he came downstairs and saw the pumpkin & pieces, he was so excited and began playing with it immediately.


Since then, he's made a number of interesting creations. The hat and shoes are typically in their "correct" spot (I think mainly due to the fact those each have 2 prongs where the other pieces only have 1 each) but all the other pieces vary. I love seeing what he comes up with.

Featured as part of 15 Pumpkin Play Activities for Kids on Growing a Jeweled Rose.

10/13/2011

Trick or Treat: hybrid cards

Sara Schmutz has a new release today - Trick or Treat - featuring 16 papers and 20 elements:


I used the kit to create a couple of Halloween cards. If you haven't tried using digital kits to make cards, you should! It's such an easy way to get more use of a kit and make several of the same design with minimal effort (of course, don't tell any of my recipients that I said these were minimal effort!).

To start, I created an 8.5x11 blank page in Photoshop and set it up with masks for 2 card faces sized at 5.25" x 4" to match the white cards I planned to decorate. I then chose my papers and clipped them to the mask, rescaling as desired. For example, I wanted to be sure to get the spider on the orange card so I scaled the digital paper down accordingly.


I did the same thing with the elements i wanted to use. I placed them on each 'card' as I wanted them. Scaled them to size and, in the case of the larger tag, decided where to trim it as well as added the text. I then shifted the elements off to the side to prepare for printing. I could have left them on the 'cards' for a single print but wanted that little extra depth added by physically layering the pieces.


After printing the sheet, I used my x-acto knife to cut out each of the pieces. I used a black stamp pad to ink the edges of the tags. It helped cover the white edges and give a little more of a spooky Halloween look.


I adhered each card front to blank white cards. The larger tag I glued directly to the blue web card. I used foam backed adhesive to attach the smaller ribbon label.


Supplies: Sara Schmutz's Trick or Treat kit; Stamp Act Jumbled font; Recollections white cardstock & cards; foam backed adhesive; black stamp ink; adhesive.

10/05/2011

Halloween Night 2010

Last Halloween we took Dylan trick or treating for the first time. Literally only went to 3 of our immediate neighbors. He wasn't quite sure what to make of it all. He did love getting candy handed to him and clinched it tightly in his fist (we had a few melted chocolate bars to say the least!). The photo below is one of my favorite from the night. We bumped into our neighbor's 2-1/2 year old son who "explained" to Dylan what was going on. Dylan meanwhile just eyed Luke's lollipop. ;)


Supplies: Miss Mint's Pimp My Page Template #40 and Kooky Spooky papers & elements; Jen Allyson's Spooked elements; Just the Way You Are font.

10/29/2010

Friday Freebie - Halloween template

Last fall I created a traditonal scrapbook page about our playgroup's Halloween party - Halloween '09.  I've recreated the design in a digital format to share.  The 12x12 template features 11 layers for masking photos & papers complete with "inked" edges on the paper layers.  Also included are the black cardstock background paper (separate .png file) and 2 title layers - one reads "halLoweeN '10" and the other "halLoweeN '09". 

Click here to download the 12x12 Halloween Template

Enjoy!

Have you missed one of my previous digital freebies? Click HERE to find them. And, don't forget to subscribe to my feeds so you won't miss future freebies!