Showing posts with label food. Show all posts

4/14/2014

Candy Tasting

I have a sweet tooth. And I appreciate supporting local businesses. That combination led me to joining the focus group for Butterfields Candy - a company whose product I personally like and recommend.


Butterfields Candy has been around since 1924 and is made in Nashville, NC, just northeast of Raleigh. Currently there are 4 flavors of their hard candy available - Lemon Buds (my personal favorite), Peach Buds, Honeybell Buds and Key Lime Buds. I can say firsthand that all 4 are delicious and, if you haven't tried them, you should. They are available at select local stores or online through their website.

If you are in the Triangle Area, Butterfields is still looking for taste testers (no previous experience with their candy required) as they test possible future flavors. Visit their Facebook page for more details.

Disclaimer: this is my personal opinion only. I did receive free candy as part of the Focus Group, but no posts or other social media were required.

2/11/2014

Peanut Butter & Banana Stuffed French Toast

More than once I've shared photos on Instagram of a weekend breakfast favorite in our house - Peanut Butter & Banana French Toast. Today I'm sharing the recipe to go along with the photos just in time to have it for Valentine's Day or on a future weekend.


Ingredients
1 Banana
Harris Teeter Take & Bake Club Rolls
Creamy Peanut Butter
Butter
1/3 cup of Milk
2 Eggs
1/4 tsp of Cinnamon
1/2 tsp of Vanilla Extract
Powdered Sugar (optional)
Slice a banana into about 1/4" pieces and set aside.

Slice the rolls into 1" thick pieces. Slice the center of each (longways) almost all the way through.

Photo credits: Dylan (age 4) - ie, "Mama's helper"

Open each and spread with peanut butter. Add 2-3 banana slices. Set aside. Repeat for all.


In a bowl, beat one egg. Mix in milk, cinnamon and vanilla.

Heat pan or skillet and melt enough butter to lightly coat. Dip peanut butter/banana/roll into the mixture fully coating and then place it in hot pan. Cook until browned on each side.

Plate and top with powdered sugar, if desired. Serve immediately.


Enjoy!

** This recipe makes enough for our family of 3. At the rate my 4 year old's appetite is increasing, I'm sure I'll be doubling this soon! **

2/04/2013

Super Bowl XLVII

Yesterday was our first at home, by ourselves Super Bowl Sunday in several years. It was perfectly awesome too. While I've loved our fun with friends the past few Super Bowls, it was nice to spend a quiet evening in the night before a work/school day when we all have to be up early.

The boys (bless them) went grocery shopping in the afternoon without me so I could finish some stuff around the house. They returned with food for our week's dinner menu plan and for our "party." We had homemade Chex Mix, Harris Teeter take & bake pizza, and fresh veggies with dip.

Dylan's Cars party plate he fixed himself.
Then we ate our first official meal at our new kitchen table. We've actually had it since November, but as it was a Craigslist find ($15!) and I'm still searching for chairs I like - it mainly gets used as a spot for Dylan and I to craft. Last night we pushed the crafts aside, grabbed chairs from the dining room and piled around it so we could watch the game and all eat together.

Our $15 Craigslist find in November - kid not included ;)
(and proud that the drill and 2 of those boxes are now put up!)
Dylan was in bed by halftime. It wasn't long after before I was on the couch in my pjs with a glass of wine watching the ads (really, I'm not that into the game itself) with Trent. Perfect end to our weekend.

10/29/2012

Monster Pizzas

Looking for a fun Halloween inspired food idea for our playgroup when Dylan & I hosted earlier in the month, I came across a recipe for Monster Pizzas. We changed it up a bit, but kept the same general concept. The boys all loved creating their own special pizzas.

Ingredients
English Muffins
Pizza sauce
Mozzarella cheese 
Mini pepperoni
Red, green & yellow peppers in various sizes

I gave each toddler half an English muffin and added the sauce for those that wanted it. Then let them top with cheese.


Next I brought over a divided plate of peppers and mini pepperoni to top their pizzas and create the faces. I got mixed reactions. To be expected from toddlers. :)


Dylan loves his veggies - especially peppers. He made a face but kept eating the green pepper nose before I could snap a photo.

Red pepper hair (or eyebrows?), mini pepperoni eyes and yellow pepper mouth.
Then ate off all the veggies before I could nab the pizzas and put them on a tray to warm in the oven. Thus his is the "ate all my veggies" pizza.


The lunch was a hit. I think almost every bite of pizza was eaten plus a good amount of fresh fruit (bananas, apples & strawberries). Of course, the promise of mini pumpkin cupcakes for dessert might have helped. ;)


2/17/2012

Peanut Butter Basketball

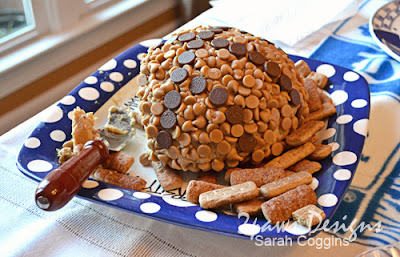
The basketball themed 1st birthday party we attended last weekend had loads of fantastic decorations and ideas, but, I confess, this was my favorite. I won't admit to how many times I was caught sneaking a bite. ;) Truthfully, just seeing the photo is making me crave it again!


My friend, Stacey, found a delicious recipe from Nestle's website for making a peanut butter ball. Then she took it a step further and placed the morsels so it looked like a basketball. When I asked her how she managed to shape it so perfectly, she let me in a on secret that I personally think is better than the original recipe idea - press the mixture into a bowl to harden. Simple, easy and you have your domed shape.

Add a side of graham cracker sticks (shown) or apple slices.Be forewarned, it won't last long! :)

11/01/2011

Jack O'Hummus

For our playgroup Halloween party, each family brings a dish to share. Inspired by a dish I saw on Pinterest with a pumpkin used as part of the display, I specifically picked a small pretty pumpkin when visiting a local farm with friends last week.

On Saturday morning, I washed the pumpkin in cool water with dish detergent. Yes, I gave it a bath! Knowing the pumpkin would be a on platter touching food, I wanted to be sure it was as clean as possible. :) Then I set up a little carving area for Dylan & me on the kitchen floor since it was cold & rainy outside.

This was Dylan's first pumpkin carving experience. He watched me carefully as I cut a circle and pulled out the top. Then I handed him a spoon so he could help me scoop.


He scooped seed by seed. Very slow. Inspecting each bit and then putting it into the "trash" bowl.


Once we had the pumpkin cleaned out, I sketched a face. Dylan approved except for one thing - it only had eyes and a mouth. "Nose, Mama. Nose." So, a nose it got.

Our Jack O'Lantern turned into Jack O'Hummus later as I dropped in a container of hummus and surrounded it with pita wedges all from a local Mediterranean deli.


I placed the Jack O'Hummus and the pita wedges into one of my 'fancy' Dollar Tree serving platters (love those!). And the hummus stayed well chilled thanks to a great idea by Trent - after the carving in the morning, we placed the pumpkin in the fridge. We pulled it out to add the hummus and take to the party. Four hours later when we were packing up to leave, the pumpkin and hummus were still cold!

Halloween may be over for this year, but I think this could still make a great fall party idea without the face. :)

5/04/2011

Day at the Vineyards

Over the weekend we joined 3 other families for wine tasting and a picnic. The kids had a great time running around the vineyard checking out old tree stumps and playing with the toys we brought along. It was a beautiful spring day in the gorgeous countryside. A nice change of scenery from our normal suburban life.


Supplies: Simply Tiffany Design's Template No. 24; Deena Rutter's d365 Starter kit; Sara Schmutz's School is In paper pack; Kate Teague's November Fall Freebie kit; Miss Mint's New Years Eve and Hoppy Easter kits; Karen Funk Designs's In Bloom kit; Sweet Shoppe Designs's A New Day kit; Karla Dudley's Digi Essentials 9 - Inked; Caflisch Script Pro font.

4/20/2011

Cheddar Bunny Carrots

Looking for a simple craft for the moms to do during our playgroup lunch I hosted two weeks ago, I decided upon a project for the kids' Easter baskets. I found an idea while browsing Pinterest about making "carrots" filled with goldfish from No Fuss Fabulous blog. This was perfect - a quick & simple craft we could complete while keeping an eye on our toddlers plus much better for them than more sugary treats.

If you are still in need of a little something for your little one's basket, here's how to create your own ...

Supplies
  • disposable icing or candy decorating bags (note: I ended up with the latter since the icing bags were sold out, but be aware there is a large Wilton logo & smaller recycling logo printed on the candy decorating bags)
  • Annie's Homegrown Cheddar Bunnies
  • green ribbon

Fill each bag about two-thirds full with crackers. Since we had the bags with the logos, we filled to just below the logo. Twist the bag closed around the top of the crackers and secure with green ribbon.


Simple as that and you have cute treats for the bunny to deliver. :)

3/22/2011

Pinterest addiction

As if I needed another addiction ... totally loving Pinterest.  So much inspiration for everything from crafty fun to decorating to recipes and I can pin it to my own virtual boards to refer to later.  Love it.  Find my pins here.

2/11/2011

Shoot and Edit: Hearts edit

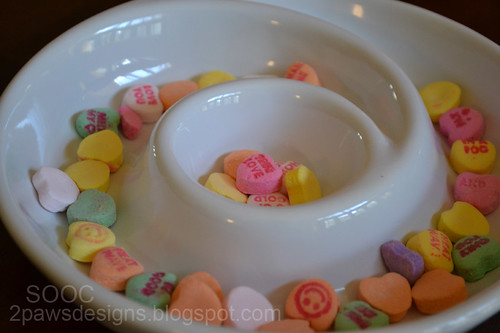
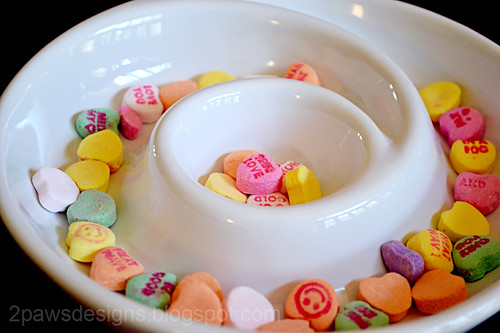
I started my edit this week the same way as I seem to start them all - by adjusting the levels - setting my white and dark points then shifting the input and output levels until it visually looked good to me.  Then I used the clone stamp tool to remove a teeny, tiny piece of something (sugar crumb perhaps?) that was hanging out on the edge of the circle in the center of the bowl.  It was bugging me and needed to go immediately.  ;)

From there ...
  • I created a duplicate layer with the high pass filter.  Love that trick from Ashley and how it really brings out the details. 
  • Added a new adjustment layer - curves.  As with the levels, I played around until it looked "right."
  • Merged all layers.
  • Duplicated the background layer.  Applied the Gaussian blur effect (0.3).
  • New adjustment layer - levels.  I initially left the RBG alone and tweaked the Red, Blue and Green.  Then I returned to RBG and made a few slight changes.
  • New adjustment layer - brightness/contrast (+3, +11).
  • New adjustment layer - color balance.  I adjusted the balance through all 3 tone balance options (shadows, midtones, highlights).  My goal was to keep the colors of the candy hearts natural and the bowl white, but also to warm up the bowl just a bit.
  • Added a solid fill layer with the color #FFF7F8.  Changed the layer to Soft Light mode.  Lowered the opacity to 60%.  I really liked the softening this step gave the image.
And here's my end result:

Join in the fun with Forever'n Ever'n Always Photography and Ramblings and Photos:

2/08/2011

Shoot and Edit: Hearts

Yup, I went the way of the conversation hearts.  One of those weeks where I waited until the last minute.  I remembered a box stashed away in the junk drawer in our kitchen (seriously do not know how old these are!).  Poured them into my Pottery Barn swirl bowl just because I like it.  :)  And took a few shots.  Here's my favorite:

ISO 1000, ss 1/60, f5.3
Join in the fun with Forever'n Ever'n Always Photography and Ramblings and Photos:

1/20/2011

Shoot and Edit: Good Morning edit

Confession, I'm really wishing I had one of these on hand at the moment.  The edit is making me hungry!

No Camera Raw.  I did try opening it as a raw image in PS and all I got was a grainy gray nothingness so I skipped that.  I opened the original image (on the right) as a .jpeg in PS and started with adjusting the levels.  I used the picker to set my white and black points.  Then I selected "enhance monochromatic contrast" in the Auto Color Options.  I returned to the levels window and adjusted the settings a bit until I liked the look.  The final settings were 14, 1.25, 255, 8, 255.

Next I jumped into Ashley's tutorial.  I followed it almost exactly.  I chose to eliminate a few of the layers (hue/saturation, black & white and photo filter) that I felt didn't quite give my image the look I wanted.  Here's the end result (click to enlarge):


Join in the fun with Forever'n Ever'n Always Photography and Ramblings and Photos:


ETA: For all I've made hungry with my donut muffin photo, I found a great recipe here.  Super easy & delicious (I made a batch immediately upon finding it!).  :)

1/17/2011

Shoot and Edit: Good Morning

Technically, I picked up this delicious donut muffin from a local bakery during lunch last Thursday.  But having a made from scratch chocolate donut muffin earlier in the day would definitely be a good morning, thus, it's my SOOC shot for this week's Shoot and Edit.


Join in the fun with Forever'n Ever'n Always Photography and Ramblings and Photos:

12/15/2010

Wordless Wednesday: Ginger Snaps


Wordless Wednesday

7/07/2010

Wordless Wednesday: First Pickle


Wordless Wednesday

Bookmark and Share

6/25/2010

Homemade Ice Cream Cookie Sandwich

Yesterday on a whim I decided to attempt making homemade ice cream cookie sandwiches to share with friends.  I had already baked the cookies the night before, but with a forecast of 101, I felt like we needed a little cool factor too.  I searched online for directions and the first I found talked about melting the ice cream, mixing in sprinkles, refreezing for 6 hours ... wait - 6 hours?  I had maybe 30 minutes. Scratch that idea. So, here's my quick and easy method ...

Easy Ice Cream Cookie Sandwiches

Pull out the ice cream and let it sit on the counter a few minutes to begin softening.  Arrange cookie pairs on plate.  Use a knife to thinly slice some ice cream and place it on the bottom of one cookie.  Add as much as desired. :)  Place the second cookie on top.  Press gently to stick it all together.  Wrap each sandwich in wax paper.  Return to freezer to harden.  (Unless you want one immediately - in which case, dig in!)  Then when you are ready to enjoy, you can pull out one sandwich, unwrap and eat.  Enjoy!

6/14/2010

HappyBaby Food Review & Giveaway

As a mother, it's important to me to give my son the best food possible. From his first day of life, I started by breastfeeding. (Not that I disagree with formula. We even supplemented with some during Dylan's early days at the urging of our pediatrician for health reasons.) As he began to eat solid foods, I starting making his food and I still make the majority of the foods he eats. However, there are some foods I don't make (ie, rice cereal) and sometimes I've just fallen behind or want to mix up the pallet a bit.

I originally stumbled across HappyBaby Food by accident one day perusing foods in the freezer aisle of the grocery store. I loved that they had food just like my homemade ones - organic foods, pureed and frozen into 1 ounce portions. I picked up a box to try at home. Dylan loved the taste and devoured them. I loved the convenience and good nutrition.


When the opportunity arose to taste test a few HappyBaby Food products for a review and giveaway, I jumped at the chance. It was a bit like Christmas when the packages arrived. We received an assortment of frozen and dry foods to try.

Dylan is in a self-feeding stage right now where he prefers to feed himself more than eat off a spoon from us. That said, we started our taste testing with the HappyBites products. The variety of shapes and textures of the different options seemed to grab his attention right away. I think he was curious about these new items that we didn't cut into tiny pieces. He could finally grab, hold and bite into them on his own.

Enjoying a Chicken Bite
The only leftovers on Dylan's highchair tray after trying the Chicken Bites and Salmon Stix were a bit of the breading. Can't blame him there. Personally, I found the Mac+Cheese and the Chicken to be very tasty. All three cooked best in the oven.

We already had some familiarity with the HappyBaby Frozen products so I was excited to see flavors that we hadn't tried in the shipment. Dylan surprised me with his love of the "Mama Grain" mixture of organic bananas, black beans and quinoa. This particular flavor smelled like banana bread. Yum!

The Organic Puffs and HappyMelts were also a big hit. I've tried both myself and found them to be tasty. Dylan eats every piece that he can get his hands on so I take it he finds them tasty too. The puffs were less sugary than other brands we've used which is a huge plus to me as a parent.

All in all, we were very pleased with all the products we tried and Dylan will definitely be enjoying more in the future. Now we want to share with you. Compliments of HappyBaby Food, one reader will win the following:
  • 2 free trial coupons for each of the HappyBaby Food product lines
  • 1 FAQ on Probiotics & DHA
  • 1 Infant & Toddler Nutrition Guide, co-authored by Dr. Sears
  • 1 HappyFamily Recipes
To Enter, leave a comment on this post with your baby's favorite HappyBaby Food product or which product you think your baby might like the best.

Want to gain additional entries? Here are a few ways:
  1. follow this blog
  2. follow me on Twitter - @2pawsdesigns
  3. follow HappyBaby Food on Twitter - @HappyBabyFood
  4. tweet about this giveaway using "I want to win the HappyBaby Food #giveaway from @HappyBabyFood & @2pawsdesigns! #contest Please RT" (valid for extra entry once per day)
  5. blog about this giveaway
  6. "like" 2paws Designs on Facebook
  7. "like" HappyFamily on Facebook
For each additional entry, please post a new comment. Ie, if you tweeted or blogged about the giveaway, come back and post a link. Thanks!

Giveaway is open to all US residents 18 years or older. Ends Sunday, June 20th at 9:00pm Eastern time. Winner will be picked by random.org. Winner will be contacted by email address. Be sure to either leave a valid email address along with your comment or check back on Monday, June 21st when the winner is announced to email it to me then.

Note: HappyBaby Food products were received to try for review, however, all opinions expressed are strictly my own.

Bookmark and Share

3/23/2010

YoBaby!

I recently started buying YoBaby yogurt for Dylan - who loves it and devours every bite. The packaging advertised a rewards program via the Stonyfield Farm website. Being a frugal minded mama, I, of course, went to check it out. While on the website I registered and found the page for printable coupons. I made my selections, clicked print and .... well, no coupons. Instead a webpage telling me I had printed my limit came up. Um, but I wasn't able to print any. I clicked my way over to the "contact us" section, explained my predicament and asked if there was any other way to obtain coupons. I expected I might get an automated response and then, maybe, a real reply in a day or two. I was wrong. I received a response in about an hour's time and was told that some coupons would be mailed to me. Woohoo! This was all last Monday and what did I find in yesterday's mail - my coupons. :)


Bookmark and Share

1/21/2010

1st foods

Dylan is loving his veggies! My mom worked on getting him to eat them 3 meals a day while I was in the hospital and recovering. He now happily gobbles them up. And, of course, gets a messy face in the process:


Supplies: October Afternoon patterned paper; Archiver's (red) and Bazzill (white) cardstock; EK Success corner rounder (scalloped edge); 2Peas Squish & 2Peas Old Type fonts; Rhonna Farrer Type Set.

Bookmark and Share

7/06/2009

weekend for 2

A wrap-up of how Trent & I spent the holiday weekend...


July 3rd * Mellow Mushroom pizza for dinner * Durham Bulls vs Charlotte Knights baseball game * Fireworks

July 4th * Went to the movies to see UP * Cookout for two - hot dogs, baked beans & chips

July 5th * Lunch with Rianna and Tommy at The Flying Biscuit Cafe

Supplies: Archiver's (blue) and Bazzill (white) cardstock; Scrapbooks Etc Quick Collage Template 114; Signo Uniball white pen; generic office supply number stencil; acrylic paint; Establo and Futura Bk fonts; Making Memories eyelets.