Showing posts with label Pottery Barn. Show all posts

1/18/2013

Giant Ruler Growth Chart

Having left the vinyl giraffe growth chart in our old house, we were in need of a new one. I had eyed a fun oversized ruler style in the PBK catalog well before our move and had it on my future 'to do' list. Thanks to help from my friend, Stacey, who rocked some stencil creations with her Silhouette and shopped for the boards, we now have one!

Sunbathing while the sealer dried (yay for unexpected 70 degree Jan days!)
Stacey & I spent a few hours together on a Saturday afternoon while our boys played and husbands watched football. I forgot to take photos, but the idea is pretty straight forward and if you google "giant ruler tutorial" there are plenty of examples. Basically, after deciding on a stencil for the lines (thickness and lengths) and a font size/style (Century Schoolbook), we used Sharpies to trace and color them in. Next we stained the boards using Minwax American Walnut stain. Having run out of time, we each sealed ours separately later. I used Minwax Polycrylic spray leftover from painting my bedroom furniture.

To hang the ruler, I purchased a pack of keyhole picture hangers. The wood was soft enough that I was easily able to attach the hangers to the back of the board using the included screws without pulling out the drill.

Help from my little assistant in positioning the hangers.
Honestly, the hardest part of this project was choosing the spot to hang it. I finally selected a wall in the playroom that's also visible when you enter the house through the front door and it has great natural lighting for photos.

After measuring and placing the screws, Trent helped me get it on the wall. Lining it up with both keyholes at once took some effort - I kept hitting one and missing the other. Then he watched the level at the top while I added heavy duty velcro under the bottom. This assured it was straight (I'm a tad OCD like that) and keeps the ruler secure. I don't want an accidental bump during play to knock it off the wall.

Complete!
Firmly attached, we're ready to start measuring just in time for Dylan's "half birthday" tomorrow.

1/17/2012

Valentine Envelope Chair Backers

Inspired by cute Valentine's envelope chair backers at Pottery Barn Kids, I pulled together a few supplies to make a pair for Dylan's Ikea LÄTT table & chairs set. I changed the design of mine slightly for a more "masculine" look by leaving off the scallops and replacing the large heart with a button.


Supplies
  • white felt (I used a packaged 36" x 36" sheet; smaller sheets would also work)
  • white & red thread
  • velcro
  • red embroidery floss
  • 2 red buttons

Start by measuring the chairs you want to place the envelopes on to determine your envelope size. I made my envelopes 11" wide by 8" high. Since I opted not to add scallops, I was able to cut each envelope as one large piece. With help from my assistant, I drew out the design using fabric marker and traced one of our china dinner plates (Pottery Barn, fittingly!) to create the curve at the opening end:


After cutting out the envelope shapes, I measured the top of the chairs to determine the size for the straps. To do this, use a tape measure to go all the way around the top of the chair where the envelope will attach - remember to overlap for where the velcro will affix. My straps were 9" long by 1.5" wide.

I folded my large cut piece into the envelope shape and held it to the chairs to determine strap placement. Knowing I wanted the straps at the outermost point and near the top, I decided on 1" in on each side and 1/2" down. Pin straps at the desired locations and sew onto the envelope piece:


Add a strip of velcro to the top end of each strap. Add the second piece on the opposite end & opposite side to secure to chair later. I literally took the envelope to the chair again after sewing on the first piece and used my fabric marker to note the location for the second piece ensuring a good, snug fit:


Fold the front up, pin and sew along both sides and the bottom at 1/4" in from edge:


Sew along the two angled edges of the flap, also at 1/4" in, to add definition, if desired. Next, hand stitch the red embroidery stitches just inside the lines you sewed by machine - all three sides of the flap and the sides and bottom of the envelope. I used DMC floss #321.


Finally, add button holes to the flaps. I used my sewing machine's button hole option to do this (tip: use fusible interfacing on the backside of the flap to stiffen and make this process easier). Hand stitch a red button on each envelope to create closure.


Finally, place on chairs and enjoy! If you create your own, let me know - I'd love to see. :)


Tip Junkie handmade projects

9/05/2011

Canvas Quote Art

I had a canvas stored in Dylan's closet that I bought several years ago. I had big plans that never materialized until a few weeks ago when a new idea came to mind and I created this for his room using a quote from Dr. Seuss:


It was so simple to do. Here's how to create your own ...
  • Canvas
  • Assorted letter stickers - mine were by American Crafts & Making Memories
  • Paints - white for letters and spray paint for main color
  • Useful tools - pencil, ruler, painter's tape, xacto knife

Paint the canvas in white (or whatever color you want the text to be). I used some white semi-gloss paint left from our Cat Drawer project and actually rolled it onto the canvas. Let dry completely.

Lightly sketch lines with pencil to help align your letters. I started at the bottom knowing I wanted the quote to be in the lower right of the canvas and used painter's tape to mark the base line. This gave me an easy point to measure off of for the rest of the lines which were at 2" spacing. Place your letters.


I literally just dug into my stash of stickers for this project and used a whole mix of styles & sizes.


Spray paint over entire canvas in color of choice. I used Periwinkle by Krylon. Let dry. Check per manufacturer's instructions as to when a second coat can be applied and do so if needed.


After canvas is completely dry (I waited until the next morning just to be sure!), carefully peel off the stickers. Some of mine were coming up on their own. For those that were more stuck, I used my xacto knife to get under one edge so I could pull them off. Even Dylan got involved in this part. :)


Hang and enjoy your artwork!


My completed canvas is hanging in Dylan's room along with his initial (from Pottery Barn Kids) and a shadow box about his first beach trip last year. The grouping perfectly filled a space that had been empty since we moved him to this room. He was so excited to see it and still points at it & comments. I think he especially likes the canvas since he got to help make it. :)

2/11/2011

Shoot and Edit: Hearts edit

I started my edit this week the same way as I seem to start them all - by adjusting the levels - setting my white and dark points then shifting the input and output levels until it visually looked good to me.  Then I used the clone stamp tool to remove a teeny, tiny piece of something (sugar crumb perhaps?) that was hanging out on the edge of the circle in the center of the bowl.  It was bugging me and needed to go immediately.  ;)

From there ...
  • I created a duplicate layer with the high pass filter.  Love that trick from Ashley and how it really brings out the details. 
  • Added a new adjustment layer - curves.  As with the levels, I played around until it looked "right."
  • Merged all layers.
  • Duplicated the background layer.  Applied the Gaussian blur effect (0.3).
  • New adjustment layer - levels.  I initially left the RBG alone and tweaked the Red, Blue and Green.  Then I returned to RBG and made a few slight changes.
  • New adjustment layer - brightness/contrast (+3, +11).
  • New adjustment layer - color balance.  I adjusted the balance through all 3 tone balance options (shadows, midtones, highlights).  My goal was to keep the colors of the candy hearts natural and the bowl white, but also to warm up the bowl just a bit.
  • Added a solid fill layer with the color #FFF7F8.  Changed the layer to Soft Light mode.  Lowered the opacity to 60%.  I really liked the softening this step gave the image.
And here's my end result:

Join in the fun with Forever'n Ever'n Always Photography and Ramblings and Photos:

2/08/2011

Shoot and Edit: Hearts

Yup, I went the way of the conversation hearts.  One of those weeks where I waited until the last minute.  I remembered a box stashed away in the junk drawer in our kitchen (seriously do not know how old these are!).  Poured them into my Pottery Barn swirl bowl just because I like it.  :)  And took a few shots.  Here's my favorite:

ISO 1000, ss 1/60, f5.3
Join in the fun with Forever'n Ever'n Always Photography and Ramblings and Photos:

12/15/2008

Secret Obsession

My finished pages and tag for Terri's "My Secret Obsession" album. My two obsessions are dark chocolate peanut M&M's (maybe not so secret) and all things Pottery Barn. :) Love that PB swirl bowl I placed the M&M's in for photographing.


Supplies: Cosmo Cricket Cogsmo papers; misc. journaling spot; Doodlebug rub-on letters; QuicKutz Tangerine font; Die Cuts with a View adhesive backed cardstock; Stickles; Micron black pen; black stamp ink pad; Bazzill cardstock; corner rounder punch; Come Unto and Pottery Barn fonts; American Crafts ribbon; My Minds Eye rub-ons. Inspired by Nov 28th of dw2008.

12/28/2007

Small Space Organization {Scrapping Desk}

Each year after Christmas and with the New Year on the horizon, I tend to get into a spring cleaning mood a bit early. This year I thought I would share some of the scrap room organization ideas I've incorporated over the past year. I'm going to break it up into multiple posts over the next few days. Hopefully, you'll find a bit of inspiration. :) Click on any of the images for a better view.

The room where I "play" is the smallest bedroom in our house - 10 feet by 10 feet - but carries a LOT of responsibility. The computer area, my scrap space, and cats' litter box all squeeze in. Until about 3 months ago, the treadmill lived in there too. Yup, chaos! LOL :D The floor plan to the right will give you an idea of how tight things are.

My scrap desk is located opposite the door. I like this spot where I can see the tv and see the furkids coming and going. Sometimes they just lay in the hallway outside the door and 
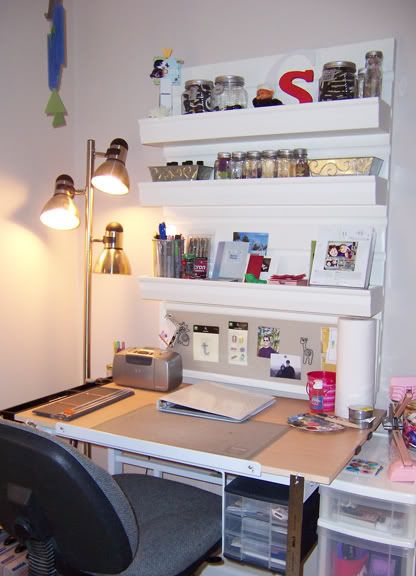
watch me or nap. ;) LOL The desk itself was the first official "scrapping" furniture purchase I made when we bought the house. I got it at AC Moore for $50 using a 50% off coupon. That's just the start of my "deals" [remember, I'm a big coupon-er and money saver ;)] in this space.

The light fixture next to the desk was a hand-me-down from a friend who was moving. So glad I scooped that up as it gives me excellent lighting when working on my projects.

The wallboard and shelving are from Pottery Barn. It's a discontinued item called "Wayne Modular." I was eyeing it in their catalogs and online late last year, but it was out of my price range (the board alone was over $100!). In January, they slashed the prices by up to 90% so I managed to get 2 boards, 2 shelves, 5 ledges, and 1 pin board for about $120 (original price about $600!). The other board hangs over our computer desk, but that will have to wait for another post as this one is already getting long.

On the ledges over the desk, I keep a variety of embellishments and tools in Making Memories storage jars. The top ledge has the large size jars with foam stamps. I've added a simple MM metal rimmed vellum tag to each and printed the stamp types in Two Peas Old Type font.

The ledge below it has a collection of 12 of the smaller MM jars with buttons, tabs, flowers, etc. The jars are flanked by two metal tin containers I picked up at the Target dollar spot in the spring. The one on the left holds my MM paints and the one on right right I use for miscellaneous loose embellishments I'm currently using.

11/29/2007

Small Space Organization {Key Rack}

Ever have that "where are my keys??" moment just before you need to leave and you're already running late? Well, years ago I bought a simple wooden mail & key organizer from Target to hang by my front door to prevent moments like those. It served it's purpose well, but a few months ago I was ready for a change. And, as you can see in the photo, we weren't exactly utilizing the mail section (minus the junk in the bottom) and the key hooks were overloaded.

Searching around online, I found a simple key organizer that I absolutely loved at Pottery Barn. Nice clean lines. Lots of hooks. But, I didn't want to pay the asking price. This looked like something I could make myself for less. So instead of point, click, buy ... I drove to Michael's and Lowes Home Improvement for supplies:
  • (1) 9"x12" white frame
  • (1) 12"x12" plywood sheet, 1/4" thick
  • (4) coat hooks
  • (8) screws, washers, and nuts [The screws that came with the hooks had pointed ends which wouldn't work. I bought flat ended screws and finished them off with nuts on the backside.]
  • white primer & white glossy paint in spray cans [from my shed ;) ]
Here's the end result which hangs proudly next to my front door:

11/01/2007

My New Fav Toy

Purely a fluff post. ;) I wanted to show off the newest and current favorite item in my scrap area.

I've looked at this Pottery Barn Kids art caddy from a distance for a year or two. Finally decided to go ahead and treat myself while shopping with my mom in mid-Oct. It was well worth the $45. I love the large size, sturdy construction and how it helps me keep more of my supplies close at hand. Of course, as you can see, I still have a bit of empty space to fill. Good thing some new Archiver's coupons arrived in the mail today.

[ETA: The PBK art caddy is available in store only at this time.]

2ps blog challenge:
What is a class you would love to attend/see at your LSS?
Not sure what class I would like to see offered, but I would love to take the new Hip Household Organizer class Archiver's is offering. Looks like a fun and useful project for me. Of course, as far as the November class schedule - it's only offered when I'm unable to attend. Hoping this class will available in December as well.