Showing posts with label crafts. Show all posts

2/25/2013

Chalkboard Wine Labels

What happens when a friend is planning a party and also follows you on Pinterest? You get random emails asking you to recreate something you just pinned. ;) Which is how another pin that might have been a "someday" became a quick reality!

The party was for her husband's 40th birthday and she wanted to give out small wine bottles for favors. Where I came in - creating custom chalkboard labels to add to the bottles. The tutorial I had pinned was for creating chalkboard images in Photoshop and included free chalkboard backgrounds to download. Easy enough. The catch - the tutorial used hand lettering scanned in. I've never been the best at lettering. Possibly could do it if I'd just sketch more. Something I haven't made a priority in a long time. So, I quickly went in search of some fun, free fonts to try to create something similar.


I used a mix of two fonts one for the numbers and one for the letters (Chalk Hand Lettering Shaded). Played around with text sizes. Added a border. And set up a sheet for her to print onto labels.


With the addition of kraft tags she made, the bottles looked great and certainly were a fun favor.

2/06/2013

Wordless Wednesday: Paper Heart Wreath

Inspired by this Pin

Linking up to Wordless Wednesday and Sarah Halstead

1/16/2013

Valentine Crafts

A month out from Valentine's Day, I thought I'd share a few of my favorite past crafts to help inspire ideas for the next few weeks ...

Valentine Envelope Chair Backers

Watercolor Valentines

Handprint Heart

You Spin Me mini album

12/21/2012

Santa's Magic Key

I saw the idea of Santa's Magic Key last year on Pinterest and meant to make one. The poem is the part I really love as it combines the magic of Santa with the real meaning of Christmas (find it here from Michelle at The Picadilly Post). I don't recall ever questioning Santa getting into a home without a chimney when I was little. I certainly didn't expect my almost 2 and a half year old to question it last year when our home didn't have a fireplace much less a chimney. I simply thought it would be fun and cute. And while we now do have a fireplace, it is gas so we still don't have a chimney. Thus, I finally finished this project!


I purchased the key last year at Michaels. I tried to find the dollar bin option mentioned in Michelle's post, but didn't have luck. Instead I found one in the jewelry section. It was a little bit pricier but not too bad with a coupon. Since I was never fond of the brass color, I used some bronze spray paint left from my bathroom hardware project to paint it.


The tag I made with fabric from my stash. I ironed freezer paper to the back, cut it to 8.5x11 and slipped it into the printer paper tray. I created a tag outline in Photoshop and added the poem plus a Santa graphic from Sara Schmutz's Jolly kit. I printed it to the fabric, peeled off the freezer paper and cut out the shape. Punched a hole in the tag using my Cropodile and added an eyelet (my scrapbooking stash pays off for all sort of crafty projects!). Then looped a red ribbon through to hang it on the door Christmas Eve and called it done.

9/28/2012

Friday Freebie: 'I Spy' Book

Dylan loves I Spy books so when I saw the idea on Delia Creates blog for DIY I Spy Books, I knew I needed to make him one. He loves it especially since his toys are featured. He'll dig through his Duplo blocks to find the physical matching pieces as well as searching the photos. :)

Here's a peek at a few of the pages ...


The fun part? I'm sharing these pages with you. The alphabet find page is a bit different. It's 6 squares like the other search pages and features ABC instead of Dylan's name.


You can download the pages here. Please remember they are for personal use only. Thanks and enjoy!

The free I Spy pages today are in lieu of my typical monthly digital scrapbooking freebie. Find past Friday Freebies HERE and, don't forget to subscribe to my feeds so you won't miss future freebies!

5/22/2012

Handprint Flag Plaque

Dylan & I made this plaque last year just before July 4th but it seemed fitting to share now a few days before Memorial Day. With Memorial Day, Flag Day (June 14th) and July 4th - it will be hanging on our wall for the next few months!


The handprint, stripes and blue canton were all done with paint. The stars were stamped on. Then I sketched the flag outline using a Sharpie marker and added the words with rub-on letters from my stash. Finally, I sealed it using Mod Podge and added a picture hanger to the back.

Supplies: wooden plaque; acrylic paint; brushes; star stamp; Stampin' Up! Whisper White ink pad; black Sharpie marker; Making Memories rub-ons; Mod Podge; picture hanger.

4/03/2012

Easter Bunny Plaque

Last year, Dylan & I made this cute bunny plaque to hang up at Easter:


Instead of painting his entire hand, I painted just the palm and the pointer & ring fingers to create the head and ears. After the print dried, I painted his thumb in pink and helped him place it for the nose. The eyes and whiskers I painted using a small brush. Finally, I finished the plaque with Mod Podge and a picture hanger on the back.

Supplies: wooden plaque; acrylic paint; brushes; Mod Podge; picture hanger.

3/01/2012

Shamrock Handprint Plaque

It's true, we have a handprint or footprint plaque for almost every holiday now. I love pulling them out to decorate with and Dylan gets so excited seeing them! Our Shamrock plaque we made last year the day before St. Patrick's day.


I started with a square wooden plaque that I painted white. After the paint dried, I very lightly sketched outline of the shamrock leaves in pencil. Then, with Trent's help, we slowly painted Dylan's hands and made the prints - two with each hand. I painted the stem and set it aside. Once the green paint was dry, I used a Sharpie marker to carefully outline the leaves I had sketched earlier as well as the stem. This gave the design the 'pop' it needed and helped define the shamrock. I completed the plaque by sealing it with a coat of Mod Podge and adding a picture hanger to the back. Also, as with all the plaques, I noted on the back the date and Dylan's age.

Supplies: wooden plaque; acrylic paints; brushes; Sharpie marker; Mod Podge; picture hanger.

2/09/2012

Snowflake Baby Shower

Another baby joined our playgroup last week, so naturally we had another baby shower. This time it was just us 6 mamas so we spent a few hours together on Saturday afternoon at a local spa. We started with treatments (massages, facials, etc) and then got back together for the celebration.

Since the party was in early January, we went with a snowflake theme. Rather ironic considering the weather that day was mid-60s and sunny! Our centerpiece was a diaper cake topped with flowers & a large chipboard snowflake.


Knowing our friend was naming her son Mason, we incorporated Mason jars into our design as vases for white carnations (lesson learned: carnations are not in season in early January!) and for drinking glasses. After spotting an idea on Pinterest, Stacey cleverly made "redneck" wine glasses by gluing glass candlestick holders to the bottom of the jars. They made fun party glasses and favors.


To mark whose glass was whose, we attached tags with blue sheer ribbon. The tags were simple white cardstock with a snowflake punched, name handwritten in silver ink and the bottom torn.

We had lots of yummy things to eat ... fresh fruit, peanut butter celery, a cheese platter and some sweets. Allison made these incredible oreo cupcakes topped with snowflakes, of course!


And, as with the last shower, I made a single invite for the mama to add to the baby book.


Supplies - Invite: Recollections white cardstock; Miss Mint's Winter Sparkle kit (snowflake paper); Juice ITC font; Making Memories edge scraper; Autumn Leaves chipboard snowflake; Studio G silver ink; Bazzill cardstock. Other: ribbons, Michaels; Paper Reflections tags; Marvy snowflake punch; Mason jars & candlesticks, Dollar Tree; snowflake placemat, thrift store; snowflake cupcake toppers, Party City; letter blocks, Pottery Barn Kids.

11/14/2011

Pumpkin Tea Shower

On Saturday my playgroup moms had a shower for our friend Allison who is expecting her second son in mid-December. We really enjoy tea time (Tea & Trucks Baby Shower and Afternoon Tea) and with a small party of 7, decided that an afternoon tea at the Washington Duke Inn in Durham was the perfect setting. Afternoon tea there is elegant on its own, but this was a party so we added a few little fall details with a pumpkin theme.


The place settings were little pumpkins painted in glittery blue spray paint topped with ribbons (credit to Stacey for this incredible idea and making them reality!). Each also had a small tag attached with a ribbon. The tags initially marked each seat but then were used to mark our tea pots so we could easily tell which tea was which.


The seat of honor was designated with balloons.


Alicia worked her magic again and made a spectacular diaper cake that functioned as the table centerpiece as well as a wonderful gift.


The favors were cookies with little pumpkins on them of course! (Lauren is a whiz in the kitchen!)


Finally, the invite. Ok, confession, I only made one and it was strictly made as a keepsake for the little guy's baby album. We're all very much looking forward to meeting him in just a few short weeks! :)


Supplies- Invite : Recollections white cardstock; Script MT Bold font; Micron pens; watercolors; Die Cuts with a View patterned paper.

9/15/2011

Handprint Crab

When packing for our beach trip, I made sure to toss in a few crafty supplies. One of my plans was to help Dylan create a handprint crab as a souvenir. It turned out to be a great family activity one afternoon when he was wearing down from the sun & water. Trent, Dylan & I returned to the house ahead of the others to make the crab:


Afterwards, we handed him a fresh sheet of paper, the brush and a small plate with additional paints on it so he could make his own masterpiece. The simple fun of painting was exactly the calm, relaxing activity he needed. :)

Supplies: watercolor paper; acrylic paint; googly eyes; glue dots; Micron black pen.

9/05/2011

Canvas Quote Art

I had a canvas stored in Dylan's closet that I bought several years ago. I had big plans that never materialized until a few weeks ago when a new idea came to mind and I created this for his room using a quote from Dr. Seuss:


It was so simple to do. Here's how to create your own ...
  • Canvas
  • Assorted letter stickers - mine were by American Crafts & Making Memories
  • Paints - white for letters and spray paint for main color
  • Useful tools - pencil, ruler, painter's tape, xacto knife

Paint the canvas in white (or whatever color you want the text to be). I used some white semi-gloss paint left from our Cat Drawer project and actually rolled it onto the canvas. Let dry completely.

Lightly sketch lines with pencil to help align your letters. I started at the bottom knowing I wanted the quote to be in the lower right of the canvas and used painter's tape to mark the base line. This gave me an easy point to measure off of for the rest of the lines which were at 2" spacing. Place your letters.


I literally just dug into my stash of stickers for this project and used a whole mix of styles & sizes.


Spray paint over entire canvas in color of choice. I used Periwinkle by Krylon. Let dry. Check per manufacturer's instructions as to when a second coat can be applied and do so if needed.


After canvas is completely dry (I waited until the next morning just to be sure!), carefully peel off the stickers. Some of mine were coming up on their own. For those that were more stuck, I used my xacto knife to get under one edge so I could pull them off. Even Dylan got involved in this part. :)


Hang and enjoy your artwork!


My completed canvas is hanging in Dylan's room along with his initial (from Pottery Barn Kids) and a shadow box about his first beach trip last year. The grouping perfectly filled a space that had been empty since we moved him to this room. He was so excited to see it and still points at it & comments. I think he especially likes the canvas since he got to help make it. :)

7/22/2011

Cars Birthday Party

Dylan has definitely had a love for cars (specifically Disney-Pixar Cars) for the last year. I joke my mom started it with the Lightning McQueen walk/ride toy she gave him for his first birthday. Maybe it was the light-up Lightning McQueen shoes Trent picked out for him in December. Or maybe just that boys & cars go hand-in-hand? Regardless the reason, my child loves all things Cars. Thus, it was pretty obvious the theme for his 2nd birthday party should be Cars. :)

In early June I mailed out "save the date" style postcards to his friends. Found the idea here and thought it was too cute. Who doesn't love mail? Dylan gets excited about ours and rarely has a piece addressed to him so I thought his friends might find it fun to get a little something.


For the front, I used an image I found on Flickr. The back had a note from Lightning McQueen stating to save the date of July 16th for Dylan's party.

The following week, I sent out the official invites. I came up with the idea in Photoshop but wanted a bit more depth so the final invites were a hybrid design. I created the background black/white checkered paper and printed it out to 5x7. The section with the info was made in Photoshop and printed on 4x6 photo paper. I used the same Lightning McQueen clip art on the invite & return address labels.


This party was for his playgroup friends & their families so we chose to start at 10am. Early enough to beat the July heat and enjoy the backyard - plus wear out the kids for afternoon naps. ;)

We had box "cars" for the kids to color and "drive" ....


Bean bags to toss into a tire ...


"Car wash" (ie, ball pit) and the climber ...


plus his two toy push mowers (amazing how toddlers love those!), small Cars coloring sheets to color (last minute addition as Dylan wanted to do that waiting for his party to start) and we played a little "Ramone's Body Art" getting temporary tattoos.

For decoration in the yard, I hung the birthday banner & road signs


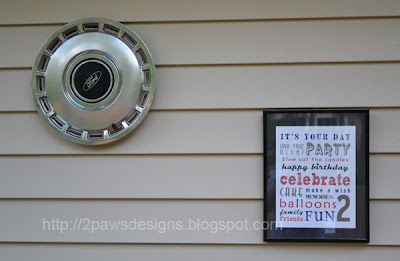
that I made as well as a couple of old records with the centers spray painted silver to look like tires & hubcaps. Against our house, we had a real hubcap and a subway art print I created:


Inside, I set up our kitchen as "Flo's V8 Cafe" and split the food & drinks into two locations. The drinks were at the bar area and I put together this fun display using a plush Lightning McQueen toy, gas pump (idea from Disney Family.com) and can of "Dinoco" oil I made from an empty formula container:


The adults had red party cups and each of the toddlers got their own Take 'n Toss Cars cup to use & take home. Before the party, I printed a label with each name to mark the kids' cups to help keep them straight.


The food area was designated with our "Flo's V8 Cafe" menu. I created the logo in Photoshop using online images as examples. Each of the foods were given a fun name (idea from here). The place setting at the bottom is from Sara Schmutz's Summer Picnic Embellishments. I used glue dots to adhere the menu to a record and set Dylan's little metal Lightning McQueen lunch box in front:


To eat, we had Perdue Chicken Nuggets (in Cars shapes, of course!), cheese cubes, and Chicken Minis & Fresh Fruit from Chick-fil-a:


Followed by "Piston Cup-cakes" for dessert (oh yes, I had to go that cheesy! LOL). I made the cupcakes myself and used Cars baking cups & Fun Pix by Wilton.


For cake time, we had the 6 toddlers seated at a small picnic table in the backyard. I have to say, I've never been more impressed! As badly as they all wanted the cupcakes throughout the morning, they sat so nicely and just looked while we sang happy birthday and Dylan blew out the candles.

On their way out, each of Dylan's friends grabbed a party favor bag:


The favors were wrapped in brown sandwich bags and sealed with labels I created in Photoshop. I used the same checkered flag border I made for the invitations. Each had a child's name on it followed by a thank you from Dylan. Inside was a pullback Cars toy from the Disney Store, coloring sheets and a small bag of M&M's.

It wasn't until the party was winding down that I thought to get someone to take a family photo (I was enjoying the fun too much!) ...


Dylan had a great time despite his lack of a smile here. He was tired & a bit displeased we pulled him away from the fun for a moment to take a photo. It was all we could do to get him to look at the camera. ;) His shirt was my final party "decoration." I followed this tutorial and finished it off with a fun red zig-zig stitch around the edges using my sewing machine.