Showing posts with label home. Show all posts

8/27/2014

Baby Girl Nursery Ideas

The weeks are starting to fly by and we're beginning to put together the nursery for Baby Girl.


Same as when Dylan was an infant, the nursery and guest room will be combined. We have the space in our new house to split them up, but there were a few times when he was little when I really appreciated having a full size bed in the same room. The guest room is larger than our other remaining bedroom and also quieter & darker.

Having an existing room to build off of gave me the inspiration for the colors. The comforter on the guest bed is navy blue. The dresser is one I found on Craigslist a year ago and painted yellow. I've recently acquired a changing table also from Craigslist and painted it the same yellow. Adding navy and coral elements such as the new fabric for the crib bedding to help tie it all together.

I'll share more photos as we make progress. Hoping to start sewing the bedding and new crib rail teething cover this weekend.

8/22/2014

Sports Themed Bedroom

When it was time to move Dylan from his toddler bed to a twin bed, I knew it was time for a change from the zoo themed nursery decor of the toddler room to something a little bit more grown up. I wanted to create a room that would grow with him. Lucky for me, he actually helped make the decision when he picked out a fun metal wall art of a baseball player. That was the start recreating his bedroom with a sports theme.


Some of the details have remained from his rooms in both this house and our previous house. The triptych over his bed, for example - he still likes all three elements and now regularly asks me to read the Dr Seuss quote to him (find the canvas quote art tutorial here).

Kermit the Frog and Scout were also "friends" before the transition (as well as Seahorse who was on vacation with him when I took these photos). We added a plush soccer ball to help pull in the theme on the bed with the new striped quilt & pillow sham.


On the opposite side of the room from his bed, is his dresser, larger toy & plush toy storage (beneath table) and a shelf of sports memorabilia.  I had fun pulling together a few items we owned plus a few extras to create this mix. We also purchased on a whim the fun basketball goal wastebasket to use for a hamper (perfect size for his small clothes). When he gets older, we can actually use it for intended use.


Sources:
Home Goods: Quilt & pillow sham; Ikea: plush soccer ball; Pottery Barn Kids: letter 'D'; Overstock.com: curtains; Target: curtain rods (Umbra), bed skirt, plastic bin with wheels, & monkey bean bag; World Market: bookcase; Hobby Lobby: metal wall art baseball player; BJ's Wholesale: basketball goal hamper (waste basket); Land of Nod: red shelf; The Container Store: acrylic canister for baseballs; Carolina Hurricanes: foam finger; Durham Bulls: Section 120 sign & Durham Bulls hat sculpture; Autographed baseballs - single a gift; grouping in jar were signatures I got at Richmond Braves games growing up; Consignment sale: light; Thrift store: small table, trophy (repainted); Gift: ceramic baseball piggy bank; Canvas wall art: DIY project. Tutorial here.

6/27/2014

Small Coat Closet Makeover

We're fortunate to have two coat closets in our house. The larger one is at the back of the foyer by the kitchen and isn't as convenient, but works best size wise for our coats. The smaller is near the garage and laundry room, but is too small to hold all our coats and, honestly, has become a disastrous catchall since we moved in. Until this past weekend. While Dylan was off having fun with grandparents, Trent & I tackled several projects around the house including a full makeover on the small coat closet.

Small Coat Closet Makeover for under $60

Rewinding to last week, here's what the small coat closet looked like:


See what I mean? Disastrous is the correct term. I had made little attempts since we moved in in September 2012, but mostly it was just a dumping ground where the door could close and we could almost forget it. "Almost" in that the shoe boxes on the top shelf hold my work shoes so I literally open this closet at least 5 days a week. No forgetting there was a mess in there.

We started by emptying everything out. I quickly got rid of anything we no longer needed such as some random empty shoe boxes. Then sorted and listed what I wanted to keep/organize. Next I measured the closet and, as with most of our bigger projects, sketched a plan so we could determine how it would all lay out and how much wood we would have to buy.


I knew I wanted one shelf higher. This would be a spot for something that we needed to store, but didn't need often as I have to use the step ladder to reach it. Turns out to be the perfect spot for the cat carrier. We keep this in the house vs the garage because, well, spiders. Eww. And having been through cat emergencies, I like it easily accessible and clean just in case. The step ladder is "next door" in the laundry room so it's not a ton of effort for me to retrieve the carrier.

The existing shelf I decided to keep for my work shoes - it's nice and convenient to quickly grab the pair I want before heading out the door. We had a couple of existing boxes that fit well in the leftover space so we can easily store other items we need but want out of "kid reach" - i.e., ponchos, shoe polishing supplies, etc.


Below this in the middle of the closet, I created an area for our pool/beach bags and towels as well as our yoga mats. I added a hook to hang the pool bag we use the least often. This left enough space below for our extra beach towels. The taupe bag is our "go to" pool bag and constantly packed with sunscreen, fresh towels and our pool key so we're ready to grab and go.


Toward the front, I added a hook on each side. One for Dylan's backpack and one to hang Baby Girl's backpack eventually (for now I'll probably use it for the diaper bag). I made sure to hit a stud for both of these hooks as, obviously, kids are tough on such things.

At the bottom we added two shelves. The upper holds the pool stuff mentioned above. The lower shelf holds two baskets. One for each child to contain their hats and gloves.


Finally, at the very bottom we added a large laundry basket to contain extra shoes. I store my own sneakers here. When searching online and in stores, I found a number of suitable options, but honestly, the price and durability of a laundry basket can't be beat. (The Target bag to the left is temporary - school supplies for Dylan's first day of kindergarten in less than 2 weeks. Eek!)

Best of all, the floor is now clear and there is still some space left in this closet. I almost don't want to put the door back on. Almost. It is nice to know there is a beautiful, organized space hiding there now.

Cost breakdown: approximately $60
- wood for new shelving $37
- paint (already owned)
- nails (already owned)
- 4 robe hooks (only used 3 so far) $6
- 2 black plastic containers $8 (50% off clearance find)
- laundry basket $8

5/26/2014

Hall Bath Makeover

Early nesting? Perhaps. We've been slowly working through various DIY projects around this house since we purchased it in September 2012. Now with the baby on the way and my belly growing, we're kicking it into high gear and trying to knock out a few more things from our lengthy wish list before the fall.

Over the weekend we added fresh mulch to the front flower beds, mowed, replaced the exterior light at the deck, and gave the hall bathroom upstairs a much needed makeover.


As with other rooms in this house, the hall bathroom was functional. The walls had been painted prior to us purchasing in Sherwin Williams 'Kilim Beige'. It's a nice neutral, but a bit dark for the bathroom and, with a flat finish, every bit of splashed water and soap was leaving stains - similar to our half bath downstairs. The only changes we had made in here prior to this past weekend were replacing the shower head, necessary repairs to the toilet including replacing the seat, and installing a curved shower rod bar.

Here's a quick look at the before taken with my iPhone literally as we began clearing the room on Saturday in preparation for painting. Okay, but certainly nothing fancy.


As we are still using the shower curtain and towels from our old house, I decided to use a similar color I had painted there and liked. I just went a shade darker this time. It's Benjamin Moore 'Spring Blossom'. A fresh, light green color.

Dylan helped me and managed to paint everything within his reach. Even climbing our 2-step step ladder (with me behind him) to reach a little higher.


Next we removed the old makeup style light fixture and replaced it with a new 4 bulb fixture. Prettier and, honestly, I think it provides better lighting. Certainly not as harsh as those makeup bulbs.


We also removed the old towel bar (something else that I never liked when we bought this house) and replaced it with a new, more stylish option times 2. It's always nice to have extra room to hang towels when we have company so we bought two 24-inch long towel rods and stacked them near the tub/shower for easy reach. My mom has done this in 2 bathrooms in her house and I knew it was an idea I wanted to copy. She even provided me with the heights (67" and 37-1/2" above the floor).

The entire process took time on both Saturday and Sunday, but was completely worth it. Even Dylan commented to me how nice it looked now. A quick side-by-side comparison look back and it's pretty obvious the drastic difference those small changes made.


Eventually we will replace the faucets (for now they work so no reason to), update the toilet paper holder & hand towel ring to match the new towel bars, and I would like to frame out the mirror with trim or possibly replace. So expect future updates. It'll probably just be a while. We have other projects needing attention including the kitchen. Remember that one? We haven't forgotten. It's just taking time, but it looks like we finally chose a granite color so progress on that soon!

Cost breakdown: about $150
1 gallon Behr Ultra, color match Benjamin Moore 'Spring Blossom', eggshell finish $27 (after $5 rebate)
Hampton Bay 4-Light Vanity model #705207 $60
Round plastic electrical box (for light install) $2
2 Delta 24-inch Windmere towel bars $53

5/14/2014

Master Closet DIY Shelving

Our master closet has needed a little work from day 1. Overall, it was in good condition. Larger than that in our previous house. Plenty of hanging space, but only one skinny shelving unit. Next to the shelving, behind the door, was a leftover dead space with only a tie rack. We've discussed adding shelving here and finally, Trent got us started 2 weekends ago.


He took measurements and cleared the space. Then we headed to Lowe's to purchase 1x12 utility shelving boards.


Trent constructed the shelving in our garage. Dylan and I grabbed rollers and painted it glossy white to match the existing shelving. Our DIY house projects are truly family affairs.


Finally, Trent put it in place in our master closet while I completed the paint - painting the wall behind in white and touching up the shelving.


I took photos while I was still waiting on the paint to dry completely. All but 2 shelves currently have clothing or toiletries on it. We're planning to store some linens for our room as well since, strangely enough, this house does not have a linen closet. Oh and we still need to rehang the door. It was easier to install with the door off as well as load the shelves while we decided what we wanted where.

Overall, I'm thrilled. It's simple, but Trent did a great job of matching the existing shelving. It's very functional. So nice to have this extra storage space! And to check one more "to do" off that long list.

Cost: under $60

2/19/2014

Wordless Wednesday: Snow Jabba


Linking up to Wordless Wednesday

1/20/2014

DIY Roman Shades from Mini Blinds

I mentioned in my currently post last week that new yellow towels had me thinking about paint and fabric possibilities for our master bathroom.


I've been leaning toward gray walls with a white/gray/yellow print fabric for the curtains. There are two windows. One over the tub in the main bathroom area and a smaller one in the toilet room. When we moved in, both had mini blinds. Ok. Sufficient. But blah. I kept thinking back to an idea I pinned a while ago about making roman shades using mini blinds. I ended up following a tutorial by Craft, Interrupted that I found more recently.


I originally searched online for fabric and found a print I liked. Then I calculated up how much I would need for the two windows - 3 yards. About $35. Reasonable, but I thought there had to be a way to do it for a little less. Then I remembered another Pinterest idea I had used in our home before - repurposing tablecloths from Target for curtains. Perfect. At about $16, I would have plenty of fabric from one tablecloth to make the two roman shades.

I found a tablecloth online that I liked and headed to Target to buy it. Then I actually saw it and stopped dead in my tracks. The colors just weren't working for me. What I thought was white/gray/yellow was white/gray/yellow and beige. It was a larger print and just … well, just felt wrong.

I reassessed. I looked at every tablecloth. No.  

I wandered down the aisle of curtains. No. 

I considered looking at the sheet sets. I did make curtains years ago from flat twin sheets that we used in both an apartment and our last house. But, again - no.

I found myself in the shower curtain aisle and suddenly I found options. 3 different designs (including one that was remarkably similar to that original tablecloth but in the right colors). I ended up choosing a pretty, silky feeling, white/gray/yellow paisley print. On sale for $18 it more than fit the budget.  And when I came home and compared it to our new "Mum" towels from JC Penney? The yellows were almost a perfect match. Yes.


At 72"x72" one shower curtain was had more than enough fabric for the two shades. I cut both out on Saturday night and yesterday completed the shade for over the toilet. The smaller of the two, I thought it would be best to start with. Honestly, the project went pretty quickly. The most time consuming part was being patient while waiting for the fabric glue to dry.


I plan to make the second shade next weekend. It should go together even quicker now that I know the basic steps and won't need to stop and reread through them multiple times.


Overall, I'm very pleased with how the shade turned out. From the ugly mini blinds to this beautiful custom shade - our master bath is looking all grown up (just wait until we get paint on the walls! Crazy ;) ). Also, this is the second time I've made a roman shade. The first was one I made for our kitchen in our last house using a pattern I saw online so long ago I've lost it. This particular idea was easier, faster and looks better.


Cost: $18.29 for shower curtain

12/30/2013

Kitchen: Pots and Pans Organizer

We have a reasonably long "to do" list for the kitchen in our house. Nothing overly pressing. Mostly wants. One of which was conquered over the weekend thanks to a Christmas gift.


The pots and pans cabinet has always been a frustration. Even in our last house. Pots stacked inside one another would get stuck and scratched up so we tried to stack larger on top of small which made an odd tower. Our pans and lids were also stacked as well. We were forever knocking some over or having to pull most out to reach the single item we wanted without sending others flying. Seriously, first world problems here, but something we could change.

After searching online for options, I came upon the Rev-A-Shelf 2 Tier Metal Pull Out Basket at Lowes. Yesterday, the boys installed it (ok, technically Trent did the majority, but he did get a little assistance from Dylan).


Before the new organizer could be installed, they had to literally break out the shelf in the back of the cabinet. We had to do the same thing in our last house when we installed a set of tray dividers in a base cabinet for pan storage. This time we had an assistant that fit perfectly in the cabinet and wanted to help put out the remaining staples.


The main installation and organization were completed by Trent while the rest of us were at the mall for a couple of hours. And when we came home? We found this:


Just looking at it makes me happy. No more awkwardly stacked pots and pans to rummage through when cooking. And, no more worrying about pots getting stuck inside one another and getting scratched up. Now we can easily access any single piece.

Cost: free - Christmas gift (thanks, Mom & Charles!) but to purchase your own, budget for about $125. We actually had been talking of buying it ourselves soon. It seemed a worthwhile cost to save our sanity and keep from further damaging (and needing to then replace) our cookware.

11/06/2013

Laundry Room Reveal

One of the first rooms we started redoing in the foreclosure house was the laundry room. Yes, the laundry room. I know, it seems odd but when you figure how much time you spend in there plus it's a relatively small room (thus "easy" project to tackle), it made sense.


We actually started in February and while I've shared glimpses on Instagram, I'm just now sharing the full photos here. All because I was trying to make it a tad prettier before I got around to nice photos.

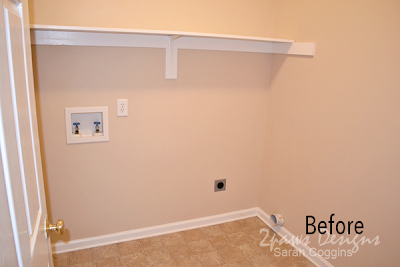
To appreciate how far the room has come, here is a before picture taken during one of our visits the month prior to buying:


Not bad. But rather bland.

First step was painting. I knew I wanted to brighten the room up and had a quart of light yellow paint on hand so I started with that painting the upper third of the room.


I hung beadboard wallpaper on the lower two thirds. (Note: we had some leftover from the cat drawer project at our old house - the adhesive was no longer good. My advice, buy what you need. Use it. Then toss any leftover. I wasted a lot of time hanging old paper that fell off a short time later and then had to start all over.) And we replaced a cracked outlet we discovered when I removed the faceplate during wallpapering.


Then Trent helped me cut 1x boards and nail them to the walls to extend the original trim around the entire room. This makes a nice separation between the paint and wallpaper.

Along the wall with the door, we added 3 hooks. I can't say enough about how glad I am we did this. We use these hooks constantly.


Because I still have my "no wasted space" mantra from our last house, I even put to use the space behind the door. This is where we store our lint trap cleaner, mop, broom & dustpan.


Not really fancy stuff but necessary and neat, tidy & unseen in this location. Plus easily accessible when needed.

Finally, I have been "prettying up" the shelf. As it is an open shelf, all the clutter of stuff tossed up there was making me a little crazy when I walked in the room. With a little reorganizing, clearing of stuff that didn't belong (box of cables? Not really necessary in the laundry room), and addition of two new baskets - the shelf is orderly and the room feels far more peaceful when you enter.


That's the full completion of the first phase of the laundry room. Yes, I have plans to further alter this room like adding a sink. But that's for another day. One project at a time.

Sources: Lowes - 1x trim boards, Style Selections Beadboard Paintable Wallpaper, Olympic white semi-gloss paint; Home Depot - Glidden Soft Candlelight eggshell paint; Target - Threshold Heavy Coat and Hat Hooks, ClosetMaid fabric bins; Marshalls and HomeGoods - baskets ; large blue mason jar thrifted; Container Store - Mom & Broom Organizer.

10/07/2013

The Front Door

Hello, gorgeous! 

Our freshly painted front door and steps lined with pumpkin mums.
It's taken a year, but finally I can think that every time I see our front door. You see, the door to the foreclosure house when we first saw it was white. Simple, functional and fine. After living with a black door for the previous 9 and a half years (HOA rules in our old neighborhood said door & shutter colors must match), I was happy for any change.

Then it rained. And the paint began to bubble and chip. Repeat multiple times throughout the months to mid summer. It was not pretty. Our best guess - whoever last painted the door used the wrong paint and thus with each rain the front door looked worse and worse.

In July, we had the entire house powerwashed. I left specific instructions to the company doing it to hit the front door and hit it hard. When we arrived home, I literally laughed out loud as I saw the disaster left behind. The bubbled paint job was almost completely gone revealing some white primer (?) and streaks of the original black beneath.

Paint chip (color at top) against the brick & siding of our home.
[Tip: try this at several times during the day to see the variations due to lighting.]
Then we waited. July is just too hot & humid in North Carolina for outdoor painting. As fall approached with cooler days, I began to get the urge to complete this project. I had a few ideas of what color I wanted - something in a blue gray tone. While surfing Pinterest, I found the perfect example from PlyGem here. The third color swatch from the bottom was exactly what I was thinking. The brick and siding colors in the swatch were similar to our home and the accent color - a blue gray. My mind was made up. Off to Lowe's we went and I quickly selected a shade from Valspar and had a quart of semi-gloss exterior paint mixed: Prussian Cadet.

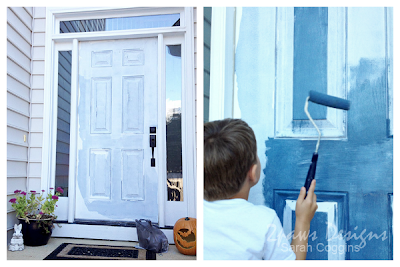
The "lovely" streaky door before on the left and my little assistant helping paint.
It took a few hours, slowly adding a coat, letting it dry and adding another coat. Repeat. Repeat. Enjoy.

Admittedly, we all did a double take our first few days returning home. It's a fun little pop of color and so much more cheery than before. Even one of our neighbors has come over and said how much she likes it. Hopefully they all do. We're certainly happy to now have a beautiful, welcoming front door. Another project complete.

Our freshly painted blue door decked out with our $3 fall wreath.

Cost: $12.98 + tax

9/25/2013

Foreclosure to Home: Year One Update

This week we mark one year since became owners of our second home. We bought it knowing it was a foreclosure, knowing it would take some work, but also seeing the potential. Admittedly there are moments when I feel like we aren't making any progress. But we are. Tiny, baby steps at times, but progress nonetheless. Here's a brief look at changes that have occurred in the last 12 months and are helping us turn our foreclosure into home.

Exterior - cleaning up of existing landscaping including removal of an overgrown ornamental tree and an evergreen shrub too close to the garage; planting of 2 new shrubs on northeast side of house and flowers around the mailbox; hired a local company to replace the entire HVAC system; mulched around playset, planted catsmint and added sandbox complete with lid/benches; hired a local company to fix the front porch slab that had settled toward the house; hired a local company to power wash entire house and clean gutters; placed new vapor barrier in crawl space.


Garage - added storage throughout with additional shelf, rearrangement of existing peg board and addition of Gladiator system; added hardware to the garage door.

Kitchen - replacement of moldy fridge, rusting dishwasher and sink faucet; repaired broken oven door handle; caulked around vinyl flooring.

Family room - hung curtains; fixed squeaky ceiling fan.

Playroom - decorated including new furniture (Ikea Expedit to house all those toys & games!), new light fixture, new floor rug (clearance find at Target just before we moved), "new to us" train table (consignment score), and DIY framed mirror and ruler growth chart. See the full room details here


Half bath - replaced toilet tank parts and bolts; complete revamp from spray painting old hardware, mirror & light fixture to painting the walls and hanging new DIY shelves. See full before & after here

Laundry room - painted and added beadboard wallpaper plus new wood trim & hooks. See full before & after here

Master bath - replaced toilet tank parts and bolts; replaced shower head; shower caulk stripped out and replaced (the company the bank hired caulked over the old moldy caulk - oh the mess! ugh); replaced hardware and faucets.


Hall bath - replaced toilet tank parts and bolts (see a trend here? Trent did all 3 within hours of us owning the house. So grateful for a handy husband!); replaced shower head; added a robe hook to the door.

Dylan's room - installed curtain rods and hung new curtains; replaced existing light fixture with new ceiling fan/light fixture combo. Started out with toddler furniture & decor from our old house and has changed into the "big boy" room.

Guest room - hung curtains (the only set we brought from our last house); replaced existing light fixture with new ceiling fan/light fixture combo (used same fixture we put in Dylan's room), and upcycled a Craigslist dresser into a new beautiful yellow dresser.

Craft room - hung Pottery Barn wallboards & shelves on wall, moved in the storage cubes (they were temporarily in guest room until we got the dresser), and am still sorting & organizing. It's the "catch all" still housing the few boxes we haven't unpacked.

Other ... replaced smoke detectors on both floors with new smoke/carbon monoxide detectors; repaired/replaced a number of outlets, outlet plates and screws (handy tip here - did you know you can buy packs of just the screws?).

The entire process has been a full family affair - even Dylan has been involved ...


Some days it feels like we've barely scratched the surface, but looking at this list it's clear we've come a long way in the last 12 months. Can't wait to see what progress we make in the next 12!

9/23/2013

Pumpkin Mums

Fall is my favorite season. And yesterday, I started decorating my house. One of the first things I did last year was add mums up the steps to the front door. Having just moved and with a lot on my plate, I literally just plopped the flowers (thin plastic 'pot' and all) onto the steps and called it done. This year, I'm making a little more effort.


While I could (and probably should for year round decorating) invest in a few nice pots to line the steps, I decided to take a fall twist and use pumpkins for pots. Fake pumpkins. I don't trust real ones to hold up all season and we've had great luck with a carved fake pumpkin for years. It still looks great. So now I'm testing how well they survive the elements + a live flowering plant.

How to make your own? Easy! All you need are 5 supplies - fake pumpkin, mum plant, marker, knife & a drill.

Supplies for faux Pumpkin Mums

Start by marking the top of your pumpkin for where you will cut. I just held the plant over and loosely traced with an orange Sharpie. My thought was the orange would blend in better if the lines ended up showing a bit. Instead, my initial hole was a bit too small so I just kept trimming out slowly until the plant just barely slid in. I wanted a snug fit.

Mark an outline of the pot for cutting.

Then (no pictures of this step) I used our drill to make a couple of small holes in the bottom to allow for drainage.

Add the flowers to the faux pumpkin, place and enjoy!

Can you spy why there isn't a wreath on my front door yet? Next project - new paint!
I bought my pumpkins on sale at Michaels and my mums on clearance at Lowes so the entire project cost me under $25 for 3 Pumpkin Mums. I'll update later in the season with how they are holding up. Hopefully, I'll be able to refill these same pumpkins year after year.

Happy Fall!

For more fake (faux?) pumpkin ideas ... our carved Bat pumpkin we've been using since 2006 and Mr Potato Head Pirate Pumpkin.

8/07/2013

Updating the Garage Door

Knocking items off our "to do" list - the latest was updating the garage door. It's a big, blank white rectangle of blah. Before we even closed on the house I knew I eventually wanted a garage door with windows, hardware and a nice white arbor above. The simplest and cheapest of those items was to add hardware.


I had done some quick searching online and expected to pay around $20. An easy & inexpensive way to update the garage door. Imagine my thrill when we were browsing at Home Depot and found a display of garage door hardware on clearance for $3.50! Needless to say, a package went straight into our cart.

As all projects around this house seem to be, this too was a family affair. I marked the holes, Trent drilled the holes, I screwed on the pieces and Dylan helped supervise. It took us maybe 15 minutes? So add "quick" to that "easy & inexpensive" update.


Eventually, we would like to replace the door with a nicer decorative one (and get those windows I want!). But for now this one functions fine and looks much nicer with it's new hardware. Another step toward making this foreclosure our home.