Showing posts with label holiday decor. Show all posts

5/22/2012

Handprint Flag Plaque

Dylan & I made this plaque last year just before July 4th but it seemed fitting to share now a few days before Memorial Day. With Memorial Day, Flag Day (June 14th) and July 4th - it will be hanging on our wall for the next few months!


The handprint, stripes and blue canton were all done with paint. The stars were stamped on. Then I sketched the flag outline using a Sharpie marker and added the words with rub-on letters from my stash. Finally, I sealed it using Mod Podge and added a picture hanger to the back.

Supplies: wooden plaque; acrylic paint; brushes; star stamp; Stampin' Up! Whisper White ink pad; black Sharpie marker; Making Memories rub-ons; Mod Podge; picture hanger.

4/03/2012

Easter Bunny Plaque

Last year, Dylan & I made this cute bunny plaque to hang up at Easter:


Instead of painting his entire hand, I painted just the palm and the pointer & ring fingers to create the head and ears. After the print dried, I painted his thumb in pink and helped him place it for the nose. The eyes and whiskers I painted using a small brush. Finally, I finished the plaque with Mod Podge and a picture hanger on the back.

Supplies: wooden plaque; acrylic paint; brushes; Mod Podge; picture hanger.

3/01/2012

Shamrock Handprint Plaque

It's true, we have a handprint or footprint plaque for almost every holiday now. I love pulling them out to decorate with and Dylan gets so excited seeing them! Our Shamrock plaque we made last year the day before St. Patrick's day.


I started with a square wooden plaque that I painted white. After the paint dried, I very lightly sketched outline of the shamrock leaves in pencil. Then, with Trent's help, we slowly painted Dylan's hands and made the prints - two with each hand. I painted the stem and set it aside. Once the green paint was dry, I used a Sharpie marker to carefully outline the leaves I had sketched earlier as well as the stem. This gave the design the 'pop' it needed and helped define the shamrock. I completed the plaque by sealing it with a coat of Mod Podge and adding a picture hanger to the back. Also, as with all the plaques, I noted on the back the date and Dylan's age.

Supplies: wooden plaque; acrylic paints; brushes; Sharpie marker; Mod Podge; picture hanger.

12/07/2011

Christmas Lights

We've had a pretty typical North Carolina late fall here - cold enough for a coat, hat & gloves one day and warm enough for short sleeves the next. Yesterday fell into the latter category. Dylan & I spent a good bit of time outdoors enjoying the warm 70 degree temps and sun in the afternoon. After dinner, all 3 of us did my favorite thing on a warm December evening - took a walk to look a Christmas lights. To me it's so much more relaxing and enjoyable than driving. Dylan loved every moment, he kept exclaiming, "more lights! More lights!"

Here are two of my favorite SOOC (well, minus cropping) shots from our walk ...


Did you spot the airplane in the first one? Loving the cross one neighbor put in their yard. It looks especially gorgeous lit up at night casting a large shadow on the house behind it.

2/02/2011

Handprint Heart

I mentioned in Monday's Shoot and Edit post that we pulled out the paints over the weekend to create more handprint art.  I confess, I still had Dylan's Christmas Tree plaque hanging so it was definitely time for a change.  I found a wooden heart plaque at Michael's and painted it white.  Then with Trent's help holding whichever hand we were painting, I put red paint on Dylan's hand and then helped him place it on the plaque. 


After the paint had dried.  I sealed it with Mod Podge just like our other plaques and added a picture hanger to the back.

Supplies: wooden plaque; acrylic paints; brushes; Mod Podge; picture hanger.

12/17/2010

Christmas Decor

A few of my favorite Christmas decorations in our home this year ...

Dylan's Advent Calendar, a gift from my mother & stepfather last year.  Love that we can reuse this each year and talk to him about the real meaning behind Christmas.  He has such fun putting up each piece (which explains why Joseph is hanging out in the middle of the grass versus in the stable) but doesn't quite understand the "one per day" thing right now.  So there is a lot of signing "more" while repeating "mo, mo."  Totally adorable. :)


Our new wreath card holder.  We don't have a lot of horizontal space to display cards (especially when we are trying to keep them out of little hands) and I have been wanting something like this for years, but not willing to pay the listed price.  Luckily, a few weeks ago when shopping at Michael's, I came across this one marked down to $9.99 and it looks great even without cards over my new green cabinet.


On our buffet, I reworked an existing glass dish.  It originally held 5 short candles along with a few decorative glass balls.  I removed the candles and refilled with pine cones Dylan and I collected from our yard.  Then returned the glass balls for a little "bling."


Accompanying it is a framed copy of our playgroup's photo with Santa.  It was a gift from Stacey to all of us moms.  She found the instructions online (here's the tutorial - Craftily Ever After: 'Christmas Present' Frame) for taking a simple wooden frame and decorating it using paint, wrapping paper, mod podge and a festive bow.  So pretty!

What are your favorite decorations?

12/13/2010

Christmas Tree Plaque

Last week, Dylan and I got together with friends to make our Christmas plaque.  I had searched online for ideas of what to do and settled on a simple straightforward design - a single handprint tree:


The downside to this design - Dylan wanted to do more than just put one handprint on it!  My boy loves to paint now.  Thankfully, my friend Stacey, smartly kept some extra plaques we let the boys freestyle paint on after their making their Turkeys last month.  With those plus dry, clean brushes, both boys sat on the floor and "painted" to their hearts content.


She even put cardboard under them to "protect" the floor from their imaginary paint.  So stinkin' cute!  They won't fall for this trick too much longer, but it worked to get us through this round of plaques.  While the boys worked on their masterpieces, we moms could add the finishing details to our projects.

Supplies: wooden plaque; acrylic paints; brushes; Mod Podge; picture hanger.

12/07/2010

Handprint Santa

I love getting crafty with my little guy and last year, I dared to pull out the paints with a 5 month old to do so.  Thanks to help from the high chair ;)  I managed to paint his right hand white and help him make a handprint onto red cardstock.  Once it was dry, I began the process of turning it into Santa using a variety of supplies from my scrapbooking stash.

The end result:

I then scanned it in and resized to approximately 3" x 4".  I printed the smaller images onto photo paper and used the laminate/magnet cartridge in my Xyron to create magnets.  Each of the grandparents received one as part of their Christmas gift.

Supplies: acrylic paint; red & white cardstock; Provo Craft & We R Memory Keepers patterned papers; black stamp ink; Making Memories snaps; Stickles; black marker; buttons.

11/15/2010

Handprint Turkey

Since our ghost footprint plaque was so much fun to make but had to be packed up until next fall, Dylan & I got together with some friends, and pulled out the paints again to make a new plaque to hang in it's place.  Ready to give the house a festive look for Thanksgiving is our Handprint Turkey:


Isn't he adorable? My favorite part is how excited Dylan gets about it.  If you ask him where his turkey handprint is, he'll point directly at it and babble excitedly. Sometimes a few claps are thrown in too.  :)  Adorable.

On the back, is a cute little poem we found on the internet (not exactly sure where credit is due since I found it in multiple searches)


We altered it slightly (changing "It comes with" to "It's made with"), printed it onto cardstock, handwrote each boy's name, date & age and adhered using mod podge.

Supplies: wooden plaque (6-3/4" diameter); acrylic paints; paint brushes; coordinating ribbon; staple gun; white cardstock; Mod Podge.

10/28/2010

Ghost Footprint

Our playgroup has two craft projects lined up for today.  One of which is making this adorable Ghost Footprint plaque (inspired by Becky's Ghostly Handprints post on The Crafting Chicks blog):


Dylan & I went ahead and completed his so we could help show the group what to do.  It's a lot of fun, very easy and inexpensive. 

Supplies
  • 5x7 wooden plaque (or similar sized canvas ... needs to be large enough to fit your child's footprint)
  • black & white acrylic paint 
  • paint brushes and a cotton swab
  • sandpaper
  • Mod Podge
  • orange ribbon
  • beading wire (or similar to help create the hanger)
  • staple gun


Start by painting the plaque black.  Let it dry completely.  If desired, sand the edges a bit to give a more distressed look.  Apply white paint to the bottom of your child's foot (note: I had Dylan strapped into his highchair and a wet paper towel ready so he didn't leave white footprints all over the house!) and press foot to the plaque.  Set the plaque aside to dry and wipe the foot clean.  Once the footprint has dried, use a cotton swab and black paint to add the dots for the eyes and mouth.  After these have dried, apply Mod Podge to seal.


While waiting for the Mod Podge to dry (follow instructions on the bottle), cut a piece of ribbon about 2 feet in length and tie a bow in the middle.  Attach it to the back of the plaque using a staple gun. 


My original plan was to use the ribbon as the hanger, but I didn't like how it looked.  Thus, the addition of the wire.  You can add the two simultaneously if you want.  I found it easy, once the ribbon was in place, to loop the wire through the knot in the center and then staple each end to the plaque.  I then pulled the wire up and twisted it onto itself to finish.


That's it! Now you can hang your completed project on the wall.  Enjoy!

9/23/2010

Welcome, Fall

In honor of the first day of fall yesterday, I went up to our attic and retrieved our fall wreath.  I love hanging it each year as it makes the door look so nice and inviting plus fall is my favorite season.


I made the wreath a few years ago for $3.  Yes, 3 dollars.  I purchased the grapevine wreath, flowers and leaves all from the dollar store.  Then I cut apart the flower/leaf groupings and arranged them on the wreath.  Simple and affordable.

Do you have a wreath on your front door this time of year?

12/19/2007

The Fallen Ornament Mystery

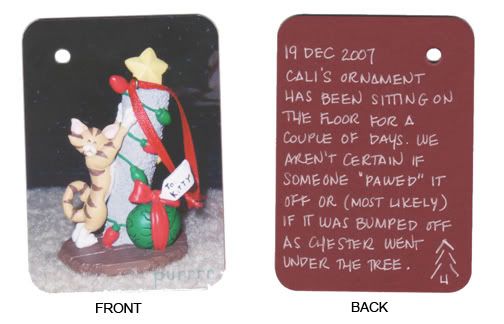
I found inspiration for tonight's card on Toni's blog. She commented about her kittens knocking ornaments off the tree. Fortunately, neither Cali nor Chester have ever paid too much attention to the Christmas trees (well, except for Ches loving to sit under it). When we lived in apartments, we had a 3' tall artificial tree and they'd sniff it out (like all new things) and then go about their usual daily activities. I worried a tad bit the first Christmas in our house what they would do with a real tree. About the same it turns out - sniff it and then move along. This year we did catch Cali sitting on the loveseat armrest pawing at an ornament after we finished decorating it. I figured since she had seen us "playing" with them earlier in the evening, she thought it must be ok.

Since then, they have left the ornaments alone. Well, we think. About 2 days ago we found Cali's ornament on the floor. I intentionally put the less delicate ones down low just in case. Honestly, I don't think they were batting at it. I think Chester bumped it while heading under the tree for a nap. I've witnessed him brushing the lower branches with his back as he heads to his current napping spot. But the truth remains a mystery and the ornament still sits on the floor in front of the tree:Supplies: Daisy Hill rub-on; misc. red cardstock; Uniball Signo white pen.

AddThis Social Bookmark Button

11/14/2007

Halloween Decor at the Magic Kingdom

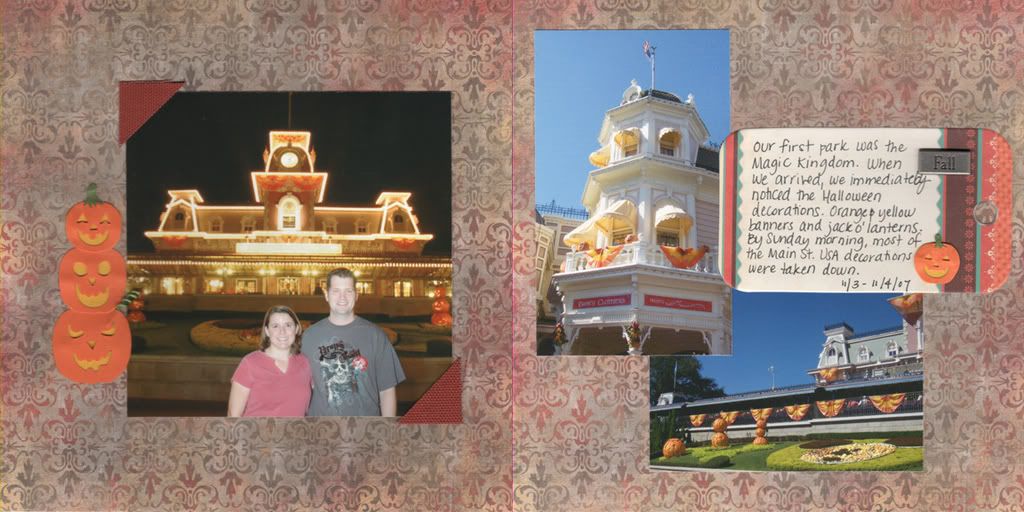
Finally did a traditional scrapbook layout tonight - and 2 pages to boot. ;) You can click on the image below to enlarge it or take a peak at it here. I was inspired by teatimetamera's Disney Challenges at Two Peas. Particularly her latest challenge: Monsters Inc and Halloween Time.

When we arrived in Orlando on November 3rd, we immediately headed to the Magic Kingdom (well, after checking in at our hotel, of course). Halloween decorations greated us from the entrance and continued down Main Street USA. I thankfully stopped for one quick photo of the jack o' lanterns above the street fronts (on 2nd page) before we headed for the rides. By the time we came back down Main Street, it was after dark.


The next morning we arrived at the park shortly after 8 for the Keys to the Kingdom tour. During this time, I noticed that the banners and jack o' lanterns along Main Street had been pulled down. The pumpkin topiaries in front of the Railroad Station and a few window decorations along Main Street were all that remained. In all of the other parks, the Christmas decorations were up!

Supplies: Karen Foster patterned paper; Jolee's pumpkin stickers; K&Co tag; Making Memories tag (I cut into photo corners) and metal "Fall" tag

10/31/2007

Happy Halloween!

If you've come from SITS Girls Blogtober, welcome to a "throwback" post as well as a Throwback Thursday Halloween photo from my childhood circa 1985.


Thought I would share a few fun photos from our Halloween decor. To answer last night's question, water noodles, pvc piping and zip ties plus a few creative costumes make great Halloween mannequins. My husband crafted 3 for our home - pumpkin man, Jason and ninja boy. We had every reaction from the kids and parents - nothing to pure fear. Ninja boy was set up by our door as though he was trick-or-treating. One little girl turned to him to show him what candy she got. :D


Today's 2ps challenge:
Share a Halloween memory you have as a child.

The first memories that came to mind when I saw today's blog challenge were costume related:

The white dress and veil in the photo on the right have stuck in my mind as probably my favorite childhood costume. I remember the cotton material with little eyelets and how fancy I thought it was.

My second recollection is of the plastic costumes my sister & I had in later years. Remember the ones that were a vinylish material - almost like coveralls except they tied in the back behind your neck? And each had a plastic face mask with an elastic band. I can still smell that distinctive odor they had.


10/30/2007

Twas the night before Halloween....

Today's 2ps challenge:
have you carved your pumpkins yet? If so did you take pics to make a layout

We carved our pumpkin last year. Yup, it's a craft pumpkin from Michaels. My husband and I decided it was time for a change from carving up real pumpkins and messing with all the goo. For now, we'll stick with this pumpkin each year.

I did not take any pictures of the carving process. The picture to the left I took tonight. :)


For fun, a little creative question: What do you get from a dozen or so water noodles, pvc piping and zip ties? :) I'll share the answer tomorrow....