Showing posts with label organization. Show all posts

12/30/2013

Kitchen: Pots and Pans Organizer

We have a reasonably long "to do" list for the kitchen in our house. Nothing overly pressing. Mostly wants. One of which was conquered over the weekend thanks to a Christmas gift.


The pots and pans cabinet has always been a frustration. Even in our last house. Pots stacked inside one another would get stuck and scratched up so we tried to stack larger on top of small which made an odd tower. Our pans and lids were also stacked as well. We were forever knocking some over or having to pull most out to reach the single item we wanted without sending others flying. Seriously, first world problems here, but something we could change.

After searching online for options, I came upon the Rev-A-Shelf 2 Tier Metal Pull Out Basket at Lowes. Yesterday, the boys installed it (ok, technically Trent did the majority, but he did get a little assistance from Dylan).


Before the new organizer could be installed, they had to literally break out the shelf in the back of the cabinet. We had to do the same thing in our last house when we installed a set of tray dividers in a base cabinet for pan storage. This time we had an assistant that fit perfectly in the cabinet and wanted to help put out the remaining staples.


The main installation and organization were completed by Trent while the rest of us were at the mall for a couple of hours. And when we came home? We found this:


Just looking at it makes me happy. No more awkwardly stacked pots and pans to rummage through when cooking. And, no more worrying about pots getting stuck inside one another and getting scratched up. Now we can easily access any single piece.

Cost: free - Christmas gift (thanks, Mom & Charles!) but to purchase your own, budget for about $125. We actually had been talking of buying it ourselves soon. It seemed a worthwhile cost to save our sanity and keep from further damaging (and needing to then replace) our cookware.

3/04/2013

Travel Entertainment for Kids

Over the weekend we took a family road trip to Williamsburg, VA. Whether all 3 of us or just Dylan & me, one thing I've long known - traveling with a young child requires entertainment. While he will actually look out the window at the scenery a good bit now, that's never enough. Here are a few of our tried & true ideas for making road trips a success:

Car Toy Bag
I originally kept a couple of toys in the diaper bag for use when out & about. Then I saw Allison's idea of using a fabric storage cube to contain an assortment of toys and books in her backseat. I copied the idea with a small bag, but quickly saw the need to upgrade. I ended up purchasing a medium sized tote from Land's End with a zipper closure. This bag is always in our car and filled with toys and books to entertain whether we're going across town or across the state. It has come in handy for road trips and long waits at a restaurant when crayons & paper aren't enough. Most of the items following are all stored in this bag.


Doodle Board
The smaller size travels well and provides a creative outlet that is clean. Just be aware of leaving it in the car in extreme weather. One of ours was warped beyond repair over the summer when left out in the heat. Perhaps best stored in the diaper bag versus the car bag.

Travel Roadway
I found the idea of creating a travel sized car roadway on Pinterest a while back. The original idea used the top of a shoe box. I didn't have one handy so I used a small cardboard box from canned cat food. I trimmed the edges down to approximately 1" high. Then used a permanent marker to sketch a road, trees, signs and houses. This roadway fits Dylan's lap perfectly and he's driven cars on it for almost a year now. Another plus - by leaving the design black & white (or brown?), he's also been able to color it adding extra fun. It's size has also worked well as a small "desk" space to support small books for coloring.


Fabric Marble Maze
I made half a dozen of these for Dylan and his friends for Christmas 2 years ago. It's small and easy to tote anywhere - purse, diaper bag, etc. Details here.

Coloring
Since he loves to color, we typically have our crayon roll with us when travel. Other fun ideas are Invisible Ink books and, our latest discovery, Crayola Color Wonder markers & books. When I wasn't able to find an Invisible Ink book late last week, I ended up buying the Color Wonder Stow & Go kit. It was a huge hit and kept him occupied most of the drive each way. We'll definitely be investing in additional books before future trips.


Button Snake
Another Pinterest idea found here. I quickly whipped up the button snake one afternoon with supplies in my house. I store it in a small fabric bag he got at a birthday party so all the pieces stay together. This simple eye/hand coordination project entertains him for a while. A lacing kit would also work.

Books & Magazines
We keep a few favorite small books in the car bag including our DIY I Spy book and a couple with digital music players (Elmo's Rockin' Road Trip). When I know we have a trip coming up, I'll often stash the latest issue of a magazine for him to enjoy on the ride.


DVD Player
Honestly, the last few trips we haven't even taken our DVD player with us! *gasp* We did try it at the start of our trip on Friday and quickly put it up. For whatever reason, it doesn't hold his attention for very long. Perhaps when he's older it will hold his attention again.

iPhone
This is part of the reason we don't need the DVD player - Dylan's iPhone has a few TV shows installed as well as a number of kid friendly apps. Plus he can take photographs, make videos and listen to his own music. Since he doesn't use it the entire trip (and is limited other times), I don't feel too guilty handing it over for the ride.

Assortment of Small Toys
Think army men, matchbox cars, etc. Perhaps toys from a kids' meal or the dollar spot. Little things that your kids will find fun for imaginative play in the car and even the hotel room during your trip. But also items that you won't fret over if they get lost. Usually ours turn up under a car seat or in the pockets in the door though.

Have other ideas? Let me know. Even with the list above, we are still on the hunt for new ones. 


9/24/2012

Moving Organization

This is it. The week of closings and moving. Here's how I've been getting us ready ...

Basket of moving supplies - I found this idea at A Bowl Full of Lemons and it's been so helpful! I used a small plastic crate we already owned from the Dollar Tree. In it, I placed a plastic cup to corral markers, pens & scissors; printed box labels (see next item); and assorted tapes (packing & painters). It's easy to move around the house, easy to spot in it's bright green color and keeps all our packing supplies at hand as we fill those boxes.


Box labels - These are a free printable from The Nest Effect. I simply bought Avery labels and printed them out. Then made notes of contents and smacked the label on the box. Simple as that.

Moving checklist - Good reminder list of all the little things to do before a move here.

Donations - I realized last year that I still had a small amount of neon 8.5x11 paper from college. This has been perfect for keeping track of donations. I use a sheet each time I prepare a box or bag for donating. At the top I note the store name and date of donation. I then list each item noting quality when necessary to help me when tax time comes around. After making the donation, I staple the receipt to the sheet so I have it ready. Each year I choose a different neon color (currently using green) - it makes the sheets very easy to spot amongst our other paperwork. We have quite the stack of these sheets this year as I have been donating a lot of items I don't feel are necessary any longer and I don't want to move!


Moving Binder - I saw this idea in numerous blog posts. It has been vital to keeping us organized. I actually found an empty binder and dividers when packing up items to put into storage. Inside I have sections for our schedule (calendar with notations of all appointments related to the move); inspection and repair notes for both houses; loan documents; utility information; reference sheet of important contacts.


Plastic Zipper Bags - Ok, so this is the least "green" part of our move, but oh so helpful. I'm using bags in a range of sizes (snack, sandwich, quart, gallon) to contain various items such as hardware for shelving we're taking with us.

Plastic Reusable Food Containers - You have to pack them anyway so why not use a few to help contain smaller items for the move? The uses are pretty much only limited to the size of the container. One of the best ideas I came up with (in my own humble opinion, of course) was to put kitchen utensils and gadgets in them. They were all headed to the same room and it kept these items clean during the move so I had less to wash when we arrived.

Big Blue Ikea Bag - hands down one of my best Ikea purchases was this bag. It's been used so many times. Currently, it's holding a few "need immediately" items that we'll take with us the moment we first have keys to the house. It's easy to continue to add to, easy to spot amongst all the boxes and easy to carry.


And with that, I'm back to packing boxes. A few more to go. The finish line is in sight.

8/27/2012

Milk Crate Refresh & Repurpose

While packing up for our move, I've come across a number of forgotten items. This red milk crate was one of those. It dated to college days and had been filled with an assortment of papers and books. Once I sorted those out, I was left with an empty crate that I debated donating before realizing I could use it to organize Dylan's puzzles in our family room.


Although we have accents of red in the room, I planned to place the crate under one of the end tables and wanted it to blend versus pop. I had seen an idea on Pinterest for sewing a cover and initially thought I would do that. Then a quicker solution came to mind - spray paint. We have several leftover cans in our shed and one with a taupe color was perfect (plus it helped me use up something else - 1 more thing we don't have to move!).


A couple of coats later I had a milk crate that looked almost brand new. It fits perfectly beneath the end table and contains most of Dylan's puzzle collection:

7/10/2012

Hidden Router

The world of WiFi has simplified the need for some wires, but in itself created a question of where to put the router, associated equipment and cords. We stumbled across an accidental spot in our small home that has worked well for keeping curious cats and toddlers out.


Do you see the basket under the end table in the corner of our living room? We'd had it there for years, but for a different purpose.


Turns out this basket is just the right size for all of our equipment and cords:


It's open woven design and top allow for plenty of ventilation but still blocks the view from Dylan and keeps the cat out. Perfectly hidden in plain sight. Where do you keep yours?

6/08/2012

Balance

That simple word is a big one. And definitely part of the new motto around our home.

Last month, our lives changed a bit when I accepted a part time job in retail working nights and weekends. I'm typically on the closing shift 4 days per week. The exact days change each week. It's meant the boys have dinner & bedtime without me those nights. Which, being totally honest, makes me a bit sad at times but I'm also grateful they get one-on-one time regularly now.

In an effort to keep us organized and make sure they easily have good meals, I resigned us up for eMeals meal planning. I also might have literally jumped for joy when I saw Harris Teeter reduced their Express Lane shopping orders to $1.95 for the summer again. I used them a LOT last summer when watching our niece (so worth it to pay $1.95 versus wrangling 2 toddlers in a car cart in the grocery store) and have already used it once since the fee dropped (again, worth $1.95 versus spending my free time walking the aisles of yet another store).

Another organizing technique we've added is using shared calendars on our phones. Thank you, Apple iCloud, for making that easy. Trent & I now have a shared "home" calendar we can each access easily to keep track of events we both need to be aware of (such as birthday parties he needs to take Dylan to when I'm working). I created a second shared calendar appropriately titled "work" where I note my hours. This one I also shared with my parents so they know my new schedule.

It's been an interesting change. Certainly not where I pictured myself when I started applying for full time positions last fall. But for the moment, I'm enjoying our new life. I'm very blessed to still get to spend my days at home with Dylan and on the nights I do work, I know he's in the best possible care. I think it's even helped the two of them to get a bit closer. They now get dedicated time each week to special adventures for just the two of them. That makes my heart happy.

3/23/2012

Half Bath Shelving

During one of my many Pinterest browsing moments, I saw this image:

Source: Rate My Space - Master Bath Renovation

I knew immediately I wanted to do something similar in our half bath on the first floor. The layout is nearly identical and we could really use the storage space of built in shelving. Somehow our once remotely tidy bathroom has taken on a new, cluttered life now that we are in the age of potty training.


Many years ago, Trent & I made our own built in shelving for the nook that is in what's now Dylan's room. I confess, this time, all I did was pull one measurement (the width of the back wall) and then Dylan & I went shopping at Lowe's. That's right, no drawings. Just one measurement and a mental sketch. Really, this type of built-in is that simple - a few cuts, a few screws, a little touch-up and it's done. Find my "how to" post here.

Now, instead of a cluttered space, our half bath has a new tidy look.


All of the decorating elements were from around the house except the green ceramic planter and the carved frame both on the top shelf. Those I found this week at a thrift store for a combined total of $3.50! Seeing the "full" view in the after photo, I think I might make one more purchase - a dark brown trash can.

3/09/2012

Little Order to the Pantry

Last year, I found a great blog post on creating your own lined canvas bins using old diaper boxes. I bookmarked it for future reference. Fast forward to this week and I was frustrated with a pile of chip/snack bags in our pantry that fall everywhere with the slightest bump. I had a small cardboard box that was just the right size so I set off to repurpose it and have it looking cute.

Completed Canvas Bin
I used canvas and spray adhesive to cover the exterior of the box. Then dug through my scraps for fabric to make the liner. I followed these instructions for making the liner with a little alteration as I added the striped top with fabric left from our dining room curtains. (Yes, this bin totally coordinates with the dining room/kitchen even though it lives in the pantry!)

Filled to the brim with bagged snacks.
Besides the new neatness to my pantry, the best part was the price - free. All of my supplies I had on hand left from previous projects.

Supplies: cardboard box, canvas, spray adhesive, fabric remnants, thread.

1/03/2012

Mr. Potato Head Parts Bag

One of Dylan's gifts from Santa this year was a Mr. Potato Head. Given he only has the basic kit so all the pieces fit inside the potato, but the "trunk" never seems to want to stay closed. When I saw an idea on Pinterest to make a burlap bag to store Mr. Potato Head and his parts, I knew I needed to make one.


Lucky for me, I had burlap on hand bought for another project before Christmas that never came to. It then took on life as a tree skirt (we had forgotten we needed a new one until the tree was up. I really want to make one vs buying another so I wanted an easy cheap fix this year - duct tape & burlap cover a tree stand nicely!). Now that our tree is down, and with a goal to make a new tree skirt by next Christmas, I was willing to cut up the burlap for this new project.


In a short time with Dylan working nearby at his craft table on a Play-doh project, I sewed up the bag using the burlap and leftover ribbon from his toddler belt. I later added the felt Mr. Potato Head during his nap time. Now all the pieces store nicely and we can toss the bag into his toy box.


Supplies: burlap; thread; 5/8" ribbon; felt; buttons (eyes); Aleene's Tacky Glue.

7/11/2011

The Cat Drawer

I'm constantly on a quest to better improve the use of space in our small home and am quite proud of this idea. Backing up to when we bought our house in March 2003, it was just me, Trent & our 2 cats. The cats' litter box tucked away perfectly into the "nook" in our then computer/scrap/miscellaneous room. After Dylan arrived and we decided to turn that room into his room, the computer/scrap stuff moved into the guest room and the cat litter box moved to our foyer for lack of space anywhere else. Isn't that just a welcome sight? See our front door on the right? Literally walk in and "hello, cat toilet." ;)


The litter box lived in our foyer for about a year. A year of me grimacing as I walked past it constantly headed up or down the stairs, in or out the door. Finally I had an "ah ha!" moment. Let's cut into the dead space under the stairs and shove that box back in there. Ok, so it should look a little nicer than that, but there was my initial plan. Our laundry closet claims most of the under stair space (it's behind the closet door on the left), but then as far as we knew there was nothing.

Under Dylan's watchful eye, Trent cut the initial hole so we could see exactly what we were dealing with:


After leaning into the hole several times to take measurements and sketching up details, we decided on our size and pretty much maxed out the height & width. Trent cut the hole to the correct dimension. We added a base of 2x4s and slid in a plywood box we built to house the drawers. Our assistant helped with the clean up. ;)


Next we framed it out and added the drawers we built. We temporarily taped up the hole in the bottom drawer to keep our nosey curious cats out until we completed the project:


Added drawer fronts:


Finally, we added textured wall paper and wood trim before painting the drawers semi-gloss white to match the existing trim and closet doors. Screwed the frame for the cat door in place (we've left the actual door off while the cats adjust). Added bronze drawer pulls to match those in the kitchen.

Here's a look at the completed project (and glimpse of our freshly painted door & shined kickplate that I mentioned needed a little TLC):


The top drawer is for miscellaneous stuff (hats, gloves, etc). The bottom drawer houses the cats' litter box and the Litter Locker:


We intentionally designed the drawer to fit the two pieces in this manner so the cats have to walk down a "hall." This design along with the small piece of carpeting helps keep the litter in the drawer. The very bottom is lined with sheet vinyl to allow for easy cleanup - which thankfully has not been an issue so far. Seems the cats like their new private space.


Can I brag a minute and say how much I'm loving this?? I dreamed it would look good (and probably drove Trent nuts talking for months about how we should do this) and am pretty darn proud of our hard work. It took many hours over several weekends mainly while Dylan napped for us to complete it but so worth it. And, it was fairly easy on the pocket - about $150.

Linked up to IHeart Organizing.
Shared with Nate Berkus Show here and with BHG.com's I Did It! here.

3/22/2011

Pinterest addiction

As if I needed another addiction ... totally loving Pinterest.  So much inspiration for everything from crafty fun to decorating to recipes and I can pin it to my own virtual boards to refer to later.  Love it.  Find my pins here.

7/07/2010

Snapware Review and Giveaway

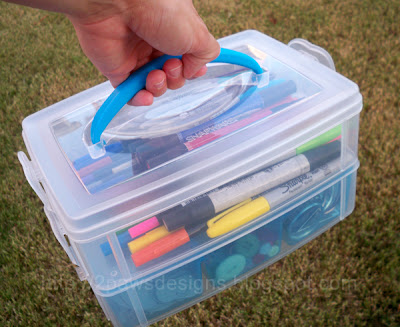
I'm always looking for new ways to better organize my home. It's small and now that we are accumulating more and more toys, it's feeling smaller and smaller! I recently blogged about relocating my computer and crafting space to the guest room. Doing so decreased my crafty storage space a bit. I was quite thrilled when Snapware gave me the opportunity to try one of their products. The Snap 'N Stack containers looked like they would make great craft storage and could easily be moved from my workspace to my closet.

I received a Snap 'N Stack Medium 2 Layer with Sectional Divider. It came with a lid, 2 layers, and (2) 3-piece divider sections with lids:


Seeing the product online, I thought the divider was one tray. Instead it is split down the center with 3 sections in each half so you could easily use a portion in each layer of the container. I choose to use them all on the bottom layer separating a variety of embellishments. The lids for the dividers (set to the side) are wonderful! They ensure any small items in the dividers stay in their specific cell.

While the container works great for storage in my craft room, I'm betting it would be wonderful for taking to crops. The lid and layers snap together snugly assuring nothing will fall out. Just grab the handle and go.


Now it's time for one lucky reader to win their own Snap 'N Stack Medium 2 Layer with Sectional Divider. To enter, you must visit the Snapware website and join the Snapware Family. After doing so, please leave a comment here stating you joined.
Want to gain additional entries? Here are a few ways:
  1. follow this blog
  2. follow me on Twitter - @2pawsdesigns
  3. tweet about this giveaway using "I want to #win the Snapware #giveaway from Snapware & @2pawsdesigns! #contest http://bit.ly/bZiwG2 Please RT" (valid for extra entry once per day)
  4. blog about this giveaway
  5. "like" 2paws Designs on Facebook
For each additional entry, please post a new comment. Ie, if you tweeted or blogged about the giveaway, come back and post a link. Thanks and good luck!!

Giveaway is open to only continental US residents. Must be 18 years or older. Ends Thursday, July 15th at 9:00pm Eastern time. Winner will be picked by random.org and announced on Friday, July 16th. Winner will be contacted by email. Be sure to either leave a valid email address along with your comment or check back on Friday, July 16th when the winner is announced to email it to me within 48 hours. If a valid email address is not left and the winner does not contact me by Sunday, July 18th, a new winner will be selected.

Note: giveaway is sponsored by Snapware. I was provided with an organizer to review, however, all opinions expressed are strictly my own.


Bookmark and Share

6/11/2010

Sneak Peek

A little sneak peek at something I'm working on for my Etsy shop ...


And, a peek into my new craft space ...


The room is slowly coming together.  I am loving all the natural light from the big window right next to my desk.  This was definitely a great change to make.

Bookmark and Share

5/26/2010

Room Remix

For a while I have been thinking about moving Dylan to a new room. Originally he was in the larger of our 2 extra bedrooms and shared space with the full size guest bed. This worked really well at times particularly when he was sick in December and he & I spent nearly a full 48 hours in there together. It was nice to be able to tuck us both into the big bed and have all of his stuff (diapers, medicine, etc) at hand.

As he's grown (and we've had overnight guests stay more frequently ... ie, Grama :D ), this has not been the most ideal situation. I do think he and my mom had quite a good time playing "peek-a-boo" through and over the rails at each other during her last stay. But we all need sleep so I began to think about putting him into a new room.

One of the pros or cons of me being a stay-at-home mommy now is the simple fact that I am here enough to see what is/isn't working, what we do/don't use, what I do/don't like, etc. Last year I created a 3D model using Google Sketchup to help arrange the furniture in the nursery/guestroom. I went back to that model and updated it to match how the furniture was currently arranged:

Then I drew the second room (the former computer/scrap room) and began drawing & repositioning the various pieces of furniture to determine the new arrangement.

The new layout of the guest room:
The bed remained in the same place. The computer desk and scrapping desk run along the wall between the two rooms and the Crop In Style cubes sit between the foot of the bed and the closet.

Dylan's new room:

I started taking apart the computer/scrap room about two weeks ago. I patched and touched up the paint where the shelving and pictures hung. Since the room was originally painted with "regular paint" (ie, before the no-VOC paint option we now have) and I just wanted to touch-up versus totally repaint, I let it sit for a few days to air out before moving Dylan into the room.

As of the beginning of the week, all of the furniture is in place in each room. I'm now focusing on organizing and decorating. Dylan's new room is taking on more of the feel of a toddler room now that he's more mobile. The built-in shelves in the corner by the glider once held old textbooks and scrapping magazines as well as knick knacks. Now they are taking on childhood favorites and stuffed animals. I confess, I'm having fun looking through Flickr again for more inspiration. His room will still have an animal theme (after all, I did just finish the zoo print crib teething rail cover). But some of the details are changing. I'll share photos as the rooms progress.

ETA: If you decide to play with Google Sketchup (it's free!), be sure to check out the 3D Warehouse for free models you can download (I did this for the glider and Aeron chair). And I have begun sharing some of my own models as well - 2pD Models. Enjoy!

Bookmark and Share

7/21/2009

Lists & Coupons

I learned the value of coupon shopping from my mom. Although, admittedly, I found them somewhat annoying to deal with until I had to pay my own bills. Funny how that works. ;)

These days I organize my coupons in a big 3-ring binder with a zipper closure. It makes it easy for me to flip through and find the coupon I want. I try to pull most before we head out to the store & stick them in a plastic pencil pocket in the front. Others I will grab as I need while we shop.

Realizing I will soon be juggling a baby in a carrier seat along, I don't want to even pretend to try and carry the binder with me on every grocery trip. Instead, I went back to a craft project I bookmarked months ago on Elizabeth's Covered in Crafts blog - an altered folder organizer. It struck me as a fun craft project and simple way to store my shopping list & coupons for a specific trip that I could easily just drop into my purse or the diaper bag.

Here's my completed project:

And the inside:

Supplies: manila file folder; Bazzill (white), Stampin' Up (green) and the Paper Company (blue) cardstock; TaDa patterned papers; QuicKutz Moxie font; American Crafts ribbon; Xyron adhesive and laminate/adhesive cartridges.