Showing posts with label kid crafts. Show all posts

12/07/2010

Handprint Santa

I love getting crafty with my little guy and last year, I dared to pull out the paints with a 5 month old to do so.  Thanks to help from the high chair ;)  I managed to paint his right hand white and help him make a handprint onto red cardstock.  Once it was dry, I began the process of turning it into Santa using a variety of supplies from my scrapbooking stash.

The end result:

I then scanned it in and resized to approximately 3" x 4".  I printed the smaller images onto photo paper and used the laminate/magnet cartridge in my Xyron to create magnets.  Each of the grandparents received one as part of their Christmas gift.

Supplies: acrylic paint; red & white cardstock; Provo Craft & We R Memory Keepers patterned papers; black stamp ink; Making Memories snaps; Stickles; black marker; buttons.

11/25/2010

Turkeys

I was inspired earlier this week to scrap photos of Dylan and his friend working on their Turkey plaques:


Supplies: Tiffany Tillman's Simple 'n Straight template and papers by Jen Allyson & Karen Funk from Design House Digital Fall Blog Hop kit; labels (recolored) from Michelle Underwood's Bright Smiles kit; fonts.

After the boys had completed their handprint on the plaques, Stacey and I helped them make an extra print on a piece of white cardstock.  We added beaks, wattles and legs to them with markers.  Then scanned the turkeys for Thanksgiving cards: 


On the inside of Dylan's cards, I printed the same poem that's on the back of the plaques (returning to the original wording of "it comes with...").  I helped him write "Love, Dylan" with crayon and then he added his own personal touch, coloring each one:


Happy Thanksgiving!

11/15/2010

Handprint Turkey

Since our ghost footprint plaque was so much fun to make but had to be packed up until next fall, Dylan & I got together with some friends, and pulled out the paints again to make a new plaque to hang in it's place.  Ready to give the house a festive look for Thanksgiving is our Handprint Turkey:


Isn't he adorable? My favorite part is how excited Dylan gets about it.  If you ask him where his turkey handprint is, he'll point directly at it and babble excitedly. Sometimes a few claps are thrown in too.  :)  Adorable.

On the back, is a cute little poem we found on the internet (not exactly sure where credit is due since I found it in multiple searches): 


We altered it slightly (changing "It comes with" to "It's made with"), printed it onto cardstock, handwrote each boy's name, date & age and adhered using mod podge.

Supplies: wooden plaque (6-3/4" diameter); acrylic paints; paint brushes; coordinating ribbon; staple gun; white cardstock; Mod Podge.

10/28/2010

Ghost Footprint

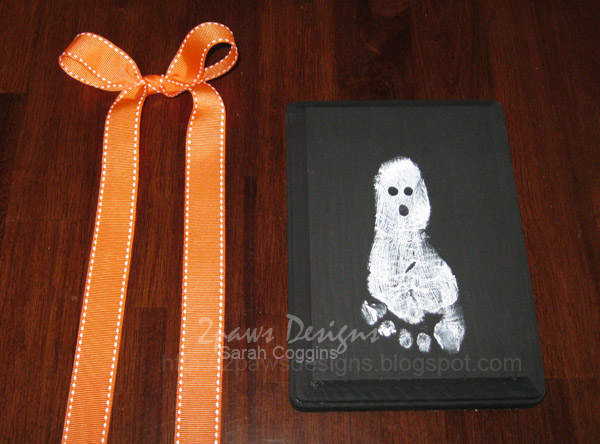
Our playgroup has two craft projects lined up for today.  One of which is making this adorable Ghost Footprint plaque (inspired by Becky's Ghostly Handprints post on The Crafting Chicks blog):


Dylan & I went ahead and completed his so we could help show the group what to do.  It's a lot of fun, very easy and inexpensive. 

Supplies
  • 5x7 wooden plaque (or similar sized canvas ... needs to be large enough to fit your child's footprint)
  • black & white acrylic paint 
  • paint brushes and a cotton swab
  • sandpaper
  • Mod Podge
  • orange ribbon
  • beading wire (or similar to help create the hanger)
  • staple gun


Start by painting the plaque black.  Let it dry completely.  If desired, sand the edges a bit to give a more distressed look.  Apply white paint to the bottom of your child's foot (note: I had Dylan strapped into his highchair and a wet paper towel ready so he didn't leave white footprints all over the house!) and press foot to the plaque.  Set the plaque aside to dry and wipe the foot clean.  Once the footprint has dried, use a cotton swab and black paint to add the dots for the eyes and mouth.  After these have dried, apply Mod Podge to seal.


While waiting for the Mod Podge to dry (follow instructions on the bottle), cut a piece of ribbon about 2 feet in length and tie a bow in the middle.  Attach it to the back of the plaque using a staple gun. 


My original plan was to use the ribbon as the hanger, but I didn't like how it looked.  Thus, the addition of the wire.  You can add the two simultaneously if you want.  I found it easy, once the ribbon was in place, to loop the wire through the knot in the center and then staple each end to the plaque.  I then pulled the wire up and twisted it onto itself to finish.


That's it! Now you can hang your completed project on the wall.  Enjoy!

8/16/2010

Crayon Bottle Caps

My weekend project - making crayons for Dylan.  I wanted a couple of large crayons that he could easily grasp.  Instead of buying a new box, I experimented with a handful of old crayons and some muffin cups.  The result is what I'm calling "Crayon Bottle Caps" since that's what they look like to me.  They are quick, easy and perfect for little hands:


Dig up some crayons (old or new), a muffin pan and muffin cups.  Then let's get started!


STEP 1
Remove the paper wrapper from each crayon.  Then break them into pieces so each piece is roughly an inch long.  Line a muffin pan with cups.  Place a few crayon pieces into each cup as desired:


STEP 2
Once you have all of the pieces laid out into the muffin cups, put the pan into the oven.  Bake at 250 for about 5 minutes to soften.  Longer if you want to fully melt them (ie, and pour into molds) or have thicker crayons.  I left mine for 10 minutes.  As you can see, the colorful mixes with the smaller crayons fully melted while the fatter silver crayon in the bottom mix is still formed:


STEP 3
Let the crayons cool on the counter for about 30 minutes or until pan is cool.  Place pan into the freezer and let it sit for 15 minutes.  This will speed up the firming process and help pull the crayons away from the pan walls:


STEP 4
Pull out each muffin cup and remove the crayon:


STEP 5
Enjoy!

4/23/2010

Handprint Thank You Notes

It's never too young to teach a child the importance of a thank you note, right? That's why I decided to have Dylan "help" me with the notes I wrote last month to thank family for the gifts he received following his baptism. I placed Dylan in his high chair, got out a bottle of acrylic paint, squirted some onto a paper plate, helped Dylan stick his hand into it and and then we made a handprint on a piece of white cardstock. Sounds easy enough but for my child who will normally touch anything (and put it in his mouth!), he resisted putting his hand into the paint. It took a bit of effort and a good grip on his hand so we could make the print & cleanup before the hand reached the mouth!

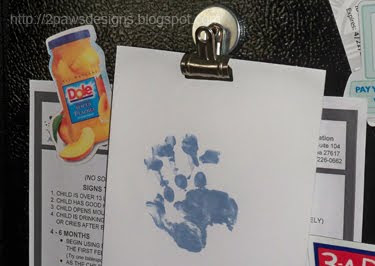
After we finished, I hung the print up on the fridge while it dried. Dylan seemed to like this part. I carried him over to see and he had a big grin on his face while reaching out trying to grab the paper. ;)


Once it was fully dried, I scanned it in. Added "thank you" and printed out copies onto several sheets of white cardstock. Roughed the edges with an edge scraper. Glued onto a sheet of 4x6 black cardstock. And here is the end result:


Simple & cute thank you notes.

Supplies: Making Memories cardstock, paint, edge scraper; 2Peas Sandbox font.

Bookmark and Share

3/16/2008

Easter Eggs

Next week at church the kids have an Easter egg hunt during Sunday School so I took my class a little gift today instead. Here are the eggs I made for them:

Each is filled with jelly beans and has a little poem included. The poem is from Shirley's Preschool Activities website: Easter Poem - Jelly Beans.