2/29/2012

Puddle Jumpers

For Leap Day, it seemed appropriate to share a frog/toad themed layout. :)  Dylan & I joined friends for the Dragonfly Walk program at Piedmont Wildlife Center earlier in the month - the theme was Puddle Jumpers.


We took a nature walk, looked for frog eggs (no luck, but the boys had fun poking ice in the stream with sticks!), learned how to make frog/toad calls using our hands & various items, and completed collages of frogs & toads, of course.

Supplies: Kate Teague's Basics: January template; Kaye Winiecki's November Rain kit; Deena Rutter's Woodsong papers; Two Peas Platform Shoes and Maiandra GD fonts.

2/28/2012

Eleven

Chester would have been eleven years old today. Just over two months ago, we said goodbye. Trying to find my way through my grief, I created this layout in early January:


It's a scraplift of Allison Waken's Jade. I loved the simplicity and neutral color scheme. I let my journaling run long to express a number of little things I miss about our sweet little furbaby.

Supplies: Robyn Meierotto's Cupcake patterned papers; Karla Dudley's Sherbert & Breezy papers; Shannon Hegarty's Lighthearted papers; DHD's Digital Scrapbooking Day 2011 Blog Hop kit (Karla Dudley 'loved' word art & Karen Funk's stitches); Karen Funk's Photo Frame Clusters 2; Just the Way You Are font.

2/27/2012

Pillowcases

I enjoyed making Dylan a Cars pillowcase last year and he likes it so much, I have made him two more pillowcases in the last few months.

The Buzz Lightyear pillowcase was one of Dylan's presents from us this past Christmas. He actually picked out the fabric when he and I were shopping one day. We were passing through an aisle and he exclaimed "Buzz Lightyear!" (although truthfully it wasn't exactly that clear but I, of course, knew what he was saying). I couldn't turn him down when I saw the clearance price on the fabric. The two solid fabrics were from my stash.


The next pillowcase was for Valentine's Day. He's been a big Muppets fan since seeing the movie at Thanksgiving so I went shopping for fabrics specifically with the Muppets in mind. I think this one is Kermit's favorite. ;)


Supplies: cotton fabrics; Coats & Clark threads; pillowcase pattern from AllPeopleQuilt.com - Pattern 15.

2/24/2012

My Memories Suite v3 Review & Giveaway

I was excited about the opportunity to try My Memories Suite v3 software and, better yet, giveaway a copy to one of my blog readers as well! I was already looking at software options for our laptop that would allow me to work on my digital scrapbook pages when away from home (or when I just want to lounge on the sofa). As it worked out, I actually got the software while out of town and downloaded it straight to my laptop.

I like how user friendly this software is - I literally just opened it and started creating. I did have a few questions and found the videos posted on the My Memories blog to be helpful.


So far I've created two pages using the software. The first one was fairly simple as I familiarized myself with the software and with kits available at the My Memories store. I used a free beach element and created the title using the word art option:


Supplies - Beach Baby: Lindsay Jane's Sea Breeze Frame

By the second page, I was moving faster and got a little more elaborate with my design. I played around with kits purchased elsewhere. This is a huge plus - you can use kits from other stores in the My Memories Suite v3 software and those kits purchased from My Memories store can be used with other software.


Supplies - Hot Diggity Dog: Shannon Hegarty's Secretary papers; Gennifer Bursett's Toolbox Mists Vol 6; Robyn Meierotto's Mellow alpha; Karla Dudley's Right Now elements.

Interested in winning a copy of My Memories Suite v3 for yourself? Just visit MyMemories.com and then leave a comment on this post naming your favorite kit. It's that simple.

Want to gain additional entries? Here's how:
  1. Follow me on Twitter - @2pawsdesigns
  2. Follow My Memories Suite on Twitter - @MyMemoriesSuite
  3. Tweet about this giveaway (valid for extra entry once per day) - "I want to #win the My Memories Suite #digiscrap software #giveaway from @mymemoriessuite & @2pawsdesigns! http://bit.ly/ykdKWD Please RT"
  4. Blog about this giveaway
  5. "Like" 2paws Designs on Facebook
  6. "Like" My Memories Suite on Facebook
For each additional entry, please post a new comment. Ie, if you tweeted or blogged about the giveaway, come back and post a link. Thanks and good luck!!

Giveaway ends Thursday, March 1 at 9:00pm Eastern time. Winner will be announced Friday, March 2nd.


If you don't win the free copy, you can still get a copy of the software at a discount. Use coupon code STMMMS54884 for $10 off the purchase of My Memories Suite v3 AND a $10 coupon to the MyMemories.com store. Feel free to share this code with friends & family.

Note: My Memories Suite contacted me with this promotional opportunity. I received the My Memories Suite software for review All opinions expressed are strictly my own.

2/23/2012

Cheez-its

My mom bought Dylan a play kitchen from Ikea during our visit a few weeks ago. He's loving it. While we had a few play foods already, there is room for a few more. I came across the idea for felt Cheez-its while browsing Pinterest. Can't get any simper than sewing straight lines down folded over orange felt and then cutting into squares.


But then the crackers needed a box. The original blogger used a real Cheez-it box. I liked the idea, but it is too big for our kitchen.


Using a scan of the box and an empty cereal box, I literally made a new box that looks exactly like the original except at a smaller scale.


Supplies: Cheez-it box (to scan); photo paper; cereal box; Mod Podge; X-acto knife and scoring tool (if available).

2/22/2012

Dinosaur Snow Globes

Dylan had a friend over on Monday and, after some time playing in the snow, we came inside for hot cocoa and a little fun. I found an idea for a snow inspired craft over the weekend - a little handmade snow globe ornament. Using supplies I had on hand, we created dinosaur snow globes! The boys were very excited.

Supplies
  • clear plastic cups
  • cotton balls
  • sturdy paper for bottom
  • small toys
  • glue

I started by pulling out all the supplies and tracing the cup lip onto a small paper plate. I cut just beyond that circle to create the bottom of the globe. I happened to have snowflake plastic cups and silver plates left over from the baby shower in January and used those, but plain clear cups and white paper plates (or cardstock) would work also.

Dylan taking apart my unglued demo snow globe
I showed each boy the general idea and gave them their supplies. Truthfully, this took about 3 tries to get both to complete the project in between free play. I quickly discovered the best glue method was for me to squirt a few thin lines around on the interior of our base circle. Then encouraged them to stick their dinosaur toy.


Next we pulled apart cotton balls to make smaller "snow" mounds and they stuck snow around the dinosaur's feet.


When they were finished adding snow, I put a thin line of glue around the lip of the cup and placed it over the entire scene. Then set aside to let dry.


The final step - enjoy your dinosaur snow globe!

2/21/2012

Snow Day!

Our little snowfall of the year came on Sunday night after Dylan had gone to bed. By morning, there was still a bit on the ground, but not nearly as much. Nonetheless, I had one excited little guy when I opened his curtains and told him to look outside yesterday!

"Snow, Mama! Snow!"
I told him we'd eat a quick breakfast and then go out to play. No. He wanted to outside right then and there. Knowing that it would melt soon, I gave in, layered us up and out we went.


I finally coaxed him inside with the promise of a snow art activity while I fixed our breakfast. I put him in his highchair with watercolors, a brush and a small bowl with some snow in it and encouraged him to paint the snow.


After breakfast, we went outside to play again. This time one of his neighborhood friends joined us. The boys had a blast picking up snow, filling & dumping a bucket, tasting snow (ok, I think that was just Dylan), and cleaning off my car!


When we came inside, I made the boys hot chocolate topped with a bit of Cool Whip ("snow" - they thought that was cool!) to help warm them up. Even with sippy cups, they both managed to sport chocolate mustaches afterward! So funny. For a tiny snowfall, it was a big day of toddler fun!

Tomorrow I'll share the art project we made once we were warm. It involves dinosaurs and snow. :)

2/20/2012

Custom Banner

Another fun banner ...


This custom order was shipped a few weeks ago along with curtain panels and an infant car seat cover. The four fabrics feature pennants, dots, cars and trains. Lots of fun for a little boy.

Supplies: Michael Miller fabrics; white cotton unknown; Coats & Clark thread; Pellon Wonder Under; Sulky Tear-Easy Stabilizer; Wright's bias tape.

2/17/2012

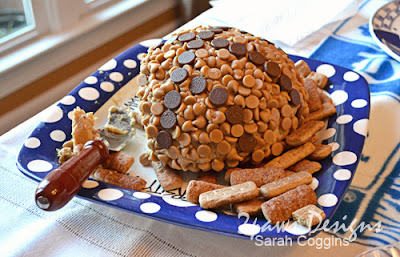
Peanut Butter Basketball

The basketball themed 1st birthday party we attended last weekend had loads of fantastic decorations and ideas, but, I confess, this was my favorite. I won't admit to how many times I was caught sneaking a bite. ;) Truthfully, just seeing the photo is making me crave it again!


My friend, Stacey, found a delicious recipe from Nestle's website for making a peanut butter ball. Then she took it a step further and placed the morsels so it looked like a basketball. When I asked her how she managed to shape it so perfectly, she let me in a on secret that I personally think is better than the original recipe idea - press the mixture into a bowl to harden. Simple, easy and you have your domed shape.

Add a side of graham cracker sticks (shown) or apple slices.Be forewarned, it won't last long! :)

2/16/2012

Baseball Birthday

In December, Trent, Dylan & I stopped by the Durham Bulls Athletic Park for the Holiday Open house. One of the perks turned out to be an opportunity to buy old stadium signs. While thumbing through the options, an idea hit me - one of the signs would make a perfect first birthday gift for one of the boys in our playgroup. His parents are big Bulls fans and we had all attended a game together last spring. When I found a sign for Section 216 (his birthday is today, 2/16!) I knew we had to buy it.


I made a baseball themed card to match using both digital and traditional scrapbooking supplies I had on hand.


I had printed several pieces for embellishments, but wasn't pleased with the look of all of them. Thus, I grabbed some blue paper from my scraps bin and cut it freehand. Then used my sewing machine to stitch it on. For the star, I had envisioned a chipboard piece but didn't have any. I did have an old frame of chipboard shapes from Basic Grey on hand. I traced a star onto an old coffee cup sleeve, cut it out, bent it up a bit for a rough leather-ish look and tacked it on with a brad. Honestly, it's my favorite element on the card.

Not the most traditional gift & card for a first birthday, but it seemed to fit just right. :)

Supplies: Recollections card & white cardstock; Sara Schmutz's No 1 Fan kit; Bazzill cardstock; patterned paper; Coats & Clark thread; coffee cup sleeve; Making Memories metal brad.