4/17/2012

Egg Carton Caterpillars

Between the gift of a new BIG copy of The Very Hungry Caterpillar (which came with a small plush caterpillar that literally fits through the holes!) and a visit to a new local art reuse center, Dylan & I were inspired to make caterpillars.

Supplies
  • Egg carton
  • Scissors
  • Acrylic paint & brushes
  • Pipe cleaners (wire cutters to cut in half)
  • Googly eyes & glue (optional)


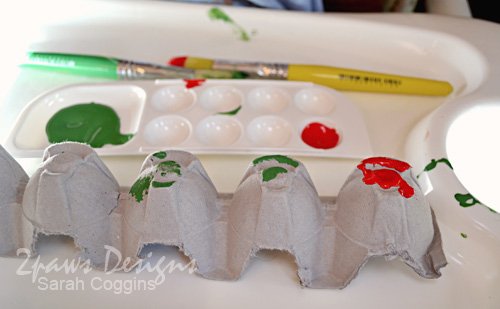
First, I cut the top off the egg carton and then cut the bottom into two long pieces - giving us each a caterpillar "body" to work with (I enjoy these crafts too!).


Then we used red and green acrylic paints to add color. For all his desire pre-project to paint, it didn't really capture Dylan's attention very long. His was a minimalist caterpillar. :)


After the paint was dry, I used the scissors to punch small holes in the head of each for the antennae. I cut one pipe cleaner in half using needle nose pliers (they are also helpful for pressing the ends to reduce any sharp points). We formed a 'U' shape with our half and pushed it up through the holes giving us nice fuzzy antennae.


Finally, we added a little dot of green paint for the nose and glued on googly eyes.


Very simple, fun craft. And, amazingly, they both survived several days including being played with!

4/16/2012

Family Photo: Fall 2010

I used this month's Blueprint challenge at DHD to help inspire another page from 2010. This one is of our church photo that September. Amazing to see how much Dylan has grown since then!


Supplies: April Blueprint Challenge template by Jen Flaherty; Vanity Fair - Persimmon patterned papers by Jen Allyson; Claire patterned papers by Karen Funk; Summer Picnic stitching by Sara Schmutz; Home Matters and Felis brushes by Karla Dudley; Weathered Frames freebie by Celeste Knight; Flight Path elements by Audrey Neal; I Love Boys elements by Robyn Meierotto; Commercial Script BT and Teletype fonts.

4/13/2012

splish splash

I've set myself a goal to finish Dylan's 2nd year album by his 3rd birthday. Thus, I'm digging out some old photos of fun events I want included. This batch came from a day at the pool & sprayground with a few playgroup friends in July 2010.


Supplies: March Blueprint Challenge template by Jen Papadimitriou; Gidget papers by Gennifer Bursett; Giggles & Grins papers by Karen Funk; Splish Splash kit by Rhonna Farrer; Teletype, Arial and Janda Everyday Casual fonts.

4/12/2012

My Cowboy

Dylan's imagination has really kicked in over the last month. It's been so fun to see. One of the ways we've been encouraging it is playing dress up. I've put together a small collections of hats and costumes into a mesh basket from Ikea. One of the hats is a cowboy hat. To help him dress as one of his favorite characters, Woody from Toy Story, I made him a vest to go with it using some fabric leftover from the chaps I made for my Jessie costume last Halloween.


I made the vest a little large to allow for growing room so he can hopefully enjoy it for a while to come.


He's also been sneaky about not wanting to have photos taken at times. It took a lot of work to get these couple with my iPhone! (Including bribing him with the lollipop seen in the 2nd shot. And, yes, he's wearing the shirt I made for his second birthday party last summer! It still fits too!) Hoping to get some better photos soon with the DSLR.

Supplies: Alova Print-Pony fabric; Coats & Clark thread; Wrights bias tape.

4/11/2012

Easter Bunny 2012

Our playgroup has managed to get together the last two years for annual Easter Bunny and Santa photos. This year it was looking good and then schedules, illnesses, etc got in the way. So, rather than our massive pile on of kids and moms, this year it was just Dylan and one friend.


We timed things perfectly so we were early to the mall with no wait. The photographer was very nice and gave the boys time to visit with the Bunny and get comfortable before sitting with him(?) for a photo. Although, the moms bribing them with a train ride afterward might have helped too. ;)

Supplies: Blueprint #6 by Gennifer Bursett; Design House Digital's Spring Menagerie collaboration kit; Miss Mint's April Morning & Kindergarten Crafts kits and Hoppy Easter elements; Hop by Sara Schmutz; Spring Time by Laina Lamb; Easter Fun by Agnes Biro; Daily Birdie font by Audrey Neal.

4/10/2012

Shaving Cream Paint

I love the amount of projects you can do with food coloring beyond, well coloring food! Dylan loves to paint and finds the larger tub in our master bathroom exciting. So on a rainy afternoon, I let him have messy fun in there. I filled a small muffin pan with shaving cream and added food coloring.


Then I gave it to him along with a brush and bubble bath. He had so much fun with it! He dipped the brush, painted the walls. Dipped the brush in the shaving cream and then into the bubble bath.


Then I showed him he could use his hands too and we both had fun smearing it all over the tub walls. Finally he dipped the pan under the water to see what would happen.


This fun art project turned into quite the little science experiment for him. I love that he enjoyed it so! He's already repeated it once with his dad's supervision and I'm sure we'll do it many, many more times in the future.

4/09/2012

Easter weekend recap

We had a busy three day, holiday weekend. On Friday, Trent went to Chapel Hill to help his dad on a few projects around the house. Meanwhile Dylan & I joined friends for an Easter brunch and egg hunt. This was his first egg hunt with candy in the eggs. Oh, his face when he realized there were treats in the eggs! He paused after his first egg wanting to open it and get to the candy. I had to encourage him to move on and find more eggs first!


That evening he enjoyed the attention of Trent as well as from my dad, step-mom and step-brother who stopped by for a visit. He and Grandpa George played a game together.


Trent had brought home a basket of Easter goodies from his parents. We gave it to Dylan on Saturday to help spread out the fun. His favorite thing - a small plush green bunny. The bunny was even added to the collection of plush toys he sleeps with (Seahorse, Scout, Kermit, and SkippyJon Jones) which is high priority. ;)


Supplies: Stuffy Collection Template #2 by Tiffany Tillman; Masking Shapes Pack #1 by Lori Whitlock; Doily Set by Agnes Biro; Fresh kit by Audrey Neal (recolored 2 papers); Batik Regular and Brush Script Std fonts.

Yesterday, in spite of both Dylan & I suffering from allergies, we did go outside first thing to hunt for eggs. He spied them from the windows upstairs in our bedroom and couldn't wait to get out there. He even passed by his basket of treats on his highchair tray, never spotting them, as he headed for the door. It was so fun watching him run around grabbing the eggs and dropping them into his basket.


He finally discovered his basket when it was time for breakfast. He was so excited about the "big" chocolate bunny and hugged the book the Bunny left. Then he unwrapped the gift from Trent & me - the Muppets movie - and he was even more excited. He's been talking about that movie since we saw it during our Thanksgiving trip to Virginia. With allergies keeping us indoors with a box of tissues, we popped it in the DVR and had a family movie day.

4/05/2012

Dying Eggs

Dylan and I have been getting our craft on this week including dying Easter eggs. This was Dylan's first time doing so. I debated with myself for a few weeks whether or not he was old enough. Now I'm very glad I went ahead and bought the kit! We only used half of the colors and 6 eggs, but he had a great time.

I set up outside on his picnic table. The weather was perfect in the shade on our patio and it helped limit mess. ;) I gave him 3 bowls with dye in the them and showed him how to dip the eggs. Then he pretty much took over.


He dipped them in one bowl, or two or all three. Some went to the drying rack and then back into the bowls again.

Here's our final result:


Truthfully, I did finally interfere with his creative process a bit and suggested some were done. This was simply to prevent them all from ending up brown! He really liked dipping the eggs in ALL three colors. And while 'gentle' isn't still fully comprehended, we only had one cracked egg (the back right) so it was a very successful project!

4/03/2012

Easter Bunny Plaque

Last year, Dylan & I made this cute bunny plaque to hang up at Easter:


Instead of painting his entire hand, I painted just the palm and the pointer & ring fingers to create the head and ears. After the print dried, I painted his thumb in pink and helped him place it for the nose. The eyes and whiskers I painted using a small brush. Finally, I finished the plaque with Mod Podge and a picture hanger on the back.

Supplies: wooden plaque; acrylic paint; brushes; Mod Podge; picture hanger.

4/02/2012

Mad March Competition - Final Round

Here's my entry for Round 6 of the Mad March Competition at Design House Digital:


The challenges are over, but the competition won't wrap up until the end of the week.  ** The winner is being decided by votes here. ** Limit one vote per person, per day through Friday, April 6th (does require free account at DHD).

For Round 6, our layouts had to meet the following requirements:
  1. Use 15 different kits, but…
  2. Use kits from exactly 6 different designers
  3. Karen Funk - Photo Frame Clusters v2, For the Boys patterned papers, Genuinely You elements; Audrey Neal - Daily Birdie font, Family Tree patterned papers; Fei Fei's Stuff - Of the Essence - Add On kit; Miss Mint - Traffic Jam, Twinkle Toes & Daditude kits; Robyn Meierotto - Kraft Day Fun elements, In Stitches - Bright Basics, Today word art, Clearly alpha, I Love Boys elements; Jen Allyson - Picket Fences kit.
  4. Use a blending mode - trio of arrowheads located at bottom of journaling on right hand page.
  5. Use an advertisement as the starting point for your page - BHG's Chill & Grill - "tossed" look of photos with white borders. (see image to right)
  6. Use a title of a book as your page title - "Honk Honk! Beep Beep!" by Daniel Kirk (children's book)
  7. Use orange as an accent color - stitching and ticket.
  8. Duplicate a photo, but use different crops of that photo - trio of b&w photos.
  9. Alter an element - altered color of ticket to orange.
  10. Do an extraction - my son's head in trio of b&w photos.
  11. Use the words “Mad”, “March”, and “Memories” in your journaling, but not as one phrase
  12. Following a visit to see MawMaw and PawPaw, we took you to Burlington City Park. It was a gorgeous March afternoon - perfect for outdoor fun.
    The last time we came, you weren’t quite a year old. Now that you’re a ‘big’ two and a half, you can finally ride the kiddie rides. We had 5 tickets so after a ride on each, we let you choose which 2 to ride again. This was great until we were out of tickets - then you were a bit mad you couldn’t ride the planes again. Next time!
    Memories of you laughing and eagerly running from ride to ride will always come to mind when I think of this day.
  13. Do a two-page layout, but… - Check
  14. One page’s background must be a photo - Check
  15. Weave an element behind and in front of something else - orange stitching at trio of arrowheads on lower left corner on left page.
  16. Create a shape (using custom shape tools) and use it in three different ways - arrowheads. Used as masking for patterned papers on left page, as 'K' in title and as brush next to journaling.
  17. Incorporate a strong diagonal line into your design - on right hand page, arrangement of photos/title and white space.