9/29/2011

Dinosaur Footprints

On a cool weather afternoon, I decided to try a new craft with Dylan that I found online - dinosaur fossils by Our Crafts ~N~ Things. We had fun using his dinosaur toys to make "fossils" of their footprints in clay.


Supplies: Simply Tiffany Studios 52 Thursday Templates Template No 28; Jen Martakis's Roar kit; Another Typewriter font.

9/28/2011

Wordless Wednesday: Pumpkin Decorating


Wordless Wednesday

9/27/2011

Salt Art

I found the idea for Salt Art in a similarly named post at Smilemonsters blog. It looked like a fun thing for Dylan & me to try. I prepped the salt a few days in advance, placing 1/2 cup of salt in each of three bags. I added 6 drops of food coloring to the bags and then shook & squeezed until all the salt was colored.

Since using salt as an art medium would clearly get messy with a 2 year old, we headed outside to the picnic table to create.

Supplies: colored salt, paper plates, foam brush and glue.

In a small bowl I mixed Elmer's glue with water to create a brushable paste for Dylan to use. I handed the brush to Dylan and a paper plate explaining he needed to "paint" on the glue first. Since painting is his current favorite art activity, he immediately jumped into this part.

"Painting" on glue.

Then I showed him how he could pinch a bit of the salt and drop it onto the plate.

Salt drop!

He continued to paint glue and add salt to his plate. Sometimes painting over the salt already there. He did add a bit of the yellow & red pink salts but so little it barely shows in the photos.

Adding more glue over the salt just because. :)

I confess, I got in on the fun too and created my own masterpiece. I was thinking of our beach trip, more specifically the ocean and sunrise, as I added my glue and salts.

Our masterpieces.

After it was done, I realized mine looked more like an Easter egg! ha! Oh well, it was fun to create regardless and we still have a good bit of sand left to play with another day.

9/26/2011

cheese!

Dylan loves getting his hands on my cameras. The DSLR, of course, is off limits. But I will let him play with my iPhone camera and our point & shoot. I actually had advice from one photographer to skip all kids digital cameras and give a child your older camera to play with instead. The quality of the kids cameras being not very good. That said, I don't have an older camera to give to Dylan (our last point & shoot died) so when I found a kids camera at a consignment sale for $4, I snatched it up immediately without even knowing if it worked! When I got home and put fresh batteries in it, I was excited to see it did work (and the previous owner left photos on it - that was amusing).

When I gave the camera to Dylan he was quite excited. Finally, he could push the buttons and have fun without mom close at hand ready to intervene if he got too wild. This camera is nice and chunky & durable (plus only $4) so I haven't flinched once when I've seen it hit the ground. After showing him where to look and what button to push, he was snapping away. I turned to look at something else and overheard him giggling and saying, "cheese!" When I looked back, he had the camera facing himself and was taking self portraits! It was so funny to watch.


The photos in the strip on the page above are some of the first self portraits he took. Definitely not high quality, but I love the happiness he captured and that he's enjoying his new gadget.

Supplies: Sara Schmutz's Recollect & Nursery Rhymes kits; Pink Trike Design's Kraft Funday elements; Jen Allyson's Design 365 January kit; Janda Everyday Casual & Another Typewriter fonts.

9/23/2011

Aquarium

Visiting the aquarium during our trip to the coast a few weeks ago ...


I had a hard time choosing photos so I made a 2 page layout and kept it very simple & clean lined.

Supplies: 2paws Designs Aquarium template; Katie Pertiet's Curled Photo Frame; Just the Way You Are font.

9/22/2011

Recollect kit

Recollect is the newest kit by Sara Schmutz and available at Design House Digital. The kit contains 32 papers, 31 tag elements, 4 ticket elements, 2 monogram alphabets. I had fun playing with it earlier this week and went in two completely different directions:

Dylan & friends at our weekly summer music class...


Supplies - Music: Sara Schmutz's Recollect & Nursery Rhymes (staple) kits; Gennifer Bursett's Blueprint #10 template; Script MT Bold & Janda Everyday Casual fonts.

And having "tea" with a friend ...


Supplies - Tea Party: Sara Schmutz's Recollect kit; Script MT Bold font. Scraplift of "that face" by lizj at Two Peas.

Be sure to visit Design House Digital today to get the Recollect kit at 30% off. Check out Sara's blog for more ideas on using this kit (plus she has occasional freebies!).

9/20/2011

Shirt & Tie Bibs

I mentioned in yesterday's post that the only girl in our playgroup celebrated her 2nd birthday over the weekend. When I stumbled across the idea of Shirt & Tie Bibs by Modest Maven on Pinterest, I instantly thought of our playgroup and how cute the 2 year old boys would look wearing them at her party. I used newspaper, a black Sharpie & one of Dylan's bibs to create the basic bib pattern. The tie & collar pieces I sketched freehand. Playing around with various fun print fabrics and coordinating solids, the end result were these 5 bibs ...


Supplies: assorted cotton & broadcloth fabrics from JoAnn Fabrics & personal stash; fusible interfacing; Pellon Wonder Under; Sulky Tear-Easy Stabilizer; Coats & Clark threads; snaps.

9/19/2011

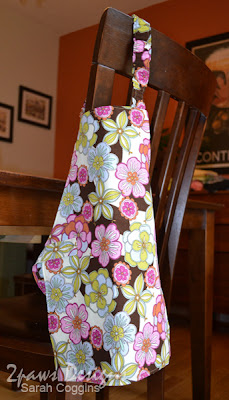
Toddler Apron

Continuing with my theme this year of homemade gifts for all of Dylan's playgroup buddies, I made this adorable little apron for our one and only girl in the group so far. (As of Feb 2012, we will have 9 boys & 1 girl - doesn't even seem statistically possible!) Since 'C' enjoys helping her mom in the kitchen, I thought something pretty that would help keep her clothes clean would be a good fit.


Supplies: Montessori Child's Apron Pattern from Sew Liberated; cotton fabrics (floral & solid light green) from JoAnn Fabrics; Coats & Clark thread; elastic; velcro.

9/15/2011

Handprint Crab

When packing for our beach trip, I made sure to toss in a few crafty supplies. One of my plans was to help Dylan create a handprint crab as a souvenir. It turned out to be a great family activity one afternoon when he was wearing down from the sun & water. Trent, Dylan & I returned to the house ahead of the others to make the crab:


Afterwards, we handed him a fresh sheet of paper, the brush and a small plate with additional paints on it so he could make his own masterpiece. The simple fun of painting was exactly the calm, relaxing activity he needed. :)

Supplies: watercolor paper; acrylic paint; googly eyes; glue dots; Micron black pen.

9/14/2011

Sun Bleached Puzzle

During naptime yesterday, I laid a piece of black construction paper and several letter & number magnets in the sun. The idea came from this post at Quirky Momma to create a puzzle by allowing the sun to bleach the uncovered area of the paper. I thought it might be a fun way to work with Dylan on letters & numbers as well as eye/hand coordination. I spelled out his name and then placed numbers 1-5. We've been practicing counting our fingers based on a song in our weekly music class so this seemed like a good way to tie together the image with the number's name.


He was excited to see the puzzle outside when he woke up. We had to let it sit a bit longer (the blank space hadn't faded quite enough - altogether we left it for about 3 hours). As soon as I let him outside, he ran over for a closer look. I moved the plastic pieces so he could see the darker spaces and he quickly began matching them up.

9/13/2011

Beach Memories

We were blessed last week to be able to enjoy a beach vacation with friends. Altogether we had 3 families consisting of 6 adults, 3 two year olds and 2 infants in 1 house. It was wonderful and I hope there will be similar future adventures!

A small glimpse at our week ...

Our family.
Sunrises (Dylan decided to shift schedules on vacation so we saw a LOT of these!)
Dive show at the NC Aquarium at Pine Knoll Shores.
Playing mini golf.
Swimming.
Walks in the sand.

9/09/2011

Bubble Painting

A glimpse of the bubble painting fun our playgroup had in early August:


Supplies: Miss Mint's Pinwheel Bubbles kit; Gennifer Bursett's Toolbox Mists Vol 1; Myriad Pro font.

9/07/2011

Cars Car Caddy

Making Dylan a car caddy has been on my to-do list for a while. I finally completed it and he's loving it. I used a mix of fabrics from my stash (the black & white checkered came from his birthday party bean bags!) and ordered one fun new fabric - the Cars road map print. The latter was the perfect addition. Besides his love of Cars, the road map design also provides a second driving "surface" for him to play on.

Folded up and ready to go!

The inside with pockets & road.

The outside with the road map.

Supplies: cotton fabrics; Coats & Clark thread; velcro; belting.

9/05/2011

Canvas Quote Art

I had a canvas stored in Dylan's closet that I bought several years ago. I had big plans that never materialized until a few weeks ago when a new idea came to mind and I created this for his room using a quote from Dr. Seuss:


It was so simple to do. Here's how to create your own ...
  • Canvas
  • Assorted letter stickers - mine were by American Crafts & Making Memories
  • Paints - white for letters and spray paint for main color
  • Useful tools - pencil, ruler, painter's tape, xacto knife

Paint the canvas in white (or whatever color you want the text to be). I used some white semi-gloss paint left from our Cat Drawer project and actually rolled it onto the canvas. Let dry completely.

Lightly sketch lines with pencil to help align your letters. I started at the bottom knowing I wanted the quote to be in the lower right of the canvas and used painter's tape to mark the base line. This gave me an easy point to measure off of for the rest of the lines which were at 2" spacing. Place your letters.


I literally just dug into my stash of stickers for this project and used a whole mix of styles & sizes.


Spray paint over entire canvas in color of choice. I used Periwinkle by Krylon. Let dry. Check per manufacturer's instructions as to when a second coat can be applied and do so if needed.


After canvas is completely dry (I waited until the next morning just to be sure!), carefully peel off the stickers. Some of mine were coming up on their own. For those that were more stuck, I used my xacto knife to get under one edge so I could pull them off. Even Dylan got involved in this part. :)


Hang and enjoy your artwork!


My completed canvas is hanging in Dylan's room along with his initial (from Pottery Barn Kids) and a shadow box about his first beach trip last year. The grouping perfectly filled a space that had been empty since we moved him to this room. He was so excited to see it and still points at it & comments. I think he especially likes the canvas since he got to help make it. :)

9/02/2011

Friday Freebie: Under the Sea

Two years ago I created a traditional scrapbook page with photos of Dylan playing in his ocean themed kick & crawl gym. I called it Under the Sea. It had a fun design with the page split by a 'wave.'

I recreated the design in Photoshop to scrap photos of four of Dylan's friends at the beach last September. Aren't they cute?


Supplies: 2paws Designs Under the Sea template; Miss Mint's Kindergarten Crafts kit; Scrap Originals Ocean Breeze kit; Anne Langpap's Citrus Freeze kit; Myriad Pro font.

Now a bit of fun for you - I'm offering the template for free for personal use. It's 12x12 and contains 9 layers that cover the papers, photos & text. Even the wavy text path and shadows are there.

Click here to download the Under the Sea template

Enjoy!

Have you missed one of my previous digital freebies? Click HERE to find them. And, don't forget to subscribe to my feeds so you won't miss future freebies!

9/01/2011

Mirror Revamp

My Mom has been searching for a mirror for her dining room for a while now. She found one possibility at an antiques shop, but with the price tag of $400 was a bit steep.


During a recent visit, she & I went shopping with the mirror on our list of things to look for. We stumbled across one in HomeGoods for $30! The shape was different but the frame detailing was similar to the pricey antique one. The only problem - the white distressed color of the frame wasn't quite the right style for her dining room.


That's where the local hardware store came in. We bought two cans of Rust-Oleum Hammered Spray Paint in gold, removed the mirror and sprayed the entire frame. Then we attached new hardware on the back for hanging. The only hanger the mirror came with was at one end allowing for vertical hanging. It will look so much better hanging horizontally over her buffet so we switched it. The total cost for the mirror, paint and hardware was under $50.

The end result hanging in my foyer:


And a close up of the detail:


Looking forward to seeing it in her dining room on my next visit!