2/15/2011

A Birthday Full of Cars

Our neighbor turned 3 over the weekend and loves cars so what better than a race car birthday card?


Supplies: Stampin' Up cardstock, inks & Celebrate stamp; Provo Craft sticker.

I had planned to give him a car to go along with it.  He loves the Hot Wheels/Matchbox type cars and has quite the collection.  That latter part is what stopped me ... he has so many so maybe another car isn't the best idea.  Then I remembered 2 things.  One, I've seen him get in and out of the car with hands overflowing with the cars he's taken between home and his grandparents, etc.  Two, a while back I saw a great tutorial on another blog for making a Car Caddy.  Aha!  The perfect gift for the boy that loves cars.  Now he has a good way to tote a few with him and has a little play space to go along with it.  I see another one of these in the future for Dylan.  It's just so cute!

Car caddy folded up and ready for travel:

Unfolded and ready for play (cars store in the pockets at the bottom):

Supplies: assorted fabric from my stash; interfacing (I used to stiffen it up since my fabrics were thinner than those in the tutorial); felt; thread; velcro; acrylic paint

2/14/2011

puppy love: Cameron & Scout

A few weeks ago, Laura at Cameron Crazy and I swapped photos to create digital scrapbook pages for each other.  She sent me 3 photos of Cameron and I sent her 3 photos of Dylan.  We also included photo dates, the boys' ages, and journaling.  Today we're sharing our "big reveal" with you.

Here's the layout I created of Cameron & Scout.  Hope Laura likes it!  :)


Supplies: Simply Tiffany Studios Holiday Edition Template No. 14; Karen Funk's Bloom & Christmas Magic kits; Deena Rutter's Maybe paper pack; Jen Allyson's Design 365 - Jan 2010 kit; Miss Mint's Twinkle Toes kit; Audacious Designs Good Dog alphabet; 2peas Island Style, Georgia and Batik Regular fonts.

See Laura's page here.

2/11/2011

Shoot and Edit: Hearts edit

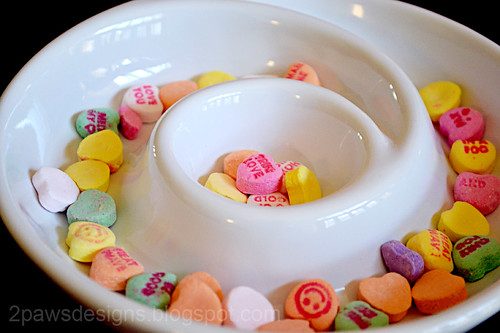
I started my edit this week the same way as I seem to start them all - by adjusting the levels - setting my white and dark points then shifting the input and output levels until it visually looked good to me.  Then I used the clone stamp tool to remove a teeny, tiny piece of something (sugar crumb perhaps?) that was hanging out on the edge of the circle in the center of the bowl.  It was bugging me and needed to go immediately.  ;)

From there ...
  • I created a duplicate layer with the high pass filter.  Love that trick from Ashley and how it really brings out the details. 
  • Added a new adjustment layer - curves.  As with the levels, I played around until it looked "right."
  • Merged all layers.
  • Duplicated the background layer.  Applied the Gaussian blur effect (0.3).
  • New adjustment layer - levels.  I initially left the RBG alone and tweaked the Red, Blue and Green.  Then I returned to RBG and made a few slight changes.
  • New adjustment layer - brightness/contrast (+3, +11).
  • New adjustment layer - color balance.  I adjusted the balance through all 3 tone balance options (shadows, midtones, highlights).  My goal was to keep the colors of the candy hearts natural and the bowl white, but also to warm up the bowl just a bit.
  • Added a solid fill layer with the color #FFF7F8.  Changed the layer to Soft Light mode.  Lowered the opacity to 60%.  I really liked the softening this step gave the image.
And here's my end result:

Join in the fun with Forever'n Ever'n Always Photography and Ramblings and Photos:

2/10/2011

Little Face

Oh how I do so love this little face ...


Each photo represents a week in Dylan's first year of life from a few hours old (top left) to celebrating his first birthday (bottom right). I love seeing them all together and how much has changed and how much has stayed the same. 


I've been working on this page off and on for months.  Picking the photos and arranging them in the template was the easy part.  I was slow piecing the rest together.  The final detail - the stitching - came earlier this week.  I felt like the page was missing something.  I decided to use my sewing machine to sew a frame around the photos.  I intentionally did not make straight lines - I think it's more fun and has more character with a little slant to it.

Supplies: Recollections kraft paper; Déjà Views sticker; Making Memories date stamp & washer; StazOn black ink; Stampin' Up cardstock; Paislee Press template; patterned papers; Little Yellow Bicycle brad; Heidi Swapp acrylic heart; staples; brown thread.

2/09/2011

card: Welcome Baby

Sweet little card I made for a friend who had a little girl.  Trying to get a bit feminine without going full out pink.


Supplies: Recollections white card; October Afternoon patterned paper; Making Memories edge scraper & flower; Mark Richards Enterprises Crystal Stickers; tag; Stampin' Up Fox & Friends stamp set and Daffodil Delight ink; Micron black pen; scrap pink cardstock; Fiskers scalloped edge punch.

2/08/2011

Shoot and Edit: Hearts

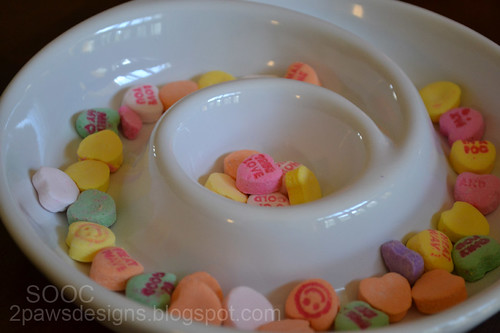
Yup, I went the way of the conversation hearts.  One of those weeks where I waited until the last minute.  I remembered a box stashed away in the junk drawer in our kitchen (seriously do not know how old these are!).  Poured them into my Pottery Barn swirl bowl just because I like it.  :)  And took a few shots.  Here's my favorite:

ISO 1000, ss 1/60, f5.3
Join in the fun with Forever'n Ever'n Always Photography and Ramblings and Photos:

2/07/2011

hat trick

I saw a challenge yesterday on Design House Digital requiring the use of a sports idiom for the title. One hit me right away - hat trick.  Perfect for noting Dylan's love of hats.  He very rarely walks out the front door without one on.


Supplies: Sara Schmutz's Delight papers; Audrey Neal's Good Dog Elements; Karla Dudley's Digi Essentials 2; Robyn Meierotto's In Stitches Journaler Black; Another Typewriter & Marker SD fonts.

2/05/2011

Shoot and Edit: Red edit

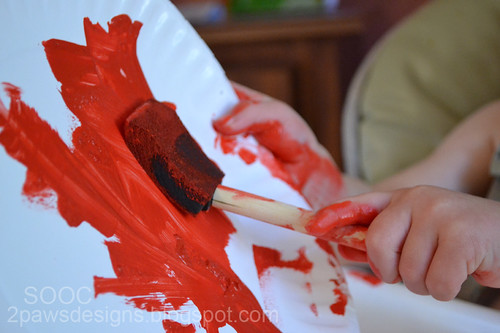
I followed along with Ashley's tutorial as I edited my photo.  My first steps were to adjust the levels and add a duplicate layer with the high pass filter.

I duplicated the background layer again and used the noise filter, but quickly got rid of it.  It softened the lines in the paint strokes and the little lines on Dylan's hands - both I liked a lot and make the photo so I wanted to leave them alone.

My next step was to add a hue/saturation adjustment layer.  I left the hue alone.  Lowered the saturation to -13 and the lightness to -1.  I then duplicated the layer.  Changed the new layer to "saturation" mode.  Adjusted the master hue/saturation settings (-8, -8, -16) and the red settings (-4, +29, +2).

I added a brightness/contrast adjustment layer (-11, +10) and a gradient adjustment layer.  I used the black/white gradient at 100% opacity.  I changed the layer's mode to soft light and the opacity to 25%.


Join in the fun with Forever'n Ever'n Always Photography and Ramblings and Photos:


Also linking up to You Capture.

2/03/2011

Baby Ribbon Blanket

During my nesting phase two years ago, I made a pair of ribbon blankets.  One for Dylan and one for Laura's son Cameron. They were so well liked and easy to make, I decided they would be perfect gifts for two friends who are expecting and made these two a few weeks ago:


Aren't they cute?  And so soft.  I confess, I almost want one for myself! :) 

Want to make your own?  Here's how ...

Supplies (will make 2 blankets)
1/2 yard each of flannel fabric and minky fabric, coordinating satin ribbons (approximately 96 inches total) and thread


Cut a 16-1/2 inch by 16-1/2 inch square of fabric from both the flannel and the minky.  Use a fabric pen to mark sewing lines (approximately 1/2 inch in) and locations for ribbons.


Cut (24) 4 inch pieces from the various ribbons.


Fold each ribbon in half and place on right side of flannel fabic.  Pin in place from wrong side.  I like to measure their placement to ensure equal spacing but then vary the lengths.


Once all ribbons are pinned, place flannel square onto minky square, wrong sides together.  Pin both pieces of fabric.


Sew around all 4 sides leaving a small hole between 2 of the ribbons.


Trim the excess fabric and clip the corners.  Turn the blanket right side out.  Smooth out.


Sew around edges approximately 1/8 inch in to finish.


Finally, add a plastic link to one ribbon, if desired (the one step I forgot to take a photo of!).  It works great as a teether or to attach the blanket to a stroller or car seat. 

Enjoy!

Note: all measurements (overall size, ribbon length & placement, etc) can be varied.  The animal print featured was made to the measurements shown.  The block pattern was made as a rectangle following the design of the print.

2/02/2011

Handprint Heart

I mentioned in Monday's Shoot and Edit post that we pulled out the paints over the weekend to create more handprint art.  I confess, I still had Dylan's Christmas Tree plaque hanging so it was definitely time for a change.  I found a wooden heart plaque at Michael's and painted it white.  Then with Trent's help holding whichever hand we were painting, I put red paint on Dylan's hand and then helped him place it on the plaque. 


After the paint had dried.  I sealed it with Mod Podge just like our other plaques and added a picture hanger to the back.

Supplies: wooden plaque; acrylic paints; brushes; Mod Podge; picture hanger.