11/29/2013

Friday Freebie: Christmas Elf Calendar

Our Christmas Elf, Christopher Pop-in-Kins, will be returning soon. Dylan is already excited. Last year was our first year so it was a new experience all around. One thing I didn't like - a bit of evening stress when trying to determine where our Elf might be the next morning and/or what he would be doing.

This year with experience under my belt and a few new ideas added to my board at Pinterest, I sat down to create a calendar with a daily plan. No more 11pm panic attacks this year. It's all laid out and ready for us from when he returns on Sunday through Christmas Eve.


Download the Christmas Elf Calendar here. Or, if you want to create your own options, download a blank copy here. I hope this makes your holiday season a bit easier and more enjoyable too.

Have an Elf idea or a photo to share? Feel free to leave me a link or share it on my Facebook page.

Happy holidays!

11/27/2013

5 Things I'm Thankful For

Leading into the Thanksgiving holiday, I thought I would share 5 things I am thankful for right now...

Our warm, cozy home (especially during last night's cold rain!).

My anything but boring job that gets me out of the office and into interesting places.


Weekly lunch dates with Trent.

Dylan's prayers at dinner and bedtime. I tay da Lord to soul my keep. Thank for food. Amen. The same each time and so amazingly sweet.

Quality time with my boys.


What are you thankful for?

11/25/2013

Alice, Narnia and Harry Potter

Part of the fun in Oxford earlier this month was learning a bit of literary history. Several famous authors and their stories have a tie to this beautiful city and the University.

On St Aldate's St is a shop with a red door - Alice's Shop. It's where the real Alice, inspiration for Alice in Wonderland, actually shopped and the shop itself was the inspiration for the Sheep Shop in Through the Looking Glass. I did step inside briefly to look around (no photography allowed) and it was full of Alice in Wonderland related items.


Across the street from Alice's Shop is Christ Church where her father was once dean, and Lewis Carroll a student and teacher.


Inside the Great Hall at Christ Church is a blending of two fictional worlds - Alice and Harry Potter. Alice came first. The long neck brass firedogs that can still be found in the fireplaces - remember how Alice's neck grew after she ate a bite from the cake marked "eat me"? These were Carroll's inspiration for that.


A newer tribute to the author and story were pointed out to me by the Custodian on duty. A section of stained glass windows features Alice, Carroll, their characters and others in the stories including the White Rabbit and the Queen of Hearts.


The Great Hall itself? A replica was created for Hogwart's in the Harry Potter movies.


Scenes in two of the movies were actually filmed in the stairwell that leads to the Great Hall. I took photos of this simply because I found it architecturally beautiful. Only later did I learn the bit of cinema history as I've never read the Harry Potter books nor seen the movies (perhaps I need to add them to my list?).


Another tribute to Oxford's history both fictional and nonfictional is told throughout the city in its gargoyles. They are everywhere and feature faces as well as animals and nature. More recently a new set was installed on the northwest side of the Bodleian Library that was the result of a competition requesting ideas from children to replace aging, deteriorated faces. The winning designs included a couple characters from Alice in Wonderland - the Dodo and Tweedledee & Tweedledum - as well as Aslan the lion from The Chronicles of Narnia.


Narnia, too, has ties to the City and University as the author, C.S. Lewis, was a faculty member at Magdelan College. He also was known to spend time along with several other writers (the 'Inklings') at a pub that still exists today - The Eagle and Child.


These photos and bits of stories are just the tip of my experiences in Oxford. Truly a lovely city rich in history.

If you could follow in the footsteps of a favorite author or character, who would you choose?

11/22/2013

Disney Trip Envelope 2013

I originally created the Disney Trip Envelope in fall 2007 and updated it a year later. Since then, it has sat amongst our trip albums and other memories waiting for a future use. The future finally arrived last spring as we took Dylan to Walt Disney World for the first time. Here's a look at the changes I made for our latest trip ...


Park Hours I kept this one essentially the same. Updated the dates and park hours for each (hint: find park hours on WDW's website here - https://disneyworld.disney.go.com/calendars/).


Parades & Fireworks On Disney's website, you can search parade times for a particular date. I searched for the 4 days of our stay and made a note of times by park so we could easily plan for when we wanted to see one.


Table Service We opted not to buy a dining plan this visit and pass on all table service. The latter was partly in not wanting to be tied to a specific place and time. We wanted to just move at whatever pace worked best with Dylan. And, while I was somewhat tempted to book a character breakfast, as he was showing a little nervousness around costumed mascots locally at the time, I didn't want to chance a similar fear and have a terrified child stuck at a table. Thus, this card was pulled from the envelope and stashed for use hopefully on our next trip.

Kid Attractions In my original design, I had a card listing our personal favorite attractions at each park and which had fast passes. I recreated the attraction card and made a new list of kid friendly attractions that we thought Dylan might enjoy and underlined the ones that had the fast pass option.


Pressed Pennies This was a new card I added. Dylan already had a pressed penny collection from various trips. Thinking he might want a specific character or two during our visit to Walt Disney World, I searched online at Presscoins.com to find where some of his favorites were located as well as noting which ones were at our resort.


Disney To Do List Before the trip, Dylan & I talked about what he might want to do at Disney and came up with a list of 7 basic things. I printed these out for him to use as a checklist during the trip. This was a fun way to enjoy our visit to Walt Disney World and also not feel as pressured to "do it all."


Admittedly, when I first created this envelope, smart phones weren't what they are now. I did have a Blackberry on the 2008 trip, but the "there's an app for that" phase hadn't begun. Part of my reason for continuing with this (besides the simple tradition for us) and for leaving my DSLR at home (*gasp*) - we wanted to be in the moment and enjoy that magic with our son. Not faces glued to little screens in our hands or fumbling with a heavy camera to get the 'perfect' shot. As magical is Disney is at any age, watching him light up with excitement was the most magical part of all.

Planning a trip to Disney with your young child(ren)? Check out my tips for Disney with a Preschooler and how to save money with Packed Fun for Less.

11/20/2013

Give Something Personal This Holiday Season

If you have a digital camera-whether it's your smart phone or your DSLR-chances are you have a lot of wonderful photos of the people you love. And there's a pretty big chance that if you do, those photos haven't seen the light of day since you first took them, posted them to Facebook, or picked that new wallpaper for your smart phone or computer.

Now, imagine those photos in a book, given as a gift. Wouldn't you look like the best most thoughtful person ever? Yeah, you pretty much would. And with Blurb's easy, custom books, you can make a photo gift book that's both personal and extremely polished.


You can use your Facebook photos, Instagram photos, or photos on your computer. You can design your own book, or have it automagically created with the Blurb Designer Collection templates. All these tools are designed to run right in your web browser, letting you make a book in as little as ten minutes, and they start at just $12.99.

A real book. One you can hold, share, and pass on. Plus it's so easily customized that you can create different versions for different people. Just swap in a few new photos, change the text, and re-order. Looking to make something a little bigger, like a family history book? Yeah, Blurb has ways to do that too.


Of course, this is a custom gift, so you don't want to be last minute about it. Even though you can order up until December 19, ordering early is always better (and a bit cheaper too).

So, get started on making a beautiful gift book now Blurb.

This post was sponsored by Blurb. See my previous reviews of Blurb products: Custom Planner and Designer Collection Photo Book. Find more of my Gift Idea suggestions both purchased and handmade here.

11/18/2013

Last Week

Trent & I spent the past week in England splitting our time between Oxford and London. Although we returned on Friday afternoon, I'm still absorbing everything we did and saw in that time. Our first visit ever so we packed it full. Here's a small glimpse ...

The Headington Shark


Chapel ceiling at Queens College


Angel carving in the chapel at Christ Church

Horse Guards, London

House of Parliament, London

More to come as I have time to reflect and tell the stories. I did start a Smash book (my first) and just ordered photos to add so there will be an upcoming post sharing details of it soon.

11/15/2013

Pink & Peach Shower

Our playgroup is growing by one more little girl and, naturally, we had a nice moms afternoon out for tea. Our theme this time took a little creative thinking … pink for a girl, peach for Georgia peaches (a tribute to her name, Savannah), and lollipops in honor of her older sister's nickname for her "Lolly." Knowing that tea service fills the table, we kept our decorations to a minimum - pretty peach roses added to the existing floral arrangement, rose petals spread across the table, and homemade Oreo lollipops in little buckets for favors.


Alicia made another one of her gorgeous diaper cakes. This one accented with lollipops and onesies in lollipop shapes.


I made the keepsake invite for the mom.


I wish I had taken a better photo, but this gives the idea. Using a free template, Stacey cut the bracket shape for me on her Silhouette. I then printed the outline and text; and finished it off with a peach flower sticker that matched the Oreo lollipop favors.

We also had small bags of flavored popcorn with labels "ready to pop" and jars of candies provided by the mom's sister.

It was a wonderful afternoon for us to celebrate. We're all looking forward to meeting the newest member of our playgroup!

11/13/2013

Wordless Wednesday: Downtown Durham


Linking up to Wordless Wednesday

11/11/2013

DIY Numbered Burlap Basket

While redecorating our laundry room, I was searching for new baskets/bins to tidy up the look on the open shelf. To give the room a more peaceful, completed feel. I managed to re-use two fabric bins from our old house and quickly found a nice handled basket at HomeGoods to store all our Swiffer products (yes, we have a lot of those!). But I couldn't find another like it. I wanted either a match or something that would coordinate nicely with what I had and tall enough to store all our lightbulbs. Yes, I did just say I was searching for a bin to store our lightbulbs.


My most recent search led me to Marshall's where I discovered a burlap basket in the clearance section for $7.50. The size seemed perfect so I scooped it up immediately with simple plans to alter it.


Going along with the trend of numbered decor and still excited about how easy & well my freezer paper stencil sharks turned out at Halloween, I decided I could do the same to the basket. I already had all of the materials.

First, I measured the distance from the handle to the bottom of the basket to determine a height for my number. I then used Photoshop to select a font and size the '1' (you could easily do this in Word or Google Docs, etc).


After printing the '1' onto regular 8.5x11 paper, I traced it onto freezer paper and cut it out using my X-acto knife. Then determined placement on the basket.


The ironing was a tad tricky only in that the basket has soft sides. I held it carefully and ironed lightly to tack it before moving it to the end of my ironing board so I could press down. I used the cotton setting and pressed it firmly twice.

Once I felt confident the freezer paper was secure, I let it cool and then painted it with fabric paint and a foam brush. I personally like the cheap foam brushes - easy to blot & dab the paint on.


After painting, the directions said to let it dry up to 4 hours. I didn't. I cheated. I was painting it in my bathroom anyhow so I got out the hair dryer to speed things up! After a minute or two, it seemed dry and I pulled away the freezer paper.


Literally, this project took me maybe 15 minutes start to finish. It helped that I had my idea, had experience with the freezer paper stenciling (really, so easy - if you haven't tried, go for it!), and used the hair dryer to speed up drying. The result is a fun new basket for our laundry room.


And, yes, it really was all for lightbulb storage.

11/08/2013

10 Years

Somedays it feels like I blinked and we went from this ...


to this ...

Photo credit: Nila Garriga Photography

10 years. 3,650 days. 2 houses. 2 cats. 1 amazing son.
Love, laughter, tears and hugs. 
Millions of memories big and small. Together.

Happy tenth anniversary, love.

Here's to the start of our next decade together
and a million more memories.

11/07/2013

Gift Idea: Personalized Photo Books

When looking for a meaningful gift, a photo book is always a hit especially when it's made by you. If you don't consider yourself crafty, no worries - with Blurb, you don't need to be. Blurb's website and free tools make it easy. 

Struggling to decide what type of book to make? Take a look at the Blurb Gift Center for lots of ideas … perhaps a Family History Book for the family member that loves researching the family tree; a Baby Book to share all those firsts with grandparents; a Food Book to pass on family recipes to the newlyweds. There really is a book for everyone.


Ready to get an early start on your holiday gift list? Blurb has two great offers to save on any of their print books:

Save 20% when you spend $40 or more on print books at Blurb
When you use the coupon code: MORESAVINGS
**Offer valid through November 11, 2013 (11:59 p.m. local time). Valid for printed books only. A 20% discount is applied toward your product total with a minimum order of $40. Maximum discount is USD $100 or CAD $100 off product total. This offer is good for one-time use, and cannot be combined with volume discounts, other promotional codes, gift cards, or used for adjustments on previous orders.

Save $25 when you spend $100 or more on print books at Blurb
When you use the coupon code: EARLYSAVINGS
**Offer valid through November 11, 2013 (11:59 p.m. local time). Valid for printed books only. A $25 discount is applied toward your product total with a minimum order of $100. This offer is good for one-time use, and cannot be combined with volume discounts, other promotional codes, gift cards, or used for adjustments on previous orders.

This post was sponsored by Blurb. See my previous reviews of Blurb products: Custom Planner and Designer Collection Photo Book. Find more of my Gift Idea suggestions both purchased and handmade here.

11/06/2013

Laundry Room Reveal

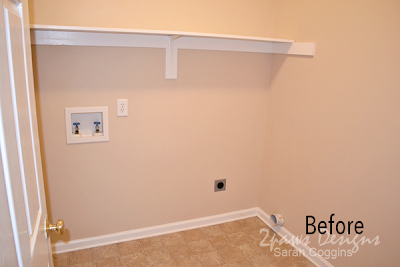
One of the first rooms we started redoing in the foreclosure house was the laundry room. Yes, the laundry room. I know, it seems odd but when you figure how much time you spend in there plus it's a relatively small room (thus "easy" project to tackle), it made sense.


We actually started in February and while I've shared glimpses on Instagram, I'm just now sharing the full photos here. All because I was trying to make it a tad prettier before I got around to nice photos.

To appreciate how far the room has come, here is a before picture taken during one of our visits the month prior to buying:


Not bad. But rather bland.

First step was painting. I knew I wanted to brighten the room up and had a quart of light yellow paint on hand so I started with that painting the upper third of the room.


I hung beadboard wallpaper on the lower two thirds. (Note: we had some leftover from the cat drawer project at our old house - the adhesive was no longer good. My advice, buy what you need. Use it. Then toss any leftover. I wasted a lot of time hanging old paper that fell off a short time later and then had to start all over.) And we replaced a cracked outlet we discovered when I removed the faceplate during wallpapering.


Then Trent helped me cut 1x boards and nail them to the walls to extend the original trim around the entire room. This makes a nice separation between the paint and wallpaper.

Along the wall with the door, we added 3 hooks. I can't say enough about how glad I am we did this. We use these hooks constantly.


Because I still have my "no wasted space" mantra from our last house, I even put to use the space behind the door. This is where we store our lint trap cleaner, mop, broom & dustpan.


Not really fancy stuff but necessary and neat, tidy & unseen in this location. Plus easily accessible when needed.

Finally, I have been "prettying up" the shelf. As it is an open shelf, all the clutter of stuff tossed up there was making me a little crazy when I walked in the room. With a little reorganizing, clearing of stuff that didn't belong (box of cables? Not really necessary in the laundry room), and addition of two new baskets - the shelf is orderly and the room feels far more peaceful when you enter.


That's the full completion of the first phase of the laundry room. Yes, I have plans to further alter this room like adding a sink. But that's for another day. One project at a time.

Sources: Lowes - 1x trim boards, Style Selections Beadboard Paintable Wallpaper, Olympic white semi-gloss paint; Home Depot - Glidden Soft Candlelight eggshell paint; Target - Threshold Heavy Coat and Hat Hooks, ClosetMaid fabric bins; Marshalls and HomeGoods - baskets ; large blue mason jar thrifted; Container Store - Mom & Broom Organizer.

11/04/2013

Owl Baby Blanket

Over the weekend, we celebrated the upcoming arrival of our newest playgroup member and third little girl. Naturally, I wanted to make her a handmade gift. This sweet owl print flannel caught my eye when I was buying tulle for my Halloween costume and I bought a yard on the spot.


A closer look at the fabrics:


I made the blanket similar to how I made Dylan's Cars blanket almost 3 years ago. It still gets a lot of love and hopefully this one will too.

Looking forward to meeting you soon, Little Miss S!