4/29/2011

Easter 2011

A glimpse of Dylan's fun on Easter morning this year:


Page design a scraplift of baersgarten's Kikaninchen layout on Two Peas.

Supplies: Miss Mint's April Morning, Hoppy Easter, Daditude and Ten Pin kits; Agnes Biro's Easter Fun kit; Karen Funk's Bloom kit; Carina Gardner's Paisley kit; Sara Schmutz's Colorwheel papers; Marker SD font.

4/28/2011

Shoot and Edit: Family edit

I experimented with an action for my edit this week. I chose to use CoffeeShop Vintage from The CoffeeShop Blog. I adjusted the levels on the photo first and then ran the action. After the action completed, I adjusted the Tint and Colorizer layers to my liking. I wanted to retain some color, but keep it softer than the original. Finally I cropped the shot slightly to remove the distracting bit of picture frame in the top left corner and the light fixture to the right.


Join in the fun with Jill Samter Photography and Ramblings and Photos:

4/27/2011

Wordless Wednesday: Fun at the Zoo


Wordless Wednesday

4/26/2011

Floral Card

Playing around with my paper supplies last week (seems like I'm doing a lot of digital designs or sewing these days), I made this card:


Supplies: Stampin' Up! Rich Razzleberry cardstock & ink, Fast & Fabulous stamp set; Recollections white cardstock; American Crafts ribbon; Chatterbox patterned paper.

4/25/2011

Shoot and Edit: Friends/Family

For this week's Shoot and Edit theme, I chose a photo I took of my husband & son reading together on Saturday:

ISO 3200, ss 1/160, f5.6

Join in the fun with Jill Samter Photography and Ramblings and Photos:

4/22/2011

tissue eggs

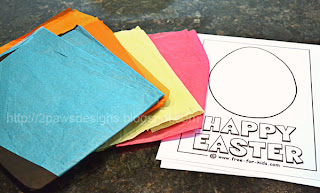
Since our tissue paper shamrocks in March were so successful with our playgroup, we decided to try a similar craft yesterday for Easter. This time we gave each boy a sheet of white cardstock with an egg outline printed on it. (I found the egg printout here.) We moms added a bit of glue using gluesticks inside the egg and then the boys had fun sticking bits of colored tissue paper to it.


Dylan's completed egg (admittedly with a few pieces by me - he bored of it before he finished covering the areas where the glue was):


And a look at our overall fun with all 6 boys ...


Supplies: Simply Tiffany Studio's 52 Thursday Templates No 9; Karen Funk's Bloom kit; Sara Schmutz's Delight papers; Oscraps.com Tweet, Tweet Collaboration kit; Miss Mint's Hoppy Easter kit; Sketch Rockwell & Myriad fonts.

4/20/2011

Cheddar Bunny Carrots

Looking for a simple craft for the moms to do during our playgroup lunch I hosted two weeks ago, I decided upon a project for the kids' Easter baskets. I found an idea while browsing Pinterest about making "carrots" filled with goldfish from No Fuss Fabulous blog. This was perfect - a quick & simple craft we could complete while keeping an eye on our toddlers plus much better for them than more sugary treats.

If you are still in need of a little something for your little one's basket, here's how to create your own ...

Supplies
  • disposable icing or candy decorating bags (note: I ended up with the latter since the icing bags were sold out, but be aware there is a large Wilton logo & smaller recycling logo printed on the candy decorating bags)
  • Annie's Homegrown Cheddar Bunnies
  • green ribbon

Fill each bag about two-thirds full with crackers. Since we had the bags with the logos, we filled to just below the logo. Twist the bag closed around the top of the crackers and secure with green ribbon.


Simple as that and you have cute treats for the bunny to deliver. :)

4/18/2011

Easter Bunny photo

Last week our playgroup met at the mall for our annual bunny photo. The toddlers refused to stay near the Bunny by themselves so the five moms and one grandma present jumped in too. The two babies were pretty relaxed about the entire event. Honestly, I think one slept through it!


I had to laugh when I finally took a look at the photo. The toddlers look like they are getting mug shots - all so serious. LOL It was such a change from last year - not that getting the photo then was easy either as we had at least one runaway baby. After that adventure we had a nice, albeit chaotic at times, lunch at the Cheesecake Factory.  This year it was Chick-fil-a in the food court. ;)

Supplies: Karen Funk's Bloom kit; Miss Mint's Hoppy Easter kit; Jenkins v2.0, 2ps Island Style and Arial fonts.

4/15/2011

Shoot and Edit: Faith edit

I was pleased with my SOOC shot this week and kept my editing to a minimal:

  • Adjusted levels.
  • Ran Ashley's Nice & Easy action
  • Adjusted brightness/contrast and hue/saturation.
  • Increased the density for the warming filter.
  • Turned on the solid fill layer.
  • Cropped image.


Join in the fun with Jill Samter Photography and Ramblings and Photos:

4/14/2011

Once Upon a Potty

Dylan has taken an interest in recent weeks in using the potty. He got the idea from my mom during her last visit and has been overeager at times to try. After having a temper tantrum one day when I wouldn't let him (no kidding!), I took him shopping for his own special seat and stool.

Yesterday he asked as he often does to sit. I agreed and handed him his copy of Once Upon a Potty to look at. I expected his usual, sit for a moment & look at the book, then ready to get up and return to playing. I took the moment to snap a picture with my iPhone. Much to my surprise, moments later he actually succeeded in using the potty for the very first time. There was a lot of cheering and high-fives. Then I treated him to M&M's. I don't expect full potty training success for a while (he's only 20 months and truthfully I hadn't even planned to start until he was at least 2-1/2). We only try when he wants to. But I do hope yesterday's success and celebration help encourage him.


Supplies: Sweet Caroline Studio's Weathered Frames 2; Simply Tiffany Design's Tears Set 1; Miss Mint's Kindergarten kit; argyle paper & word strips my own design; Chaparral Pro & Jenkins v2.0 fonts.

4/12/2011

Shoot and Edit: Faith

I took this shot earlier today. It's of a prayer in a book that belonged to my mother as a child and she later shared with me. It's a bit delicate now (ie, I was probably a bit hard on it when I was younger) so I keep it safe on a high shelf in my bedroom. I thought it would be interesting to photograph for this week's theme of Faith.

ISO 1600, ss 1/160, f5.3
Join in the fun with Jill Samter Photography and Ramblings and Photos:

4/10/2011

Shoot and Edit: Up edit

I wasn't sure I'd get my edit in on time this week. I typically work on them on Thursday nights after Dylan is in bed when I have time to focus on Ashley's tutorial for the week. This past Thursday I was too exhausted. Then I was hit early Friday morning with a migraine that didn't subside until well into yesterday morning. By the time I was feeling better and shaking the fog of pain medications, I just wasn't into it so I waited until today. And I'm glad I did. Yesterday I had no interest in playing with textures. I just couldn't focus. Today I'm back to the "normal me" and saw the possibility of the texture in this particular photo and I got excited. I found the time (after Dylan's bedtime, naturally) to watch the video, download the textures and play. So happy I did because I'm really liking the result ...

I started my edit using Ashley's Nice & Easy action.  Then flattened my image, cropped it and added the texture layers.  Here is my final texture recipe:


And the completed edit:


I like how it has a bit of an aged look to it. :)  Oh, and for those that asked, yes, Dylan did make it to the top. He's gotten very good at climbing stairs at the playground (and even walking down sometimes) with those nice low handrails. Great place to practice!

Join in the fun with Jill Samter Photography and Ramblings and Photos:

4/07/2011

Giraffe Love

I had so much fun making this giraffe for one of Dylan's friends.  Isn't he adorable?


I found the directions to make him here. Technically, he should stand up (apparently I didn't get him stuffed quite as well as I thought) but he does look rather cute sitting there.  I'm going to try another one soon for Dylan.  He loved this one so much that when he saw it after I finished, he grabbed it and stashed it in his crib! I felt a little guilty taking it away.  Hopefully his buddy loves it just as much.

And, of course, I needed a matching card:


The sentiment was inspired by Big Birthday Giraffe card by mum of 2+2 at Splitcoast Stampers

Supplies: Treehouse Designs patterned paper; Recollections white cardstock; Making Memories edge scraper; QuicKutz Studio font; Stampin' Up! Fox & Friends stamp set and Early Espresso ink; Bernhard Modern Standard font.

4/05/2011

watching the seals

I took these photos during our trip to the North Carolina Zoo last month.  The large photo at the bottom is one of my favorites - I really wonder what was going through Dylan's head as he watched the seals swimming by.


Supplies: Simply Tiffany Design's 13th Collection template; Pink Trike Design's Stormy Skies kit; Karen Funk Designs's Christmas Magic kit; Caflisch Script Pro font.  Inspired by the March Color Swatch Challenge at Design House Digital.

4/04/2011

Shoot and Edit: Up

Climbing *up* the stairs ...  :)

ISO 80, ss 1/160, f8.0
This week I grabbed another shot I took with my point and shoot.  I confess, it was a very quick snap & go as my friends and I were trying to keep a hand on 3 toddlers running around the playground.  I think we moms were the most tired at the end of it!

Join in the fun with Jill Samter Photography and Ramblings and Photos:

4/01/2011

Shoot and Edit: Green edit

I did love my SOOC shot this week.  Just found it, well, dull.  The colors needed to pop - the green of the leaves, the yellow & orange of the butterfly.  Those things were my focus and following the tutorial Ashley shared, it came together.

I used the "getting grass greener" hue/saturation steps to improve upon the green of the main leaf - the leaf the butterfly is sitting on.  I left the remaining leaves as is.  Then I repeated the new hue/saturation layer with shades of orange and yellow.  For these I focused only on the orange and yellow areas of the butterfly's wings.  After I was pleased with all three colors, I merged the layers and added a new adjustment layer for color balance.  I tweaked all three options (shadows, midtones & highlights) slightly.  Again, I merged the layers.  Then I added the high pass which gave the photo that final pop it needed.  I'm excited about the results:


Join in the fun with Jill Samter Photography and Ramblings and Photos: