7/23/2011

Shoot and Edit: Summer edit

I had fun editing this photo of Dylan & his buddy playing at the sprayground. I only had my point & shoot on me that day (way too much lugging kids, stuff & DSLR to the pool) and took the shot from the comfort of my chair under an umbrella. With the glare of the sun making it difficult to see the LCD screen, the shot was a bit tilted and dark. I corrected those and tightened up the focus a bit with my edit.


Week 28: Summer Edit

Join in the fun with Jill Samter Photography and Ramblings and Photos:

7/22/2011

Cars Birthday Party

Dylan has definitely had a love for cars (specifically Disney-Pixar Cars) for the last year. I joke my mom started it with the Lightning McQueen walk/ride toy she gave him for his first birthday. Maybe it was the light-up Lightning McQueen shoes Trent picked out for him in December. Or maybe just that boys & cars go hand-in-hand? Regardless the reason, my child loves all things Cars. Thus, it was pretty obvious the theme for his 2nd birthday party should be Cars. :)

In early June I mailed out "save the date" style postcards to his friends. Found the idea here and thought it was too cute. Who doesn't love mail? Dylan gets excited about ours and rarely has a piece addressed to him so I thought his friends might find it fun to get a little something.


For the front, I used an image I found on Flickr. The back had a note from Lightning McQueen stating to save the date of July 16th for Dylan's party.

The following week, I sent out the official invites. I came up with the idea in Photoshop but wanted a bit more depth so the final invites were a hybrid design. I created the background black/white checkered paper and printed it out to 5x7. The section with the info was made in Photoshop and printed on 4x6 photo paper. I used the same Lightning McQueen clip art on the invite & return address labels.


This party was for his playgroup friends & their families so we chose to start at 10am. Early enough to beat the July heat and enjoy the backyard - plus wear out the kids for afternoon naps. ;)

We had box "cars" for the kids to color and "drive" ....


Bean bags to toss into a tire ...


"Car wash" (ie, ball pit) and the climber ...


plus his two toy push mowers (amazing how toddlers love those!), small Cars coloring sheets to color (last minute addition as Dylan wanted to do that waiting for his party to start) and we played a little "Ramone's Body Art" getting temporary tattoos.

For decoration in the yard, I hung the birthday banner & road signs


that I made as well as a couple of old records with the centers spray painted silver to look like tires & hubcaps. Against our house, we had a real hubcap and a subway art print I created:


Inside, I set up our kitchen as "Flo's V8 Cafe" and split the food & drinks into two locations. The drinks were at the bar area and I put together this fun display using a plush Lightning McQueen toy, gas pump (idea from Disney Family.com) and can of "Dinoco" oil I made from an empty formula container:


The adults had red party cups and each of the toddlers got their own Take 'n Toss Cars cup to use & take home. Before the party, I printed a label with each name to mark the kids' cups to help keep them straight.


The food area was designated with our "Flo's V8 Cafe" menu. I created the logo in Photoshop using online images as examples. Each of the foods were given a fun name (idea from here). The place setting at the bottom is from Sara Schmutz's Summer Picnic Embellishments. I used glue dots to adhere the menu to a record and set Dylan's little metal Lightning McQueen lunch box in front:


To eat, we had Perdue Chicken Nuggets (in Cars shapes, of course!), cheese cubes, and Chicken Minis & Fresh Fruit from Chick-fil-a:


Followed by "Piston Cup-cakes" for dessert (oh yes, I had to go that cheesy! LOL). I made the cupcakes myself and used Cars baking cups & Fun Pix by Wilton.


For cake time, we had the 6 toddlers seated at a small picnic table in the backyard. I have to say, I've never been more impressed! As badly as they all wanted the cupcakes throughout the morning, they sat so nicely and just looked while we sang happy birthday and Dylan blew out the candles.

On their way out, each of Dylan's friends grabbed a party favor bag:


The favors were wrapped in brown sandwich bags and sealed with labels I created in Photoshop. I used the same checkered flag border I made for the invitations. Each had a child's name on it followed by a thank you from Dylan. Inside was a pullback Cars toy from the Disney Store, coloring sheets and a small bag of M&M's.

It wasn't until the party was winding down that I thought to get someone to take a family photo (I was enjoying the fun too much!) ...


Dylan had a great time despite his lack of a smile here. He was tired & a bit displeased we pulled him away from the fun for a moment to take a photo. It was all we could do to get him to look at the camera. ;) His shirt was my final party "decoration." I followed this tutorial and finished it off with a fun red zig-zig stitch around the edges using my sewing machine.

7/20/2011

Things You Said ...

I loved this overlay & prompts from Paislee Press. Dylan cracks me up right now with funny things he says and his "sayings" for certain things (ie, "me me" = "excuse me"). Definitely everyday moments I wanted to capture for his album.


Supplies: Paislee Press's Conversation Piece No 1; all patterned papers from Design House Digital's NSD 2011 Blog Hop kit; Rhonna Farrer's Celebration kit; Daily Birdie font.

Layout included in School of Design - Journaling From the Heart 3 at Design House Digital. Sept 15, 2011.

7/19/2011

Look who's two!


Celebrating Dylan's 2nd birthday today - still hard for me to believe. From tiny newborn to fun, independent toddler. He's a happy boy with nearly a constant smile on his face. An infectious laugh. Sweet and loving to all. Enjoys playing with his friends. Loves cars (especially those Disney-Pixar ones), Tom & Jerry and, of course, his family. :) He gives his Dada & I the best hugs & kisses. We are so very grateful. Happy birthday, Dylan!!

7/18/2011

Shoot and Edit: Summer

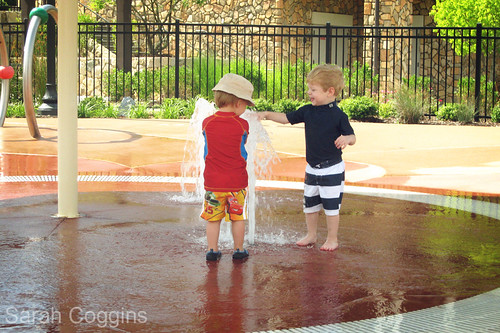
Nothing says "summer" like fun splashing with your friends at the sprayground. :)

ISO 200, ss 1/100, f11.0

Join in the fun with Jill Samter Photography and Ramblings and Photos:

7/15/2011

Cars Birthday Party Preview

I've been busy this week finalizing the details for Dylan's birthday party. Here are a few sneak peeks I've shared recently on Instagram:

Creating a "Dinoco" oil can label as part of the decorations.

More party decor - a real hub cap. (Great find at the Scrap Exchange.)

Bean bags.

The menu. (Inspired by this post at Mad in Crafts blog.)

I'll share more photos & details after the event. In the meantime, I have some cupcakes that need icing ... :)

7/13/2011

Birthday Banner

I've always loved seeing the fabric birthday banners other crafters have made and thought perhaps someday. Someday no more - Dylan's birthday is coming up next week so that seemed like the perfect excuse to take action on this project. I found a couple of great tutorials online (Audrey Pawdrey & See Mommy Sew) and used a mixture of fabrics from my stash to create a fun banner we could use for all our family birthday celebrations.


Supplies: fabrics, thread, Wonder Under, 1" bias tape maker.

7/12/2011

first {full} haircut

At 20 months, Dylan finally got his first full haircut. My stepmother is a hair stylist so we went to visit her at her salon. This was also his first time in a salon as she had done his previous trims at their home. Dylan did a great job of sitting relatively still until we neared the end. At that point, I pulled up Curious George clips on my iPhone for him to watch so she could complete the cut. Then he had fun "helping" sweep up the mess. ;)


Supplies: Sara Schmutz's Star Spangled kit & Back to Basics tags; Karla Dudley's Digi Essentials 2; Miss Mint's New Do kit; Karen Funk's Claire kit; Another Typewriter, Marker SD & Caflisch Script Pro fonts.

7/11/2011

The Cat Drawer

I'm constantly on a quest to better improve the use of space in our small home and am quite proud of this idea. Backing up to when we bought our house in March 2003, it was just me, Trent & our 2 cats. The cats' litter box tucked away perfectly into the "nook" in our then computer/scrap/miscellaneous room. After Dylan arrived and we decided to turn that room into his room, the computer/scrap stuff moved into the guest room and the cat litter box moved to our foyer for lack of space anywhere else. Isn't that just a welcome sight? See our front door on the right? Literally walk in and "hello, cat toilet." ;)


The litter box lived in our foyer for about a year. A year of me grimacing as I walked past it constantly headed up or down the stairs, in or out the door. Finally I had an "ah ha!" moment. Let's cut into the dead space under the stairs and shove that box back in there. Ok, so it should look a little nicer than that, but there was my initial plan. Our laundry closet claims most of the under stair space (it's behind the closet door on the left), but then as far as we knew there was nothing.

Under Dylan's watchful eye, Trent cut the initial hole so we could see exactly what we were dealing with:


After leaning into the hole several times to take measurements and sketching up details, we decided on our size and pretty much maxed out the height & width. Trent cut the hole to the correct dimension. We added a base of 2x4s and slid in a plywood box we built to house the drawers. Our assistant helped with the clean up. ;)


Next we framed it out and added the drawers we built. We temporarily taped up the hole in the bottom drawer to keep our nosey curious cats out until we completed the project:


Added drawer fronts:


Finally, we added textured wall paper and wood trim before painting the drawers semi-gloss white to match the existing trim and closet doors. Screwed the frame for the cat door in place (we've left the actual door off while the cats adjust). Added bronze drawer pulls to match those in the kitchen.

Here's a look at the completed project (and glimpse of our freshly painted door & shined kickplate that I mentioned needed a little TLC):


The top drawer is for miscellaneous stuff (hats, gloves, etc). The bottom drawer houses the cats' litter box and the Litter Locker:


We intentionally designed the drawer to fit the two pieces in this manner so the cats have to walk down a "hall." This design along with the small piece of carpeting helps keep the litter in the drawer. The very bottom is lined with sheet vinyl to allow for easy cleanup - which thankfully has not been an issue so far. Seems the cats like their new private space.


Can I brag a minute and say how much I'm loving this?? I dreamed it would look good (and probably drove Trent nuts talking for months about how we should do this) and am pretty darn proud of our hard work. It took many hours over several weekends mainly while Dylan napped for us to complete it but so worth it. And, it was fairly easy on the pocket - about $150.

Linked up to IHeart Organizing.
Shared with Nate Berkus Show here and with BHG.com's I Did It! here.

7/09/2011

Shoot and Edit: Red, White & Blue edit

My original photo needed a little punch of color. Sounds funny, I know, but comparing the edit to the original I could really see how dull the SOOC shot was.

I kept my edit simple again [it's my style clearly :) ]. Started with Ashley's Nice & Easy action and tweaked each layer. Merged. Then tried the step she taught this week about using the marquee tool & free transform. I had no idea! Love that. Along with a bit of cloning, I was able to remove some of the background noise on the right hand side.

I would have loved to remove the metal chair arm in the bottom right, but everything I did looked too fake. I couldn't just leave it as it was too shiny & distracting so I added a new brightness/contrast layer. I adjusted both then used the layer mask to remove it from all other areas of the photo. Subtle, but definitely helped.


Join in the fun with Jill Samter Photography and Ramblings and Photos: