5/30/2011

Memorial Day

Flag proudly displayed on our front porch.

5/27/2011

Shoot and Edit: Chalk Drawings edit

Thinking about this week's edit, I already had in mind that I wanted to keep it simple. I enjoy learning the new techniques for editing, but honestly was glad to see Ashley kept her editing simple and used her Nice & Easy action. I, too, used that action on my photo. Tweaked a bit and then cropped the image.

Here's my final result as well as my experiment with this week's mouse over tutorial (I had been wondering how that was done!):


Join in the fun with Jill Samter Photography and Ramblings and Photos:

5/26/2011

Duke Lemur Center

In January, Dylan and I visited the Duke Lemur Center with friends. Unfortunately, the day we chose happened to be quite chilly so the lemurs were hiding indoors. We could only see them by peeking through windows. Must go back on a warmer day to see them outdoors playing. Nonetheless it was a fun adventure.


Supplies: Kate Teague's Easy Breezy Elements & Schoolin' kits; Design House Digital Spring Fever Designer Blog Hop kit; Simply Tiffany Design's Tears Set 1; Batik Regular font.

5/24/2011

Toddler Belt

Dylan has been very long and very slender since birth. This can make fitting pants & shorts a challenge as those that might be the correct size for length are too big for his waist. And finding a toddler belt is also challenge. Thus, I was thrilled when I stumbled across a tutorial on another blog a few months ago - make happy: toddler/preschooler "i can do it!" belt.


During an afternoon nap I whipped up the belt and he's been proudly wearing it ever since. He loves that like Dada and Mama, he too has a belt. ;)


Supplies: 1" belting; 5/8" striped ribbon; D-ring (here I lucked out as I had 2 left from my nursing cover project when I was pregnant!); velcro; thread.

5/23/2011

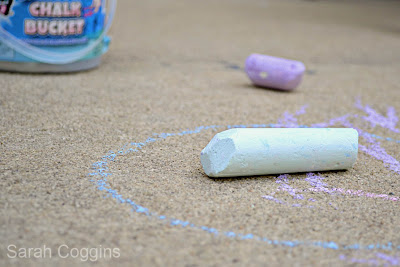
Shoot and Edit: Chalk Drawings

A snapshot of our chalk fun last night:

ISO 400, ss 1/250, f5.3

Join in the fun with Jill Samter Photography and Ramblings and Photos:

5/20/2011

Tee Ball

I've been on quite the digital scrapbooking kick this week and apparently in love with baseball the last two days. :) Here's a layout I did based on the Team Photos challenge last week at Two Peas. Love these photos from the first day we pulled out Dylan's new tee ball set. He was so excited.


Supplies: Kaye Winiecki's Homerun kit; Oh Boy! The ABCs collaborative kit by Carina Gardner & Crystal Wilkerson; DHD's iNSD Designer Blog Hop collaboration kit; Prestige Elite Std font.

5/19/2011

Durham Bulls Baseball Game

We took Dylan to his first Durham Bulls baseball game yesterday. Perfect day for it - sunny and mid 70s. We took our niece as well and met some friends. Amazingly, even with four kids from 3 months to 26 months, we managed to make it through the entire game. [Although the last inning we were at the playground. ;) ]


Supplies: Miss Mint's Kindergarten Crafts kit; Karen Funk's Photo Clusters vol. 2; Kaye Winiecki's Homerun kit; Antique Type & Century Gothic fonts.

5/17/2011

splish splash

Dylan &one of his buddies playing at an indoor wading pool in February:


Supplies: Gennifer Bursett's Blueprint 5 template; Anne Langpap's July Freebie; Deena Rutter's Rocketman kit; Karen Funk's In Bloom kit; Karla Dudley's Digi Essentials 2; "splish splash" brush created from 2peas Flower Pot font; Century Gothic font.

5/16/2011

piggies

Thought this photo I took of my niece last month playing with her toes was too cute to not scrap:


I expect I'll have a few more pages with Lily in them in the coming months as I'm now watching her during the week as well. Two under two - it's quite the adventure! But Dylan is loving having "Baby" around. :)

Supplies: Karen Funk's Claire kit; Century Gothic Font.

5/13/2011

Shoot and Edit: Mother's Day edit

Now that Blogger is sort of up and running again (hoping yesterday's post eventually reappears), I can finally share my edited photo for this week. It took me a number of steps including playing with the suggested gradient mapping twice! I'm not sure if this was the most direct way to get from SOOC to edit, but I am pleased with the results.

  • Adjusted levels.
  • New adjustment layer - Brightness/Contrast. Tweaked slightly.
  • Merged layers.
  • New adjustment layer - Gradient Map. I selected an existing purple/blue/green/orange option. Lowered the layer opacity to 10% and changed the blending mode to linear light.
  • Merged layers.
  • New adjustment layer - Hue/Saturation. I increased the saturation a bit.
  • New adjustment layer - Gradient Map. This time I selected the black & white option. Lowered the layer opacity to 30% and then erased the noodles. This let the vivid colors of the noodles shine through and toned down the wood color a bit bringing it closer to it's color in real life.


Join in the fun with Jill Samter Photography and Ramblings and Photos:

5/12/2011

mamarazzi

Have camera ... now how do I use it? This is what led my friend, Allison, and I in taking a "mamarazzi" class taught by local photographer Annie Harrison of Red Bridge Photography. We met Annie & her partner, Rebecca Faulk, at a park in Durham. Our boys had a chance to play while we learned the basics of shooting in manual mode on our dslr cameras as well as discussing how to best shoot little subjects (ie, your kids & babies - hence "mamarazzi"). Then we spent an hour practicing and getting tips from the professionals.

Putting together a scrapbook page for our adventure, I knew I wanted to keep the focus on the photos. I started with a template by Paislee Press since I love the simplicity of them. I removed a couple of embellishment elements, edited the title & journaling then put in the photos. I literally did not touch the paper colors or the shadowing. It sounds quick and sort of was. It took me a while to narrow down our hundreds of shots to just 12 that really rock and help sum up the day.


Supplies: Paislee Press Press Plate No 27 template; title - from class workbook; Myriad Pro font.
5/11/2011

Wordless Wednesday: Morning Wave Goodbye to Dada


Wordless Wednesday

5/10/2011

Coffee Filter Painting - layout

Dylan and his friends creating their coffee filter paintings this past February:


Supplies: Design House Digital's iNSD Designer Blog Hop collaboration kit; Deena Rutter & Biograffiti's Whole Lotta Love kit; Agnes Biro's Easter Fun kit; Deena Rutter's Rocketman kit; Daily Birdie font.

5/09/2011

Shoot and Edit: Mother's Day

The pasta necklace Dylan made me for Mother's Day:

ISO 2500, ss 1/15, f4.8

This was our playgroup craft last week. Thanks to Stacey for prepping & leading us in it!

Join in the fun with Jill Samter Photography and Ramblings and Photos:

5/08/2011

Happy Mother's Day!

A very happy Mother's day to all moms! Wishing you a wonderful day.

Here's the card I created this year. It started out as a digital design that I printed onto a white card and covers the front & back.


I reprinted the butterfly alone onto a second sheet of white cardstock. Hand cut it using my x-acto knife. Inked the edges, scored the wings along the body and glued to the card. The result:


Supplies: Recollections white card; Design House Digital's iNSD Designer Blog Hop collaboration kit; Karla Dudley's Digi Essentials 2; Commerical Script font; Stampin' Up! Daffodil Delight ink.

5/06/2011

Shoot and Edit: Growth edit

My biggest frustrations with my photo this week were the overall darkness and the glare on the vinyl wall decal. I snapped fast in my hurry to get the shot before Dylan moved on. He really threw me as last month he posed for about 15 photos there! And, of course, yesterday on his own he stood in front of the wall and let me "measure" him (ie, I put my hand on top of his head so we can see how he measures up - so cute!).

For my edit, I started by adjusting the levels, rotating the photo slightly (I used the wall corner on the right side as my base line) and cropped the image. Then I began playing ...

  • Used the picker to select the navy blue color from the giraffe and created a masking layer in that color. I erased all but the glare areas. Then changed the blending mode to multiply and lowered the opacity to 74%. This kept the shadowing but eliminated the brightness.
  • Merged the masking and background layers.
  • Ran Ashley's Nice & Easy action (yes, I love that action!). I slightly adjusted all the layers (levels, brightness/contrast, hue/saturation, photo filter) and turned on the soft light fill layer.


Join in the fun with Jill Samter Photography and Ramblings and Photos:

5/05/2011

NC Zoo

My son and I joined friends for a spontaneous mid-week adventure to the zoo last week. I think the boys enjoyed each others company as much as seeing the animals. :)


Supplies: Simply Tiffany Studio's 13th Collection template and Butter Mini kit from Design House Digital's iNSD Designer Blog Hop; Kate Teague's Lazy Days kit; Stamp Act and Century Gothic fonts.

5/04/2011

Day at the Vineyards

Over the weekend we joined 3 other families for wine tasting and a picnic. The kids had a great time running around the vineyard checking out old tree stumps and playing with the toys we brought along. It was a beautiful spring day in the gorgeous countryside. A nice change of scenery from our normal suburban life.


Supplies: Simply Tiffany Design's Template No. 24; Deena Rutter's d365 Starter kit; Sara Schmutz's School is In paper pack; Kate Teague's November Fall Freebie kit; Miss Mint's New Years Eve and Hoppy Easter kits; Karen Funk Designs's In Bloom kit; Sweet Shoppe Designs's A New Day kit; Karla Dudley's Digi Essentials 9 - Inked; Caflisch Script Pro font.

5/03/2011

Shoot and Edit: Growth

For the prompt of growth, I decided to try a shot of Dylan standing in front of his growth chart. I managed 2 quick shots before he was distracted by something else in the room and took off. ;)

ISO 400, ss 1/40, f4.2

His growth chart is a giraffe wall vinyl. Curious to see the entire thing and why I highly recommend not sticking these to your walls (insert major regret here) see this post.

Join in the fun with Jill Samter Photography and Ramblings and Photos: