12/15/2010

Wordless Wednesday: Ginger Snaps


Wordless Wednesday

12/13/2010

Christmas Tree Plaque

Last week, Dylan and I got together with friends to make our Christmas plaque.  I had searched online for ideas of what to do and settled on a simple straightforward design - a single handprint tree:


The downside to this design - Dylan wanted to do more than just put one handprint on it!  My boy loves to paint now.  Thankfully, my friend Stacey, smartly kept some extra plaques we let the boys freestyle paint on after their making their Turkeys last month.  With those plus dry, clean brushes, both boys sat on the floor and "painted" to their hearts content.


She even put cardboard under them to "protect" the floor from their imaginary paint.  So stinkin' cute!  They won't fall for this trick too much longer, but it worked to get us through this round of plaques.  While the boys worked on their masterpieces, we moms could add the finishing details to our projects.

Supplies: wooden plaque; acrylic paints; brushes; Mod Podge; picture hanger.

12/10/2010

Refinished Cabinet

In my spare time over the last few weeks (ie, nap time and when Trent is home to help keep an eye on Dylan), I have been working on painting the dining room and refinishing a cabinet. The cabinet is my solution to child proofing the cat food & water now that Dylan is allowed into the dining room and kitchen (he's at the point where the living room alone is like being trapped).

The cat food bowls and water fountain are like a magnet drawing him in.  Dylan knows these aren't for playing with but can not resist the temptation.  Thus the idea for a cabinet where they could be closed off from him, but accessible to the cats came about.

I found this cabinet on Craigslist for $20:

It was a good size (36"w x 18"d x 36"h) and overall in good condition.  It had expected wears from previous use, but also had great bones.  I had a vision that it could be beautiful and functional with a little work.


I sanded it down.  Removed the old knobs.  Patched the holes.  Cut a 6" x 6" opening in one side for the cats to enter.  Then came paint.  I was momentarily stumped.  The other furniture in the room is a dark walnut tone.  I wasn't convinced that I could get a color to match and, honestly, didn't want it to match.  I wanted it to be a fun accent piece.  Searching the room for inspiration, I came to the curtains.  In May 2009, I had added a striped top panel to lengthen the curtains after accidentally shrinking them.  Looking at the striped fabric, I had my aha! moment - a nice olive green color would be perfect.  After a trip to Lowes for supplies and several layers of paint (Valspar #318-6 Shubbery mixed in Olympic semi-gloss no VOC base) later, my vision was starting to come together.

Even Dylan was joining in on the fun when he could - oh how he loved climbing in and playing hide 'n seek:

Finally, the dining room was painted and the new knobs I ordered on eBay arrived:


For now only the cat food is in there as we let them adjust to the new location.  I'll eventually place their water fountain on the bottom and cut a hole in the shelf so they can access the food above. And, of course, I had to add locks to keep Dylan from being able to open the doors. 

And in it's new home:

All in all, I spent less than $50 and ended up with a unique, beautiful piece.

12/09/2010

Coming Together

When we bought our house new in 2003, every wall was painted "builder's white."  Over the years we've slowly been painting room by room.  One of the early rooms to get paint was our dining room.  But only an accent wall.  The terra cotta color resulted from a conversation Trent & I had sitting in a Starbucks one day (he liked the color on their walls) and the luck of discovering a $2 oops gallon at Lowes not too long after.  For $2, we might as well give it a shot.  Although at first a shocking contrast to the white walls, we loved it.


Now, when searching my photo files for an older shot of the room, I had to laugh when I discovered the above photo taken in March 2005.  A lot has changed in the last 5 years ... new table & chairs, new light fixture, the peace plant is still alive and much larger, the curtains have a new top panel, etc.  But what remained were the small cabinet for the aquarium (which I just replaced - details tomorrow on that project) and the stark, "builder's white" walls. 

In the last few weeks with the goal of moving in a new cabinet and the effort involved in moving the aquarium, I became determined to paint the remaining walls.  It took a couple of tries to get the right shade.  I ended up with a 55% tint of Valspar 348-2 Offshore Mist (mixed in Olympic no VOC base).


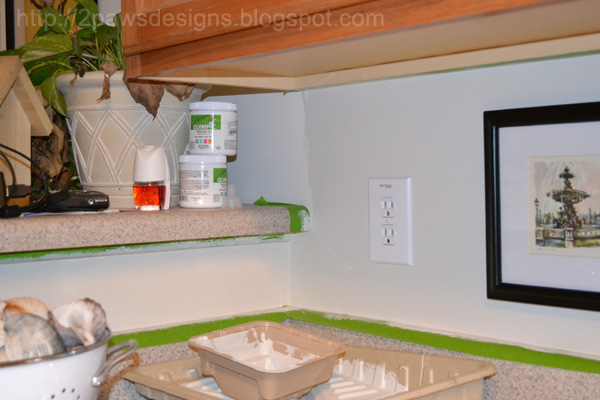
Our kitchen and dining room connect as one big space.  The official walls of the dining room are complete.  I'm still working my way through the kitchen (lots of cabinets & counter to tape off and outlet covers to remove).  Here's an early in progress glimpse that gives a good feel of the new color versus the old white  [forgive the mess, this is real life :) and, yes, those paint trays are still there!  LOL]:

And a view of our dining room with the new cabinet and paint (and I did not intend the focus to be on the light fixture - still learning how to use my new dslr):

Two subtle changes (the paint and green cabinet) and yet a big impact on the room.  Loving it.  Only 7 years and it's finally coming together.

12/08/2010

{Made by Me} Wednesday

I'm up to my eyeballs in holiday preparation and events.  Amazing how busy this time of the year gets, isn't it?  I've decided to extend last week's {Made by Me} Wednesday through next Tuesday (Dec 14).  Visit the original post to join in the fun and link up your crafty project!  Looking forward to seeing what you've created.  :)

12/07/2010

Handprint Santa

I love getting crafty with my little guy and last year, I dared to pull out the paints with a 5 month old to do so.  Thanks to help from the high chair ;)  I managed to paint his right hand white and help him make a handprint onto red cardstock.  Once it was dry, I began the process of turning it into Santa using a variety of supplies from my scrapbooking stash.

The end result:

I then scanned it in and resized to approximately 3" x 4".  I printed the smaller images onto photo paper and used the laminate/magnet cartridge in my Xyron to create magnets.  Each of the grandparents received one as part of their Christmas gift.

Supplies: acrylic paint; red & white cardstock; Provo Craft & We R Memory Keepers patterned papers; black stamp ink; Making Memories snaps; Stickles; black marker; buttons.

12/06/2010

Birthday Card: enjoy

A very happy birthday to my stepfather today ...


Supplies: Die Cuts with a View card; Stampin' Up Marina Mist ink; Heidi Swapp stamp; EK Success corner rounder punch; Making Memories stitches; Jolee's Boutique sticker; Autumn Leaves label; Doodlebug Designs rub-on letters. Inspired by November A Year in Cards class at Two Peas.

12/03/2010

Santa - take 2

As I mentioned in yesterday's post, we had plans to return to Santa with Dylan's entire playgroup.  Realistically, we moms knew it would be a challenge to get all 6 toddlers either sitting or standing with Santa for a photo.  After a few moments of chaos, we jumped right in too and honestly I'm so glad we did because we ended up with a great group shot:


Supplies: Pressplate No 26 template by Paislee Press; Veronica Ponce's Cottage Bluff kit; Robyn Meierotto's Holly Jolly kit; Kate Teague's Berry Days kit; Century Gothic font.

12/02/2010

Santa - take 1

Ah, yes, the annual photos with Santa.  Last year, Dylan was all smiles in line but when I put him in Santa's lap, a bit of uncertainty crossed his face.  He didn't fuss, but I did not get a smile out of my child that up to then always posed and struck a big grin when he saw the camera (even if I wasn't taking his photo! LOL).

Fast forward to this year.  Trent's cousin, his sister and I decided to meet at a nearby mall this past Tuesday for lunch and to get photos of Dylan and his new little cousin, Lily, with Santa.  We thought it would be so cute to have the two kids in one shot.  I printed a photo of Dylan with Santa from last year.  Showed it to him that morning.  Took it to the mall with us.  When we arrived, I positioned his stroller just outside of Santa's area so he could watch a few other kids.  I handed him the photo, he pointed to it, to Santa and smiled & babbled excitedly.  Oh, yes, this would be good!

Until we approached Santa.  There was my boy from a year ago - not too sure about being put into this man's lap for a photo.  He did manage to sit for a few pictures.  He and Santa even looked at the photo of the two of them.  Then he happily retreated and stood calmly (now the fact he didn't try to bolt should have been a clue!) beside me while I took photos of Lily with Santa.  Then I dared to try to place him on Santa's other knee so we could get a photo of the two of them.  The tantrum struck!  So I stuck him on the stool in front of Santa and, well ....  Why, Mom???  Why are you making me do this???


Definitely a memorable visit!  Oh yeah, and we're daring another try with Santa for a photo with his play group buddies today.  LOL  Should be interesting.  ;)

Supplies:  Erica Hernandez's Letter Template #17 template (altered); Robyn Meierotto's Holly Jolly kit; Miss Mint's Winter Sparkle kit; Karen Funk's Fallin' For You digital patterned paper.

12/01/2010

{Made by Me} Wednesday

Another week, and another gorgeous fall colored card shared.  This one is from Stamping with Klass:


Are you working on holiday projects or other crafty fun? Share it in this week's {Made by Me} Wednesday fun by linking it below (linky tool is open until Tuesday, December 7th December 14th).  Share anything (cards, decor, scrapbooking, sewing, etc) even if it was made last year.  So long as it's new to the party and made by you, it qualifies.  Looking forward to seeing what you've made!