3/31/2011

CSN Stores Review

Has it really been almost 2 months since I said I was going to shop at CSN Stores?  I always have one small problem - making a decision!  The inventory is so huge and I have a great time looking and trying to narrow down my list. This time, I picked from both my "wants" and "needs."

In the "wants" category was a LeapFrog fridge magnetic toy.  Dylan loves playing with the magnets on our fridge (off, on, rearranging) and had fun with the Fridge Farm Magnetic Animal Set at a friend's house so I thought he might enjoy this type of toy.  I selected the Fridge Wash & Go Magnetic Vehicle Set as he loves cars & planes. And I picked right.  Dylan was eager to get his hands on it the moment I opened the box! 


The toy comes with the base (bubble wash) and 10 puzzle pieces that form 25 vehicle combinations. You can match the pieces to create a green train, yellow car, blue boat, red fire engine and white plane or mix up the pieces for a unique vehicle.  The base turns on and responds to the pieces you place.  If you make a match, it will say the vehicle color and type ("green train").  If you mix up the pieces, it will tell you what your combination was - for example, "car in the front and train in the back."  I've only actually heard this when I've mixed them though as Dylan is a stickler for matching them exactly!  He'll even come behind me to "fix" them if I mixed up pieces. ;)

The toy also plays songs after pieces have been placed or when the stoplight is pushed. Admittedly, I've heard the main song enough I have it memorized now, but he loves pressing the buttons to start the music and then dance along. So cute and it's been great for giving him something to do in the kitchen while I'm fixing meals.  He has played with this toy every day since it arrived.

On the "needs" side of my list, I selected an item for our four-legged kids - a Petmate Cafe Pet Feeder.  We had been using two bowls, but since I moved their food into a cabinet out of Dylan's reach, it seems they eat it faster than I remember to fill it!  This has resulted in a lot of loud meowing.  Thus, I set out to find a self-feeder to put in place of the bowls.  We had tried another one also by Petmate years ago and found it didn't meet up to it's promise of automatically replenishing the food. The food did not come out unless we shook or knocked it out ourselves.  I was hopeful this new style would work better.


Unfortunately, we have a similar situation.  The food does not replenish automatically.  I am having to shake it myself periodically.  I've tried showing our cats how to paw at it to pull more down.  No luck there either.  Perhaps you can't teach old cats new tricks, either? ;)  Overall though it is a nice feeder.  I like how it does store a reasonable amount of food so I'm not having to pull out the bag and refill it frequently as I did with the bowls.  It's also very easy to clean which is always a plus.

Thanks again to CSN Stores for giving me an opportunity to shop!

Note: CSN Stores contacted me with this promotional opportunity and I received a giftcard to use toward a purchase for my review. However, all opinions expressed are strictly my own.

3/29/2011

playground fun

Dylan (navy shirt) and a couple of his buddies having fun at the park last week:


Supplies: Gennifer Bursett's Blueprint #4 template; Karen Funk's Bloom kit; Sara Schumtz's Colorwheel papers; Audacious Designs's Good Dog alpha; Batik regular and Arial fonts.

3/28/2011

Shoot and Edit: Green

I took this photo in the Butterfly House at the Life + Science Museum in Durham a few weeks ago:

ISO 400, ss 1/60, f5.6

Join in the fun with Jill Samter Photography and Ramblings and Photos:

3/25/2011

Shoot and Edit: Flowers edit

I spent a bit of time last night playing around with multiple edits for my flower shot this week.  I knew starting out that I wanted to warm up the photo.  Although the flowers are from a plum tree, they are more pink in real life.  The SOOC shot had too much purple and gray.

First I tried my hand at editing it using many of the same steps I've used in the past few weeks.

For the second edit, I started off the same as the first by adjusting levels and adding high pass.  I merged the layers then used Ashley's Nice & Easy action.  I like how it added a few of the adjustments I typically use as well as one I don't always think to (hue/saturation).  I tweaked all of the layers/options except brightness/contrast.  And I turned on the solid fill layer.

Finally, I backed up in my steps using snapshots and returned to my original edit.  I duplicated the SOOC background image, applied the dry brush.  I then duplicated that layer and ran the action I made for myself weeks ago to do the high pass filter.  I merged those two layers.  Duplicated the layer it created and added the angled strokes.  I finished with the same levels and color balance I used in my first edit.

I did not try an edit with Pixel Bender as I can not find a plugin compatible with my older version of Photoshop (CS).  If anyone knows differently, please let me know - I'd love to try it.

Here is a look at all 4 side-by-side:

I like the 1st & 3rd the best - the warmth and brightness.  The differences between them are so subtle I have a hard time picking between them.  Thanks for taking a look at my edits!

Join in the fun with Jill Samter Photography and Ramblings and Photos:

3/23/2011

Cookie Monster Pillow

The first friend in Dylan's playgroup celebrated his 2nd birthday last week.  I'm still in shock.  It seems like it wasn't that long ago all of us mommies were pregnant (well, the first time around - some just were/are now - no, not me!). The theme for his party was Cookie Monster and he definitely has a love for the blue, furry friend.  Normally I steer clear of the party theme for the gift, but this time ... well, I had a crazy idea at the last minute and went for it.  On a Tuesday morning 2 weeks ago to be exact with the party on the following Saturday, Dylan & I headed to the fabric store for supplies.  I didn't even have a pattern.  Just an idea in my head and a simple sketch in my sketchbook. Yes, I lost my mind.  But the result was totally cute ...


The felt cookie comes out of his hand for play or to "feed" Cookie Monster. 


Dylan (who hardly has any interest in Sesame Street) found the entire thing delightful and even tried to eat the cookie!  I took this as a sign that it was a good gift and, from what I've heard, the birthday boy is loving it.  Yay! 

Supplies: flannel, felt, Wonder Under, thread, pillow, batting

3/22/2011

Pinterest addiction

As if I needed another addiction ... totally loving Pinterest.  So much inspiration for everything from crafty fun to decorating to recipes and I can pin it to my own virtual boards to refer to later.  Love it.  Find my pins here.

3/21/2011

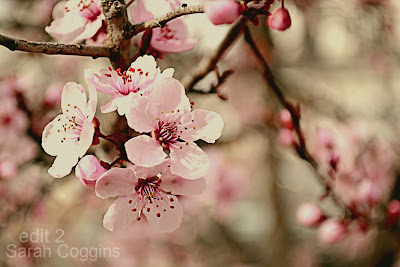
Shoot and Edit: Flowers

I took this photo just over two weeks ago in prep for this week's theme, flowers.  Always my first sign that spring is upon us - I love these pink flowers on the plum tree in our front yard.  They suddenly appear.  Cover the entire tree.  Then just as suddenly are gone as the purple leaves fill in.  Only a few flowers remain this morning and they will most likely be gone by the time I share my edit.

ISO 100, ss 1/320, f5.6

Join in the fun with Jill Samter Photography and Ramblings and Photos:

3/18/2011

Shoot and Edit: Yellow edit

I had a lot of fun playing with this little ducky.  I love his worn look and am really happy with how the edit came out.

Here are my steps ...
  • Levels - set white and black points.  Adjusted input and output levels until they "looked" right.
  • Duplicated background layer and used high pass filter.
  • New adjustment layer - curves.  
  • Merged all layers.
  • Duplicated background layer and applied Gaussian Blur.
  • New adjustment layer - levels.  Set white and black points.  Tweaked RGB.
  • New adjustment layer - brightness/contrast.
  • New adjustment layer - color balance.
  • Merged all layers.

Then I followed Ashley's instructions this week for adding sun flare with a few tweaks...

  • Created 3 duplicate layers of the background layer and renamed each starting from the bottom: lens flare, lighten and contrast.
  • Selected the contrast layer.  Changed the blending mode to soft light and lowered opacity to 70%.
  • Selected the lighten layer.  Changed the blending mode to screen and lowered opacity to 50%.
  • Selected the lens flare layer.  Filter>Render>Lens Flare.  I tried the different types of lens flare options and ended up with 105mm Prime at 100%.  I lowered the layer opacity to 75%.
  • Selected the lighten layer.  Added a new adjustment layer - levels.  Adjusted the input and output levels slightly.  Lowered the layer opacity to 78%.
  • Selected the contrast layer.  Added a new adjustment layer - photo filter.  Applied warming filter 81 at 25% density.  Checked preserve luminosity.
  • Added a solid fill layer using color #F4F6DF.  Blending mode soft light.  Layer opacity 9%.
  • Duplicated the solid fill layer.  Changed the blending mode to screen and lowered the layer opacity to 4%.
  • Merged all layers.

    Finally I followed Ashley's steps from last week regarding sharpening to improve my image for the web.  Here's the final edit:


    Join in the fun with Jill Samter Photography and Ramblings and Photos:

    3/17/2011

    Art Smock

    Over Christmas while digging through the final couple of boxes of "stuff" I have stored at my mom's house, I came across my childhood art smock.  Neither Mom or I can recall the origins but the story that it was made by me (possibly during the 4-H sewing class I took) seems to make the most sense.  Especially when you factor in that one tie was longer than the other! ha!

    The smock had seen better days.  A few of the stitches were coming undone.  It had a number of stains.  But, it was mine and I still loved it.

    Then I had a thought - what if I could update it a bit and turn it into an art smock for Dylan?  We're always getting into crafty projects and he could use one.  Truthfully, the only real improvements needed were new bias tape at the top (the stitches were coming undone and pink does scream "girl") and new stitches for the pockets (seriously, I must not have been so stuck on evenness back then as the 3 pockets were all a different width).

    Dylan and I made a trip to the fabric store with the art smock in hand to pick the bias tape.  The first color that jumped out at me was a light yellow.  It paired well with the existing blue fabric and original stitches plus was much more gender neutral than the pink.  Perfect.


    This was a very simple project.  I ripped out the old stitches in the pocket area that were coming undone.  Resewed using a similar zigzag stitch and made sure all 3 pockets were equal size (yes, it really drove me crazy now - blame the architecture training!).  I used the measurements of the original bias tape and added a few inches as I based the tie length on the longer of the two ties (still laughing over those being different lengths!) to determine the length of the new yellow bias tape.


    Here I made one change and used a straight stitch to attach it versus the zigzag of the original.  I just liked the look better.  Then I tied knots in both ends and one at the back of the neck to tighten it up just a bit.


    We haven't had time to try it out for its intended purpose yet, but Dylan did have fun just wearing it around the kitchen last night:


    And thanks to Allison for sharing her Roaring Art Smock on her blog this week.  This project has been on my to-do list for a while and her post gave me the kick to get it done.  :)

    3/16/2011

    Natural Science Center of Greensboro

    My Dad & I took Dylan to the Natural Science Center of Greensboro on Monday.  The last time we went was when he took my sister and me when we were kids.  It was fun to see the changes and enjoy the fun through Dylan's eyes.  Oh the good time he had!  We'll definitely have to visit again on a future trip to Greensboro.


    Supplies: Simply Tiffany Lefty Righty 9 template (used left side only); Miss Mint's Craft Jar, Kindergarten Crafts and Tropicle Popsicle; Erica Hernandez's Alphabet Border Mask; Sara Schmutz's Delight papers; Deena Rutter's Maybe papers; Nancy font.

    3/14/2011

    Shoot and Edit: Yellow

    I check the list for upcoming Shoot and Edit themes to help me start thinking of shots I want to take.  This duck teeter totter at a local park caught my eye last month for the yellow challenge.  I took a photo then with my DSLR but wasn't too thrilled with it.  Harsh lighting was part of the reason.  Yesterday we were back at the same park, later in the day and I snapped a few photos with my point & shoot for fun.  When I came home and looked at them, I liked this particular shot the best.  And, since I do tend to mix up which camera I use, I decided this is a good time to play with editing one from my other camera.

    ISO 80, ss 1/250, f8.0
    Join in the fun with Jill Samter Photography and Ramblings and Photos:

    3/12/2011

    Etsy Treasury Feature

    I was thrilled yesterday to see the newest addition to my Etsy shop was featured in Baby Boys Baby Blues treasury by leenieb1233.  I just began adding crayon rolls to my shop after getting requests following the one I made recently for Dylan.  My Leaf Print Crayon Roll is the far left in the 3rd row:

    3/11/2011

    Shoot and Edit: Spring edit

    I did not realize how dull and faded my SOOC shot was until I began to edit it.  I looked back into my previous Shoot and Edit posts to help guide me.  Here's the path I took to get to my final (and much more exciting) photo ...

    • Levels - set white and black points.  Adjusted input and output levels until they "looked" right.
    • Duplicated background layer and used high pass filter.
    • New adjustment layer - curves.  
    • Merged all layers.
    • Duplicated background layer and applied Gaussian Blur (1.8px).
    • New adjustment layer - levels.  Set white and black points.  Tweaked RGB as well as red, green and blue individually.
    • New adjustment layer - brightness/contrast (+3/-2).
    • New adjustment layer - color balance.
    • Solid fill layer using color #FFE53A.  Soft light blend.  50% opacity for layer.
    • Merged all layers.

    After I saved my edited photo, I followed Ashley's instructions this week for sharpening photos for the web.   I'm quite pleased with the outcome.  Kind of leaves me feeling like I might find a few bits of sand on my desk.  :)


    Join in the fun with Jill Samter Photography and Ramblings and Photos:

    3/10/2011

    Shamrock Art

    We were excited to participate in our usual Thursday playgroup today.  Dylan & I have missed the last two weeks due to other adventures.  Today we joined our friends for art and lunch at Allison's house.  She found a great idea online for a Tissue Paper Shamrock Craft.  It turned out to be the perfect, quick craft that entertained 4 toddlers and resulted in very little mess (a huge plus all around!).

    I printed the shamrock template from the website and used it to trace and cut outlines from black scrapbook paper.  Each shamrock was approximately 7" high by 6" wide.  We moms stuck them to a sheet of clear contact paper.  Then we gave one to each of the boys and put a basket full of tissue paper bits (greens & yellow) in the center of the train table in front of them.

    Each boy had his own method.  It was funny to watch.  Dylan wasn't sure what to do at first and then became very serious about his project:


    Then he got a bit wilder - shaking and crumpling up his art:


    When the boys finished, we set their art aside to add a second layer of contact paper to the top to seal them in.  I brought Dylan's home as is (haven't decided whether or not to trim around the shamrock shape - I kind of like the wild outside of the lines look) and hung it up on our patio door for a photo.  Love the overlapping of the colors:


    I'm so grateful for my crafty friends!  This was lots of fun.  :)

    P.S. Although not blatantly obvious from the angle of the photos, I thought I should add in case you haven't seen via Facebook or Twitter - yes, Dylan is sporting quite the shiner at the moment.  He fell while pushing one of our dining room chairs on Sunday morning and hit the edge of the seat resulting in a scratch plus nasty bruising. Thankfully, it looks far worse than it is.

    3/09/2011

    sandy toes

    Earlier this week, I bought a digital template from my good friend, Laura.  I finally had a chance to play with it yesterday.  Seems Dylan's sandy toes were still on my mind from Monday's Shoot and Edit post.  I grabbed that shot plus two more, did a few edits and dropped them into the template.


    Supplies: First Parade template from Laura Edwards Design; Ellie Lash's Detour kit; Kitty Designs's Cherish kit; Stamp Act and Arial fonts.

    3/07/2011

    Shoot and Edit: Spring

    This is spring to me ... cool enough to still wear your favorite pair of jeans, but warm enough to go barefoot in the sand box.  :)

    ISO 400, ss 1/1000, f5.3

    Join in the fun with Jill Samter Photography and Ramblings and Photos:

    3/03/2011

    Camera Strap Cover

    In between projects, I picked out fabric and sewed a little treat for myself - a camera strap cover.  I wanted something pretty to cover up the blaring yellow "Nikon" and pad the strap a bit making it more comfortable on my neck.


    I used this tutorial by Priddy Creations on Everything Etsy and adjusted the measurements slightly to fit my strap.

    Supplies: fabrics - Central Park by Kate Spain for Moda (floral) and unknown (light purple solid); Coats & Clark thread; fusible flannel.

    3/01/2011

    Tea & Trucks Baby Shower

    I am very blessed to have made wonderful friends during a prenatal water aerobics class I took two years ago.  Six of us have maintained a close friendship and playgroup with as many of us as possible getting together at least once a week.  Altogether we began this adventure with 5 boys and 1 girl.   2011 is bringing at least 2 more little boys to the group with one little one making his arrival almost two weeks ago and another expected this month.  Of course, this kind of excitement needs a party so the other four of us decided to host a shower for the two friends expecting.

    We ended up with a tea and trucks shower.  That is, a lovely afternoon tea for the ladies with a touch of boy inspired fun of trucks tossed in.  It worked out so well and everyone had a great time. Here's a peek at the details ...


    On the island in the center of the kitchen, we set out a variety of tea cups and teas for the guests to select from along with sugar, honey, lemons and cream.


    The food was arranged on the kitchen table.  We had a lovely assortment - quiches, sandwiches (cut into train shapes - so cute!), deviled eggs, fresh fruit, cheese, cupcakes and a dirt pie served appropriately in a dump truck with a shovel. ;)


    Off to the side of the kitchen island from the teas, were small guestbooks for each of the moms with cards left out for the guests to write a note and adhere to the appropriate book.


    Next to the guestbooks was a toy dump truck containing tea bag favors for the guests.


    Credit goes to Allison for coming up with the great idea for the personalized packaging for the bags.  She sent me a sketch and I ran with it in Photoshop.  The result were simply adorable little packets that we added Tazo tea bags to.  One side had an image of a dump truck with the words "It's a Boy!" above it.  The opposite side had the name plus "Rolling into town / [month] 2011."


    The gifts were displayed next to the fireplace in the adjoining living room.  A diaper cake denoting each mom's side with a slightly different twist based on their personalities.  Alicia did a fabulous job creating those!


    Supplies: throughout - Bazzill Basics Paper cards, Reflections white cardstock, Amienne font; Invitations - miscellaneous blue & green cardstock, QuicKutz onesie die, Momenta stickers, adhesive backed foam, ribbon; Instructions for favors & guesbooks - Momenta stickers; Guestbooks - chipboard, binder rings, QuicKutz onesie die, Momenta stickers, Making Memories edge scrapper, Ellie Lash's Detour kit, Mod Podge; Tea Bag Favors - Ellie Lash's Detour kit; staples, Tazo teas.

    Linking up to Tip Me Tuesday at Tip Junkie.
    Tip Junkie handmade projects