11/13/2007

Another Masking Tip

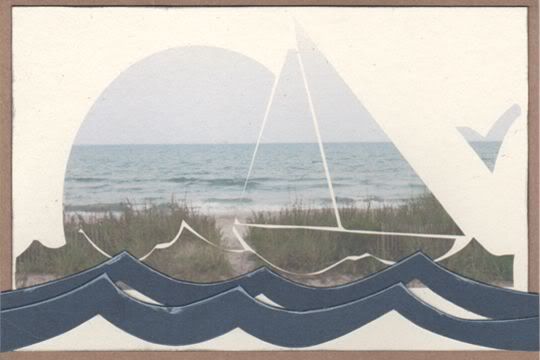
Here's another fun use of the masking technique I explained in yesterday's post (Creating "Photo Letters" in Photoshop) -- use dingbats in place of traditional fonts. Last June I created this card for my mother-in-law to thank her for use of her beach house for a weekend.


I used a photo I took while on the trip and masked it with a dingbat (GE Nautica) found at Dingbat Depot. Then I printed the image on off-white cardstock. The waves I cut freehand from blue cardstock using my x-acto and inked them using a white stamp pad.

11/12/2007

Digi-scrapping

Although my traditional scrapbooking supplies have been calling out to me, I just haven't had the mojo to create a scrapbook page since returning from our trip. I look at my fun supplies, thumb through them. Even printed a couple photos, but am at a loss. I have, however, been able to create 2 digital pages using Adobe Photoshop CS. Both I posted in my gallery at Two Peas (and below!) and have had questions about I created certain aspects. In the two posts following this one, are step-by-step instructions for how I went about creating what I call "photo letters" and shaped text. There may be other ways, simpler, faster, whatever. But this is how I did it in my own words. Hope it will help you learn a new trick and inspire you. :)

Today's 2ps blog challenge:
I spend a lot of time online because...

LOL! That's an easy one: blogging, Two Peas message board, email, searching out weekly sales deals, finding and printing online coupons, etc, etc. :)

Creating "Photo Letters" in Photoshop

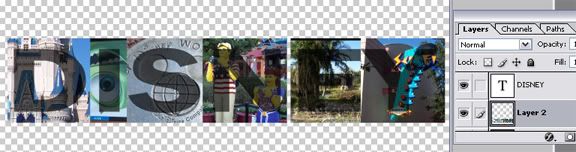
I created the cover page for our Walt Disney World album in Photoshop CS. The layout idea is scraplifted from a two-page layout by Tricia Kennedy that is published in the Nov/Dec 2007 issue of scrapbooks etc. magazine. I loved the clean, simple design and use of "extra" photos to create part of the title.


STEP 1
Open a new layout. Size as desired. Mine is 8"x8" at 300 pixels.

STEP 2
Type the text you would like to change to photo letters. Adjust the font and size as desired.


STEP 3
Change the opacity of the text layer so that you will be able to "see" your images as you locate them.

STEP 4
Create new layers below the text layer for your images. One image per layer will allow you more flexibility it shifting the images.

STEP 5
Open an image you would like to use. Resize it as needed. Copy/paste into one of your image layers in your layout. Use the Move tool to locate the image where you would like it. For example, I shifted the photo of Mike Wazowski so the pupil of his eye would be visible.

STEP 6
After the images are arranged how you want them, merge the image layers together.


STEP 7
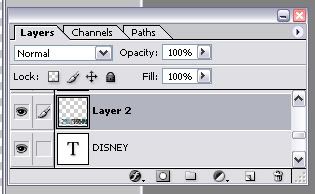
Return the opacity on the text layer to 100%. Then, move the image layer above the text layer.


STEP 8
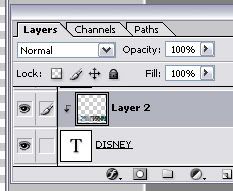
Select the image layer so that it is highlighted. Now, hold down the CTRL key while pressing the G key. You will notice a little bent arrow next to the layer image in the Layers Manager.


This action creates a clipping mask using your text as the mask. This is the result:

Note: I added a black background to the last image for easier viewing. :)

Shaped Text in Photoshop

Here are step-by-step instructions for how I added journaling to my layout in the shape of Mickey's head.


STEP 1
Open the image you want to use as a template. For me, this was the survey marker photo. I enlarged it so the text shape wouldn't match up exactly with the photo in my layout.

STEP 2
Add a new layer. In the end you will delete the template layer and don't want to lose any of your journaling when doing so. I used this as my "buffer layer" to insure none of my journaling ended up on the template.

STEP 3
Select the pen tool.


STEP 4
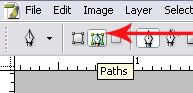
Click the Paths button in the toolbar at the top of the screen.


STEP 5
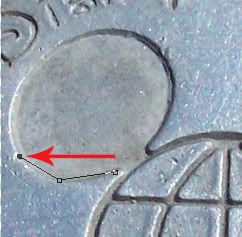
Begin outlining the shape you want to duplicate with your text.


STEP 6
After you have completed your outline, select the Text tool and place the cursor over your pen line where you would like the text to begin. Click to start your text.
Note: The pen line does not need to completely enclose the image you are tracing -- just go as far as you would like to take your text.

STEP 7
Type your journaling. It will follow the path you created with the pen. Add any spaces to help "push" your text where you want it to go. For example, I did this to help center the word "World" at the top of the "head."

STEP 8
Once you have finished typing your journaling, select the template layer and delete it.

STEP 9
Merge the two remaining layers. (Note: I changed the text here to black to make it more readable. I left it white for the project.) Select all, copy and then you can paste it into your layout. Use the Move tool to position it where you want it.


11/11/2007

Photo Organization

Digital Photo & Print Organization
Since purchasing my first digital camera in early 2002, organizing photos has become a bigger challenge. With 35mm film, I felt as though I was limited by the number of exposures on the roll and would take a photo cautiously - not wanting to run out of film and miss something. These days, I have the opposite problem - too many photos! I keep a 1GB card in my digital camera and snap away. On the trip to Disney, between my camera and the photo CD we purchased from Disney, I have 365 photos!! Enough to make anyone's head spin.

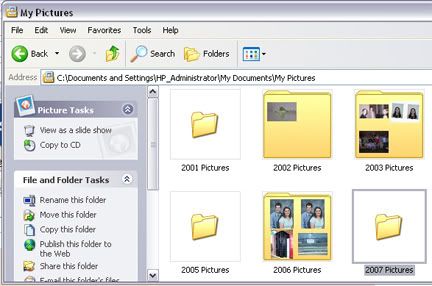
On my computer, I simply store all my photos in the My Pictures folder. Inside are folders for each year. Then I have folders for each event within the annual folders labeled by date and event. For example, my Disney photos are in a folder with the title "Nov - Disney Trip."

Having over 300 photos for one event can be a little much. For starters, it eats up more of the hard drive space, but also can make it difficult to find a specific photo I'm looking for. After transferring all photos from the camera card to the hard drive, I start flipping through them using the Windows Picture Viewer. As I find a photo that is "not good" [for me, this ranges from blurry to "why did I even take that?" ;) LOL ], I delete it. If I hesitate, I'll keep it for the time being.

Recently I added a folder to my 2007 Pictures titled "-to be ordered-" where I can drop copies of images I want to get printed so when I'm ready for prints, I don't have to search multiple folders and I don't need to worry about accidentally reordering a photo I've already had printed. (I jump between developing companies depending on which has the best prices at the time which can make a double order easy to do if I'm not paying attention.) After I've uploaded the images to a photo developing website, I delete those images from the "-to be ordered-" folder.

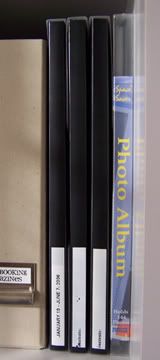
Finally, I back-up all of my digital images in two places - my Maxtor external hard drive and on annual CDs. Although I think I might start using DVDs as they have a greater capacity. All of my prints, are stored in Pioneer Space Saver Photo Albums. I love the slim design of these albums and as they are more for my reference and archiving than for show - it's not important to me to have "pretty" photo albums. I purchase the 144 pocket option online from Archival USA and add date labels on the spine using my label maker.


Older Photo Organization
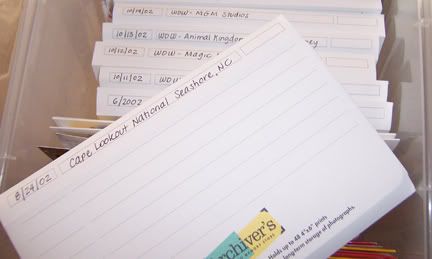
I have lots of prints from both the "old" film days and those that were given to me by whomever took the photos. I store these separate from the digital print albums. Why? Well, I use the Pioneer albums as an index of my digital photos. A hard copy way to thumb through and see what I might like to work with when scrapbooking or just looking for a photo to share. I don't want to mix these with my film prints. I store my film prints in Rubbermaid Photo & Media Storage Boxes. Any groupings of a particular event, are sorted into photo envelopes from Archiver's. I like using these envelopes because of their archival quality and lined outside with room to list the contents. They keep the boxes orderly and help me locate an event quickly.

11/10/2007

If I had one million dollars to donate

Today's 2ps blog challenge:
If you had to donate one million dollars to any charity, which one would it be and why?

I'd donate the money to the National Parkinson Foundation. My maternal grandmother suffered from Parkinson's most of her life. I saw first hand how devastating it can be not only to the afflicted but to their family and loved ones. My grandmother asked that her brain be donated following her death in the possibility that it may help researchers learn more about the disease that took over her life. If I had one million dollars, I would give it to the NPF in hopes it would help further their research for a cure.

Wolfpack Victory!


Part of our reason for returning from Orlando yesterday was to attend today's football game between NCSU and UNC. We shivered through the entire nailbiter of a game. It literally came down to the last few minutes and, thankfully, a 31-27 Wolfpack victory!

11/09/2007

Magical Week

Home again. :) My husband and I celebrated our 4th wedding anniversary yesterday. But, rather than just enjoy a day - we flew to Orlando last Saturday and spent the week at Walt Disney World. We visited all four theme parks, Downtown Disney and the waterpark, Blizzard Beach. It turned out to be a wonderful time to visit - not crowded at all and comfortable weather (almost chilly at times!). Definitely a fun way to celebrate.

The photo at the left was taken on Sunday during a break in a tour we went on - Keys to the Kingdom. This 5 hour tour literally took us backstage at the Magic Kingdom from behind Main Street USA to underground in the "utilidor" tunnels that run b
elow the park. Our tour guide was full of interesting tidbits about the park that we might have otherwise missed including where to spot a couple hidden Mickeys.

Speaking of which, we spotted Mickey's likeness high and low throughout the parks and resorts.


And, of course, we saw a lot of characters (pun intended :D ). But probably most surprising was a visit by Tinker Bell.

I could probably write on and on - it was a week's worth of fun - but I still have over 300 photos to sort through and at least 2 more bags to unpack....


11/02/2007

Small Space Organization {Kitchen}

My husband & I own a relatively small home. While we purge regularly, our lack of storage space can sometimes make things feel and seem more cluttered. Here are four of my favorite small space organizers:

Gravity-Feed Can Rack from The Container Store
This rack fits perfectly in one o
f the upper cabinets in our kitchen. We typically keep multiple of a single canned food type so the rack makes it easy to locate exactly what we want and see whether or not it's time to restock.


Socket-Pocket
Replace any outlet cover with the Socket-Pocket and instantly add a small pocket to hold your electronic device while it's charging. Each package contains 2 Socket-Pockets. We placed one in our kitchen for cell phone charging.


Sink Front Tip-Out Trays by Rev-A-Shelf
Small plastic trays to add in the "wasted" space behind drawer inserts at sinks. We added a set of these in our kitchen to hold sponges, bottle brush, etc. but they could also be used in a bathroom or laundry room.

Tray Dividers by Knape & Vogt
Our kitchen has a very skinny cabinet to the left of the stove. Basically, it was useless to us. It had a shelf in it and just wasn't deep or wide enough to hold much of our kitchen items. I found these dividers online and picked them up from Woodworker's Supply. Then came the fun - convincing my husband to help me literally rip the shelf out of it so I could put these in. Now that "useless" cabinet holds all of our baking pans and cooling racks.

11/01/2007

My New Fav Toy

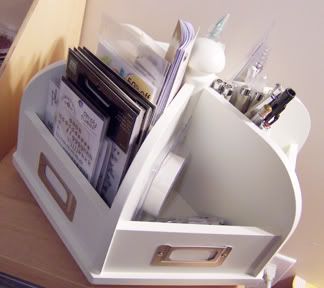
Purely a fluff post. ;) I wanted to show off the newest and current favorite item in my scrap area.

I've looked at this Pottery Barn Kids art caddy from a distance for a year or two. Finally decided to go ahead and treat myself while shopping with my mom in mid-Oct. It was well worth the $45. I love the large size, sturdy construction and how it helps me keep more of my supplies close at hand. Of course, as you can see, I still have a bit of empty space to fill. Good thing some new Archiver's coupons arrived in the mail today.

[ETA: The PBK art caddy is available in store only at this time.]

2ps blog challenge:
What is a class you would love to attend/see at your LSS?
Not sure what class I would like to see offered, but I would love to take the new Hip Household Organizer class Archiver's is offering. Looks like a fun and useful project for me. Of course, as far as the November class schedule - it's only offered when I'm unable to attend. Hoping this class will available in December as well.