11/03/2010

{Made by Me} Wednesday

One of many things I love about {Made by Me} Wednesday is seeing the variety of projects that get shared.  This digital layout by Cameron Crazy is too sweet:


Now it's your turn to join in this week's {Made by Me} Wednesday fun!  Add a link to your creative project below (linky tool is open until Tuesday, November 9th).  Share anything (cards, decor, scrapbooking, sewing, etc) even if it was made last year.  So long as it's new to the party and made by you, it qualifies.  Looking forward to seeing what you've made!


This linky list is now closed.

11/01/2010

Hybrid Airplane Birthday Card

Dylan and my dad both share a love of planes.  Thus, an airplane card seemed perfect for my dad's birthday last month.  I had fun mixing my digital and traditional supplies (even digging through my scraps) to put together this cute hybrid card:


I started with a plain white card (I have a whole pack of these I bought at a craft store - so easy to decorate for any occasion).  I measured it and created a new page in Photoshop to match the size - 5.5 inches wide by 8 inches tall.  I added a guide to mark the horizontal center (ie, the fold) and then filled the area beneath it in white to create a mask for the front of the card design.  Next I added the digital cloud page onto a new layer.  I used the transform tools to rescale it and then clicked Ctrl-G to create a clipping mask.  I also changed the opacity to 80% to lighten the image a bit.  Then I printed it out on the card.


My original intent was to have the cloud paper print full bleed to the sides and end.  Unfortunately, it came out with white borders.  I decided to continue ahead with the borders but you could easily play with your printer settings to correct that and even print the image to the entire outside of the card (front & back) if you want.

The next step was preparing the stamped image.  I used black ink to stamp the plane onto three scraps of paper - white, red and yellow.  I cut out the various plane parts from the red and yellow papers then glued them to the white.  After all the pieces were in place, I trimmed the white cardstock flush to the colored pieces.


Using the remaining white cardstock, I sketched out my design for a wavy banner and added the message with small rub-on letters.  It didn't quite fill the space so I adjusted my banner length and then outlined it with a fine tipped black marker.


I cut out the banner with my x-acto knife cutting just beyond the black lines. Using a straight needle, I punched two small holes in the corners on the straight end.  I threaded a single piece of black thread through them.  It spans the two holes in the back.  I pulled it outward and tied a knot.  Then glued the knotted end behind the airplane. Finally I used adhesive backed foam squares to add the plane and banner to the card.  On the inside I finished the sentiment off by stamping "happy birthday."

Supplies: white card; Kitty Designs Cherish kit; miscellaneous white and yellow cardstock; We R Memory Keepers patterned paper (red); Imaginisce stamp; StazOn black ink; Doodlebug Designs rub-on letters; Micron black pen; black thread; adhesive backed foam squares.

10/29/2010

Friday Freebie - Halloween template

Last fall I created a traditonal scrapbook page about our playgroup's Halloween party - Halloween '09.  I've recreated the design in a digital format to share.  The 12x12 template features 11 layers for masking photos & papers complete with "inked" edges on the paper layers.  Also included are the black cardstock background paper (separate .png file) and 2 title layers - one reads "halLoweeN '10" and the other "halLoweeN '09". 

Click here to download the 12x12 Halloween Template

Enjoy!

Have you missed one of my previous digital freebies? Click HERE to find them. And, don't forget to subscribe to my feeds so you won't miss future freebies!

10/28/2010

Ghost Footprint

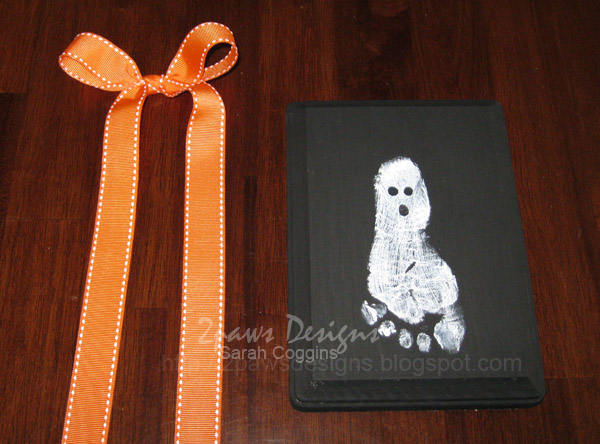
Our playgroup has two craft projects lined up for today.  One of which is making this adorable Ghost Footprint plaque (inspired by Becky's Ghostly Handprints post on The Crafting Chicks blog):


Dylan & I went ahead and completed his so we could help show the group what to do.  It's a lot of fun, very easy and inexpensive. 

Supplies
  • 5x7 wooden plaque (or similar sized canvas ... needs to be large enough to fit your child's footprint)
  • black & white acrylic paint 
  • paint brushes and a cotton swab
  • sandpaper
  • Mod Podge
  • orange ribbon
  • beading wire (or similar to help create the hanger)
  • staple gun


Start by painting the plaque black.  Let it dry completely.  If desired, sand the edges a bit to give a more distressed look.  Apply white paint to the bottom of your child's foot (note: I had Dylan strapped into his highchair and a wet paper towel ready so he didn't leave white footprints all over the house!) and press foot to the plaque.  Set the plaque aside to dry and wipe the foot clean.  Once the footprint has dried, use a cotton swab and black paint to add the dots for the eyes and mouth.  After these have dried, apply Mod Podge to seal.


While waiting for the Mod Podge to dry (follow instructions on the bottle), cut a piece of ribbon about 2 feet in length and tie a bow in the middle.  Attach it to the back of the plaque using a staple gun. 


My original plan was to use the ribbon as the hanger, but I didn't like how it looked.  Thus, the addition of the wire.  You can add the two simultaneously if you want.  I found it easy, once the ribbon was in place, to loop the wire through the knot in the center and then staple each end to the plaque.  I then pulled the wire up and twisted it onto itself to finish.


That's it! Now you can hang your completed project on the wall.  Enjoy!

10/27/2010

{Made by Me} Wednesday

It's time for another round of {Made by Me} Wednesday.  With less than 2 months until Christmas, this stunning card Bonnie from Stamping with Klass shared last week has me inspired to get started on my cards:


Join in this week's {Made by Me} Wednesday fun by adding a link to your creative project below (linky tool is open until Tuesday, November 2nd).  Share anything (cards, decor, scrapbooking, sewing, etc) even if it was made last year.  So long as it's new to the party and made by you, it qualifies.  Looking forward to seeing what you've made!


This linky list is now closed.

10/25/2010

L Birthday Card

Simple card I created for a friend's birthday earlier in the month:


Supplies: white card; Autumn Leaves & KI Memories patterned papers; Fiskars border punch; StazOn stamp ink; miscellaneous ribbon; Making Memories letter charm.  Inspired by September A Year in Cards at Two Peas.

10/22/2010

Ganyard Hill Farm

Our playgroup visited Ganyard Hill Farm in Durham earlier this month for a bit of fall fun.  The boys had a great time on the slides, playing in the corn crib and taking a hay ride.  At the end each got to pick their own pumpkin right out of the patch.


Supplies: Kate Teague's Just the Photos 5: "edges" template; Sara Schmutz's Delight digital papers 3; Holly Jones's Leafy Border; Giddyup Std and Times New Roman fonts.

10/20/2010

{Made by Me} Wednesday

Last week's {Made by Me} Wednesday projects have me in a creative holiday mood....

Beautiful, inexpensive holiday decor from Handmade by Annabelle (I love thrifty crafty decor):

A crinkly snowflake card from Stamping With Klass (I had no idea embossing vellum would make such a cool effect!):

Join in this week's {Made by Me} Wednesday fun by adding a link to your creative project below.  Share anything (cards, decor, scrapbooking, sewing, etc) as long as you made it.  Looking forward to seeing what you've made!


This linky list is now closed.

10/18/2010

Owl Halloween Cards

Eager to play with my new Fox & Friends stamp set, I took inspiration from Bonnie's Step it Up a Notch and the Two Peas Challenge: 15 & 30 Minutes Card to create these cards:


I cut a single sheet of cardstock in half and scored it to create the base for both cards.  Then I cut equal size pieces of the background paper, inked the edges, punched the circles and stamped the owls.  I glued each white circle to the scalloped circle.  Then I put together the first card - gluing the patterned paper to the card and attaching the owl embellishment with adhesive backed foam.  For the second card, I "stepped it up a notch" (to quote Bonnie) by adding the black & white patterned paper and the ribbon.  I also gave the owl a little bling (hard to see in the photo) by coloring over the stamped image with Stickles.

Supplies: Stampin' Up! cardstock (tangerine tango), Fox & Friends stamp set, and Basic Black ink; white cardstock; Stickles by Ranger Industries; QuicKutz circle die; EK Success scalloped punch; Fiskars and American Crafts patterned papers; adhesive backed foam; Ribbon from Target dollar spot.

10/15/2010

Disney Halloween 2008

Quick layout of a few photos I took of the Halloween decorations in the Magic Kingdom in 2008:


Supplies: Cherie Mask's Thrilling October kit; Jen Allyson's Halloween Freebie kit; EK Success patterned paper (scanned & recolored); 2paws Designs scalloped edge strip; Angelina font. Inspired by SpookCraftular Challenge #3 at Two Peas (scraplift Shannon Tidwell's Halloween Night Fight layout) and the October Swatch Challenge at Design House Digital.